SSD_EMMC Reference
1. Overview
The SSD22x/SSD21X series does not support EMMC booting. The alternative is to use nor/nand+emmc. This document mainly introduces the usage of this solution, including software configuration changes and programming methods.
2. Software configuration changes
2.1. config changes under Project
-
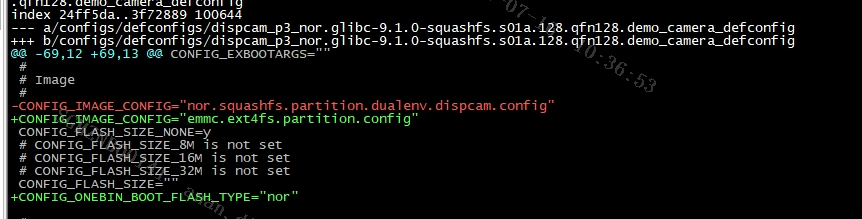
Need to change: CONFIG_IMAGE_CONFIG="emmc.ext4fs.partition.config"
-
If nor+emmc, you need to add CONFIG_ONEBIN_BOOT_FLASH_TYPE="nor"
If spinand+emmc, you need to add CONFIG_ONEBIN_BOOT_FLASH_TYPE="spinand"
Reference example:
2.2. Config changes under Uboot
The following configuration needs to be changed, Note that after the compilation is completed, replace the uboot under project\board\p3\boot\emmc\uboot
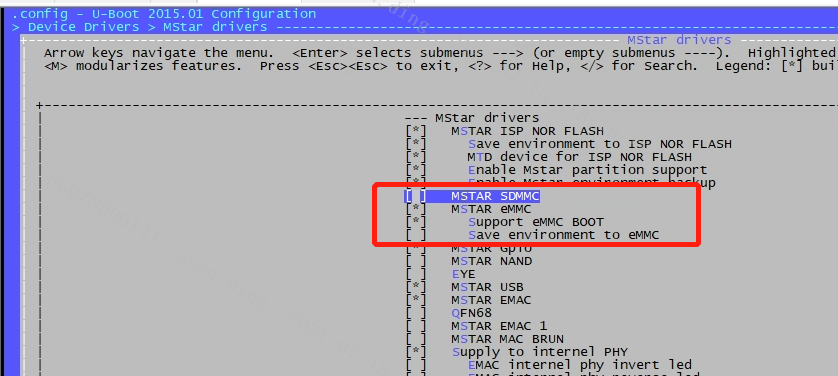
#Device Drivers -->

# [*]Mstar drivers -->

# [*]MSTAR emmc

# [*]Support eMMC BOOT

# [ ]Save environment to eMMC (select emmc as the environment variable storage medium, this item is mutually exclusive with Save environment to ISP NOR FLASH and Save environment to NAND FLASH, only one of the three can be selected)

# [ ]MSTAR sdmmc (do not check)
Reference example:
2.3. Config changes under Kernel
The following configuration needs to be changed:
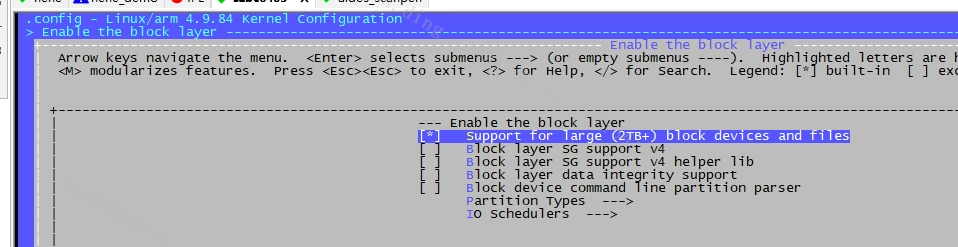
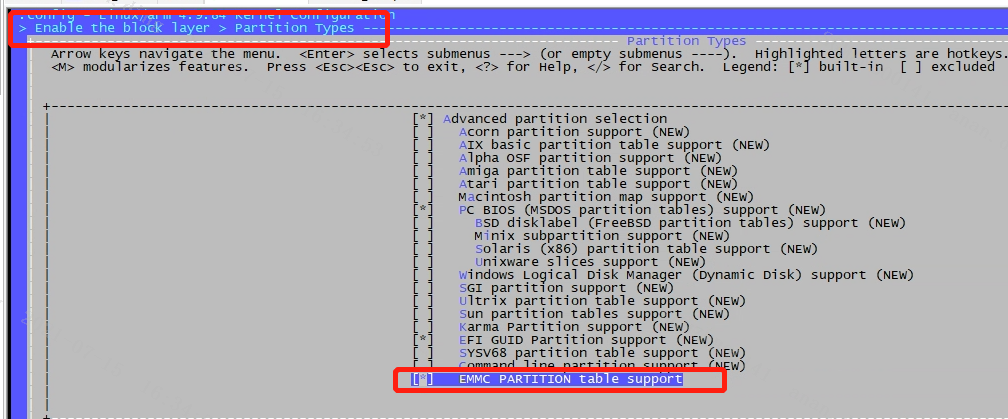
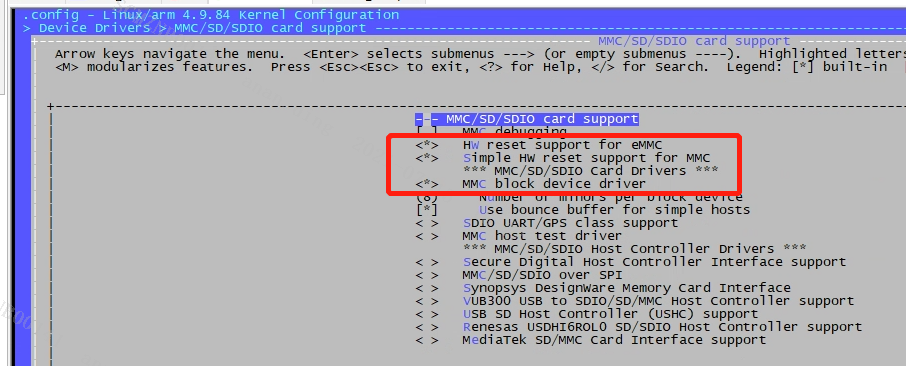
#Enable the block layer -->

# [*]Support for large (2TB+) block devices and files

# [*]Partition Types

# [*]EMMC PARTITION table support

#Device Drivers -->

# [*]MMC/SD/SDIO card support -->

# <*>HW reset support for eMMC

# <*>Simple HW reset support for MMC

# <*>MMC block device driver

# [*]SStar SoC platform drivers -->

# <*>EMMC driver

# [*]UNIFY EMMC DRIVER

# [*]SELECT M6 EMMC0 (M6 support, selected means use emmc0)

# < >SStar SD/MMC Card Interface Support ( uncheck)

#File systems -->

# <*>The Extended 4 (ext4) filesystem (suboptions remain default)
Reference example:


3. Burning method
3.1. Automatic burning with estar under UBOOT
-
Enter the uboot command line.
-
Confirm that the tftp software path and ip have been set, and the ip of the development board has been set.
-
Type estar in the uboot command line and wait for the burning to complete. After the burning is completed, reboot into uboot, and find that the emmc command can be used, and the emmc partition can be identified and read and written under the kernel, indicating that the burning is successful.
Restrictions: Requires ethernet network support
3.2. Blank flash burning with USB
Please refer to SSD_USB Device upgrade (onebin)
Restrictions:
-
Requires a PC
-
A USB interface is required (because there is only one USB, this method cannot coexist with USB wifi)
3.3. Blank flash burning with programmer
For the Nor/nand part, you can use ISPTOOL to program, or refer to SigmaStarDocs -> Development -> BSP Development Reference -> SPI NOR/Spinand Master Chip Production.
For the part of EMMC, please refer to the following method.
Master Mirror Production :
Use the emmcnize tool to make a master image. This tool is a PC-side tool, which is used to combine images such as kernel, rootfs, file system, user data, and environment variables into an image that can be directly burned to an empty film through the burner.
3.3.1. Environment variable mirroring
Write the environment variables to be set to a txt file according to the format printed by the uboot printenv command, for example:
#env.txt

baudrate=115200

bootargs=console=ttyS0,115200 root=/dev/mmcblk0p2 rootwait rootfstype=ext4 rw init=/linuxrc cma=64M

bootcmd=emmc read.p 0x21000000 kernela 0x1C61E8;bootm 0x21000000;

bootdelay=0

ethact=sstar_emac

ethaddr=00:30:1b:ba:02:db

fileaddr=23b2ef00

filesize=101

stderr=serial

stdin=serial

stdout=serial
After uboot is compiled, there is a mkenvimage tool in the tool directory, execute ./mkenvimage -s 0x1000 -o env.bin env.txt to generate an environment variable image.
3.3.2. Making a partition configuration file
The emmcnize tool builds the partition table and packages the image by reading the part.ini configuration file. The configuration file format reference is as follows:
[kernela-volume]

image=kernel

vol_id=1

vol_size=0x300000

vol_name=kernel
image=XX, defines the partition image name, which must be the same as the existing image name.
vol_id=X, defines the partition id, which is currently used for identification.
vol_size=XX , defines the partition size (in Bytes), which must not be smaller than the corresponding image size.
vol_name=XX, defines the partition name, the partition name seen through emmc part under uboot.
[XXX-volume] section is the real user partition, and their image, vol_size, and vol_name can be changed according to the actual partition situation. The vol_id is numbered from 1 and supports a maximum of 64 partitions.
Reference example:
Regarding the size of env in part.ini, as shown in the following figure, please set to 615200-0x278=614568 blk=0x12C15000 bytes:

3.3.3. Packaging the master image
Put the image to be packaged (env.bin, kernel, rootfs.ext4, data.ext4, etc.), the partition configuration file (part.ini) and the emmcnize tool in the same directory, specify the configuration file as the input, and specify the output file, Format: ./emmcnize <input ini file> <output image file> , for example:
./emmcnize part.ini image.bin
Normally, completing the operation will print a "done" message as described below.
parsing section "data-volume"

volume id: 4

volume size: 67108864 bytes

volume name: data

write to volume4 from image file customer.ext4

Done