SSD_USB Device Update(onebin)
1. Overview
Applicable for IKAYAKI_DLM00V015 and later versions, the previous version needs to be patched.
1.1. Upgrade Method
-
USB device upgrade in blank flash mode
-
USB device upgrade in Uboot mode
-
USB device upgrade in Kernel mode(uvc mode)
-
USB device upgrade in Kernel mode(u disk mode)
1.2. Test Environment
pcb: ssd212 demo board
Kernel config: pioneer3_spinand_defconfig
Project config: dispcam_p3_spinand.glibc-9.1.0-s01a.64.qfn128.demo_defconfig
usbtool: usb factory tool (v1.0.0.4)
2. Upgrade usb device in blank mode
Demand scenario: There is a complete pcb and a usb interface, but the nandflash or norflash is blank.
Implementation principle: IC is powered on and first executes rom code, and then jumps to flash/emmc/sdmmc to execute IPL according to the external hardware config. If no IPL data is found, the system automatically enters the ufu upgrade mode. Preload u-boot.bin via pc tool .
Requirement in this mode: The preloaded u-boot.bin itself has the ufu upgrade capability.
Steps:
-
uboot config
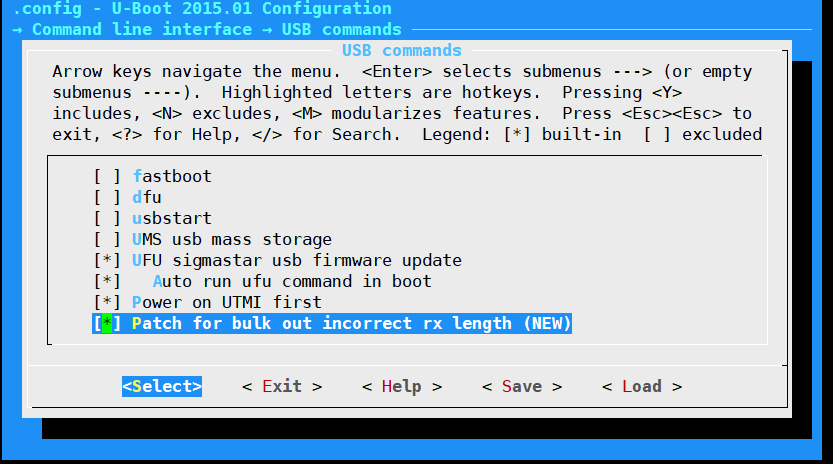
Replace the compiled u-boot_spinand.img.bin or u-boot.img.bin with the corresponding bin file under /project/board/p3/boot/usb/upgrade (only used for empty boot).

For emmc/sdmmc, after compiling the corresponding u-boot.img.bin, refer to rootfs_dispcam.mk (search for add for usb factory upgrade tool) to make modifications.
-
Compile the entire package of sdk according to the normal process, and generate an image upgrade file.
-
After the whole package of sdk is compiled successfully, execute the make_usb_factory_sigmastar.sh script, you can choose to upgrade all and some partitions:

After the execution is successful, the SstarUsbImage_xxxx(date).bin empty upgrade package will be generated in the project\image\output\images directory.
-
Download the toolkit (current version V1.0.0.4)
-
Power on in blank flash mode and connect to usb. It can be observed that there is a storage device connected to the PC

-
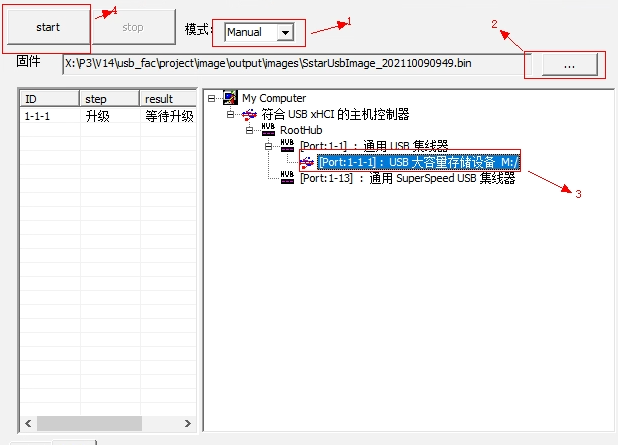
Connect the PC to the board to be upgraded through usbhub (the flash of the board must be empty), open the USB Factory Tool.exe, and the display is as follows:

The functions of each ICON on the figure are as follows:
1→ Upgrade start and stop buttons, it should be noted that the stop button must be pressed after all connected devices have been upgraded successfully;
2→Upgrade package selection button: used to select the upgrade package file of the usb blank chip;
3→USB device upgrade status and result display column, it should be noted that there are currently two statuses for blank flash upgrade: preparation and upgrade. You must wait for the upgrade status to succeed before unplugging the usb device and inserting another usb device to upgrade;
4→Display currently recognized usb devices
5→Usb device insertion display status log
-
Select the usb upgrade package file. After all the plugged devices are recognized, click the start button to upgrade. The interface after the upgrade is completed is as follows:

The functions of each ICON on the figure are as follows:
1→Display the result of each device upgrade;
2→ Display the log of each device upgrade;
3→Display the number of all connected devices and the status of the upgrade;
4→Display the detected usb devices, it should be noted that the detected usb devices will be removed after the upgrade is successful
Perform the following operations according to the upgrade status of each device displayed in 1→:
Upgrade successful: unplug the corresponding device and insert another blank chip to continue the upgrade;
Upgrade failed: You can try to plug and unplug the device to re-upgrade to see if it is ok
-
If you do not want to insert the board and recognize the device and automatically upgrade, you can choose the manual mode, the upgrade method is similar to the auto, but you need to select the device that needs to be upgraded before the upgrade, and then click start to upgrade:
3. USB device upgrade in Uboot mode
Requirement scenario: There is a complete pcb and a usb interface to ensure that the system can enter the uboot mode
Implementation principle: uboot already exists in flash/emm/sdmmc. And this copy of uboot supports PC upgrade in device mode. By executing the interaction between uboot and PC software, the download and upgrade are completed.
This mode requires: uboot itself has the ufu upgrade capability.
Steps:
-
Configure uboot
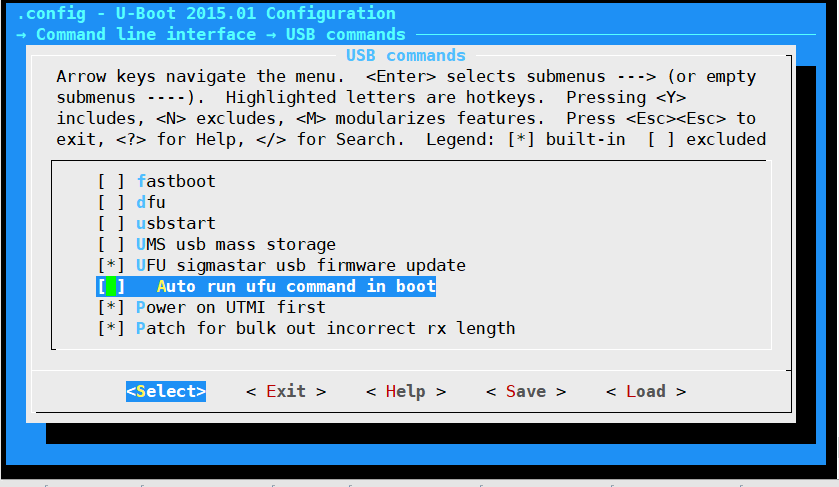
Support ufu upgrade, but do not open automatic operation.
-
Burn uboot into flash. This boot has ufu upgrade capability.
If you need to use the usb device upgrade function in uboot, you need to set the following parameters in the boot mode, and the device will enter the device upgrade mode after booting.
setenv ota_upgrade_status 1

saveenv
-
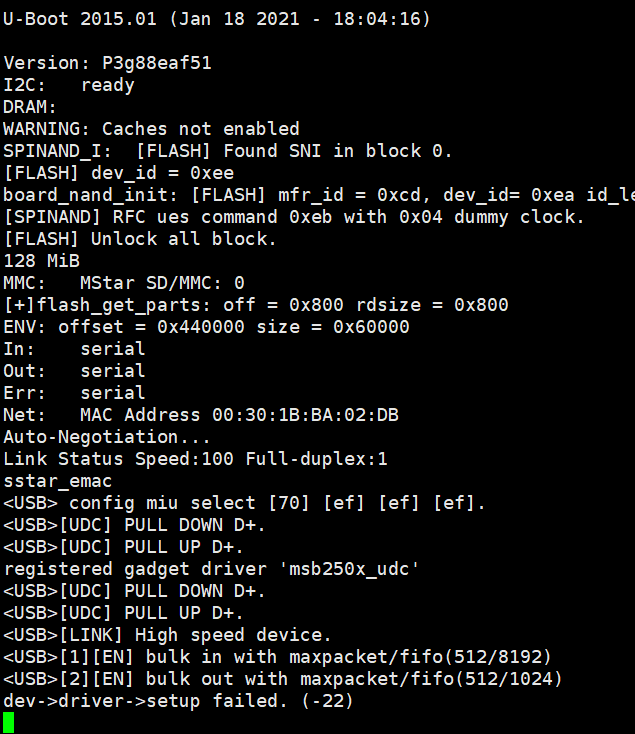
Restart the board and enter uboot, it will stop at the following position:
-
Open the usb factory tool to identify the device, and then upgrade according to the above blank flash upgrade method.
4. USB device upgrade in Kernel mode(uvc mode)
There are two parts here: Kernel config and Applications
Implementation principle: The board end will be configured in uvc mode. By applying the command under the pc tool to the application on the board side. Then set the environment variables, and finally use the ufu upgrade function under uboot to complete the upgrade.
When verifying the usb upgrade under the kernel, first make sure that the usb device upgrade can be used normally under uboot.
This mode requires:
-
uboot supports ufu upgrade. Refer to 3. USB device upgrade in Uboot
-
Kernel config uvc mode
-
need to have app mi_uvc
4.1. Kernel config
The config of uvc can be added to the existing config in the following two ways:
Method 1 (recommended): Directly modify the default config of the current platform.
Add config:
CONFIG_MEDIA_SUPPORT=m
CONFIG_MEDIA_CAMERA_SUPPORT=y
CONFIG_MEDIA_CONTROLLER=y
CONFIG_VIDEO_DEV=m
CONFIG_VIDEO_V4L2=m
CONFIG_VIDEOBUF2_CORE=m
CONFIG_VIDEOBUF2_MEMOPS=m
CONFIG_VIDEOBUF2_VMALLOC=m
CONFIG_MEDIA_SUBDRV_AUTOSELECT=y
CONFIG_USB_GADGET=m
CONFIG_USB_GADGET_VBUS_DRAW=2
CONFIG_USB_GADGET_STORAGE_NUM_BUFFERS=2
CONFIG_USB_GADGET_SSTAR_DEVICE=m
CONFIG_USB_AVOID_SHORT_PACKET_IN_BULK_OUT_WITH_DMA_FOR_ETHERNET=y
CONFIG_USB_LIBCOMPOSITE=m
CONFIG_SS_GADGET=m
CONFIG_USB_F_UVC=m
CONFIG_USB_G_WEBCAM=m
CONFIG_USB_WEBCAM_UVC=y
CONFIG_MULTI_STREAM_FUNC_NUM=1
Method two:
1. Use the default config of the current platform
>> make pioneer3_xxxx_defconfig
2. Add config: make menuconfig
a. media frame config
-> Device Drivers
-> Multimedia support
-> Device Drivers
-> Multimedia support
-> Cameras/video grabbers support
-> Device Drivers
-> Multimedia support
-> Media Controller API
Output module: media.ko videodev.ko v4l2-common.ko
b. usb Gadget frame config
-> Device Drivers
-> USB support
-> Device Drivers
-> USB support
-> USB Gadget Support
Output module: usb-common.ko udc-core.ko
c. udc driver config: This module is a hardware ip related module, which can be configured according to the specific situation
-> Device Drivers
-> USB support
-> USB Gadget Support
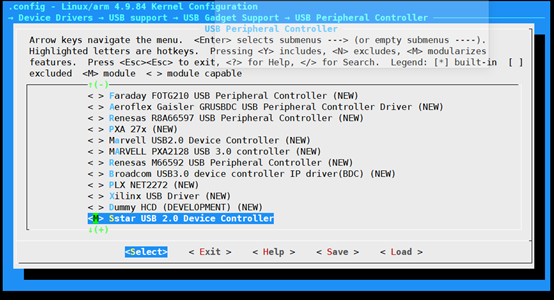
-> USB Peripheral Controller
-> Sstar USB 2.0 Device Controller
Output module: udc-msb250x.ko
d. gadget webcam
-> Device Drivers
-> USB support
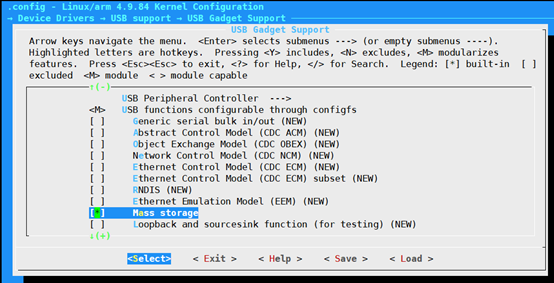
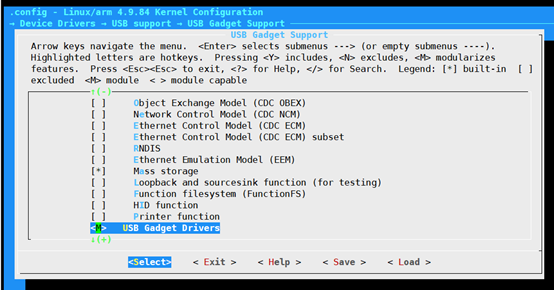
-> USB Gadget Support
-> USB Gadget Drivers
-> Device Drivers
-> USB support
-> USB Gadget Support
-> USB Gadget Drivers
-> USB Webcam Gadget
-> Device Drivers
-> USB support
-> USB Gadget Support
-> USB Peripheral Controller
-> Sstar USB 2.0 Device Controller
-> Avoid short packet in bulk out with DMA for ethernet
Output module: libcomposite.ko videobuf2-core.ko videobuf2-v4l2.ko videobuf2-memops.ko videobuf2-vmalloc.ko usb_f_uvc.ko g_webcam.ko
Project config, because there is currently no UVC related config, so when compiling the uvc function, you need to manually modify the following two files:
-
If you use the second config in the kernel config, you need to modify the project/makefile file, and comment out the $(MAKE) linux-kernel under the image target, so as not to recompile the kernel and overwrite the previously manually compiled kernel;
-
The project/kbuild/customize/4.9.84/p3/dispcam/kernel_mod_list_late file is modified to the content:
media.ko
videodev.ko
v4l2-common.ko
usb-common.ko
#usbcore.ko
#ehci-hcd.ko
#scsi_mod.ko
#usb-storage.ko
videobuf2-core.ko
videobuf2-v4l2.ko
videobuf2-memops.ko
videobuf2-vmalloc.ko
udc-core.ko
libcomposite.ko
usb_f_uvc.ko
udc-msb250x.ko
g_webcam.ko streaming_maxpacket=3072 streaming_maxburst=13 uac_function_enable=0
4.2. 应用程序
Source code reference: myuvc_remove_media.zip
Application-side executor: mi_uvc
Core code:
case UVC_SET_CUR:
if (cfg->bCmdCap & CAP_SET_CUR_CMD) {
UVC_INFO("/etc/fw_setenv ota_upgrade_status 1\n");
system("/etc/fw_setenv ota_upgrade_status 1");
system("sleep 1");
system("reboot");
if (cfg->bInfoCap & INFO_AUTO_MODE_SUPPORT) {
}
}
else {
goto invalid_req;
}
Operating procedures:
Compile the kernel by referring to the above method, and execute the application after updating the image.
After connecting usb to pc, execute usb factory tool. After the board receives the cmd of uvc, it will reset the env to automatically restart and enter the uboot upgrade mode.
Refer to the steps in the blank flash upgrade mode (after step 5) and use the usb factory tool to upgrade.
5. USB device upgrade in Kernel mode(u disk mode)
Demand scenario: In the scenario where uvc is not used. For example: U disk mode
Implementation principle: By default, the usb factory tool still firstly detects whether the device is uvc. If it is uvc, it is exactly the same as the above uvc upgrade steps; if it is not uvc, the extension upgrade will be used. In order to support the extended upgrade, the usb factory tool will replace the XU command with a customized setup command issued by EP0, and notify the board to upgrade. (Note: The special setup command has been added to the usb gadget driver and must be updated to the corresponding version before upgrading. This file composite.c has been updated)
This mode requires:
-
uboot itself has ufu upgrade capability.
-
The kernel supports U disk mode.
-
Use usb factory tool.
config method:
-
uboot config, refer to 3. USB device upgrade in Uboot
-
kernel supports usb device mass storage function
Drive config method:
1. usb Gadget framework config

    -> Device Drivers
        -> USB support

    -> Device Drivers
        -> USB support
            -> USB Gadget Support

    Output module: usb-common.ko udc-core.ko

2. config support configfs

    -> Device Drivers
        -> USB Gadget Support
            -> USB functions configurable through configfs

    If configured as a module, you need to install the corresponding driver: libcomposite.ko

3. Chip ip related driver

For example: USB device2.0 driver

-> Device Drivers
-> USB support
-> USB Gadget Support
-> USB Peripheral Controller
-> Sstar USB 2.0 Device Controller

Generate driver: udc-msb250x.ko

4. USB function related driver

Sub-options need to be configured in the following locations: (Need to deal with the dependencies required by the function)

    -> Device Drivers
        -> USB support
            -> USB Gadget Support
                -> USB functions configurable through configfs

5. mass storage

    -> Device Drivers
        -> USB support
            -> USB Gadget Support
                -> USB Gadget Drivers
                    -> Mass Storage Gadget

    Generate module: usb_f_mass_storage.ko
The config is shown in the figure:

Modify in project/kbuild/customize/4.9.84/p3/dispcam/kernel_mod_list_late to:
usb-common.ko
udc-core.ko
libcomposite.ko
udc-msb250x.ko
usb_f_mass_storage.ko
Operating procedures:
-
Update image
-
Confirm to load the above 5 ko files
-
Execute the script and configure the parameters of the U disk
Create file: dd if=/dev/zero of=/customer/disk.img bs=1M count=20
./usb_storage.sh
-
Execute the upgrade script
./fwupdated &
-
Refer to the steps in the blank flash upgrade mode (after step 5) and use the usb factory tool to upgrade.
6. Notes on Unable to Upgrade
-
First make sure that the upgrade can be done normally under the blank flash, otherwise check the hardware.
-
Secondly make sure that the upgrade can be done under uboot. Otherwise check the hardware and uboot config.
-
In the kernel mode, the upgrade command of the uvc tool can be received normally (you can restart to enter the uboot upgrade mode). Make sure to execute mi_uvc.
-
If multiple uvc devices are detected on the pc, disable the camera device on the pc.
References:
7. Problems that may be encountered during use
When using SD card/SDNAND instead of spinor/spinand, the tool will pop up a window prompting you to format, as shown in the figure below:

Solution:
-
For Win10 system, turn off the U disk autoplay https://jingyan.baidu.com/article/acf728fd6f27bdf8e510a38b.html
-
For Win7 system, you also need to close the Shell Hardware Detection service
Click Start - enter services.msc in the Run box and press Enter;
Find the Shell Hardware Detection service and double-click it;
First stop the service, then select Disable as the startup type, and click OK.