SSD_Environment Setup
1. Build Compilation Environment
We develop and debug by cross-compilation, that is, "host + target". The host and target are connected by serial port or network, as shown below:

Note:
-
In addition to debugging, Sigmastar's debug tool can also read registers and program empty flash through PC tool.
-
For debugging only, the serial port device can be used to connect the debugging line sequence (con3), and the line sequence should be aligned with the schematic diagram.
-
To read Register or burn bare Flash, you need to use the debug tool.
-
Purchase debug tool by yourself according to your demands. Click here for purchase.
2. Install Linux Build Code
It is recommended to use Ubuntu 16.04, which has been verified, if you encounter environmental problems with other versions, we will not provide assistance.
2.1. Install Ubuntu 16.04 Server
-
Install VMware Worksation;
-
Select 1604 iso;
-
Click
Finishbutton for easy mode installation and the system will automatically install it; -
Install VMtools for coping and sharing windows direction to ubuntu, Click here for reference.
After ubuntu is successfully installed, you need to set up the development environment.
2.2. Add New Accounts
-
Set password
The newly installed ubuntu first needs to set the root password. Enter the system to set the root password:
# sudo passwd, enter the password continuously until the prompt is successful; -
Add a new user
Use command
# sudo adduser xxx --forceto recreate a new user after entering the system, when prompt to enter some information of account, keep pressing Enter; -
Install related tools and compilation environment
Execute
# sudo apt-get install libncurses5-dev libncursesw5-dev, when prompted that the current user cannot execute sudoers, please modify as follows:sudo chmod u+w /etc/sudoers vi /etc/sudoers
Reference:
root ALL=(ALL:ALL) ALL, add a line:xxx ALL=(ALL:ALL) ALLsudo chmod u-w /etc/sudoers
Re-execute sudo, it is recommended to execute #sudo apt-get update after installation.
2.3. Install samba
samba is used to share Linux files to windows.
# sudo apt-get install samba samba-common

# sudo smbpasswd -a xxx (Add a samba account for windows to access the linuxsamba)
Modify /etc/samba/smb.conf
[xxx]

path=/home/xxx

public=yes

writable=yes

valid users=xxx

available=yes

browseable=yes

guest ok = yes
After completed samba config, restart the samba service and test access to samba from windows: \\192.168.1.11 (your ubuntu ip).
2.4. Install ssh
ssh is used to log in and debug.
sudo apt-get install openssh-server;
2.5. Other Tools
To avoid SDK compilation failure, some tools need to be installed. For convenience, you can install all before compiling
# sudo apt-get install libc6-dev-i386

# sudo apt-get install lib32z1 lib32ncurses5

# sudo apt-get install libuuid1:i386

# sudo apt-get install cmake

# sudo apt-get install libncurses5-dev libncursesw5-dev

# sudo apt install bc

# sudo apt-get install xz-utils

# sudo apt-get install automake

# sudo apt-get install libtool

# sudo apt-get install libevdev-dev

# sudo apt-get install pkg-config
2.6. Modify sh
If the default is sh, you need to change sh to bash.
# sudo rm /bin/sh

# sudo ln –s /bin/bash /bin/sh
2.7. Install toolchain
-
Copy
gcc-sigmastar-9.1.0-2020.07-x86_64_arm-linux-gnueabihf.tar.xzto/tools/toolchain/, custom directory. -
Unzip toolchain
-
Set the toolchain to the environment variable to avoid manual export every time;
-
Add
export PATH=/tools/toolchain/gcc-sigmastar-9.1.0-2020.07-x86_64_arm-linux-gnueabihf/bin/:$PATHin /etc/profile -
After completing the configuration, confirm whether the gcc version has been switched to 9.1.0 as follows.

-
After the compilation environment is set up, compile the SDK.
3. SDK Compilation Steps
"Compile boot", "compile kernel", and "compile sdk" are mentioned as follows. Boot has been compiled and placed in the project path by default. Therefore, when you first verify, you can directly skip "compile boot" and "compile kernel". Directly from "compile sdk" (the compilation of the kernel has been integrated into the compilation of the sdk, the kernel will be compiled by default) to compile the entire image, which can be programmed and verified.
Note: Before compiling, make sure that the toolchain path in the previous step is set correctly.
3.1. Get code
The corresponding SDK development package can be obtained from FTP.
3.2. Compile boot
-
spi-nor
glibc:
step1: Set up the compilation environment
#declare -x ARCH="arm"
Or: export ARCH=arm

#declare -x CROSS_COMPILE="arm-linux-gnueabihf-"
Or: export CROSS_COMPILE=arm-linux-gnueabihf-
step2: Select the appropriate config
#make pioneer3_dualenv_defconfig (ENV dual backup and USB upgrade are enabled by default since V011)
Or: make pioneer3_defconfig;
step3: clean and compile
#make clean;make
The image generated after compilation is completed in:
pioneer3_defconfig: `boot/u-boot.xz.img.bin` , replace it with
`project/board/p3/boot/nor/uboot/u-boot.xz.img.bin`,
then recompile the project;

pioneer3_dualenv_defconfig: `boot/u-boot.xz.img.bin`, replace it with
`project/board/p3/boot/nor/uboot/u-boot_dualenv.xz.img.bin`,
then recompile the project;
-
spi-nand
glibc:
step1: Set up the compilation environment
#declare -x ARCH="arm"
Or: export ARCH=arm

#declare -x CROSS_COMPILE="arm-linux-gnueabihf-"
Or: export CROSS_COMPILE=arm-linux-gnueabihf-
step2: Select the appropriate config
#make pioneer3_dualenv_spinand_defconfig (ENV dual backup and USB upgrade are turned on by default since V011, which is the default configuration of the public release)
Or: make pioneer3_spinand_defconfig;
step3: clean and compile
#make clean;make
The image generated after compilation is completed in:
pioneer3_spinand_defconfig: `boot/u-boot_spinand.xz.img.bin`, replace it with
`project/board/p3/boot/spinand/uboot/u-boot_spinand.xz.img.bin` ,
then recompile the project;

pioneer3_dualenv_spinand_defconfig: `boot/u-boot_spinand.xz.img.bin`, replace it with
`project/board/p3/boot/spinand/uboot/u-boot_dualenv_spinand.xz.img.bin`,
then recompile the project;
Flash Type Other Defconfig SPI-NOR Basic pioneer3_defconfig SPI-NAND Basic pioneer3_spinand_defconfig SPI-NOR Add ENV dual backup mechanism on the default basis pioneer3_dualenv_defconfig SPI-NAND Add ENV dual backup mechanism on the default basis pioneer3_dualenv_spinand_defconfig
3.3. Compile the kernel
Compiling alkaid will compile the kernel by default, which is different from SSD201/SSD202. Therefore, it is recommended to compile directly under the project after modifying the relevant kernel. The content of the kernel will be compiled by default, and there is no need to manually release to the path under the project.
step1: Set up the compilation environment
#declare -x ARCH="arm"
Or: export ARCH=arm

#declare -x CROSS_COMPILE="arm-linux-gnueabihf-"
Or: export CROSS_COMPILE=arm-linux-gnueabihf-
step2: Select the appropriate config
| Chip | Packaging | Memory | Flash Type | Toolchain | Other | Defconfig |
|---|---|---|---|---|---|---|
| SSD210 | QFN68 | 64M | SPI-NOR | glibc | Without sensor | make pioneer3_ssc021a_s01a_demo_defconfig |
| SSD210 | QFN68 | 64M | SPI-NOR | glibc | With sensor | make pioneer3_ssc021a_s01a_demo_camera_defconfig |
| SSD210 | QFN68 | 64M | SPI-NAND | glibc | Without sensor | make pioneer3_ssc021a_s01a_spinand_demo_defconfig |
| SSD210 | QFN68 | 64M | SPI-NAND | glibc | With sensor | make pioneer3_ssc021a_s01a_spinand_demo_camera_defconfig |
| SSD212 | QFN128 | 64M | SPI-NOR | glibc | NA | make pioneer3_ssc020a_s01a_demo_defconfig |
| SSD212 | QFN128 | 64M | SPI-NOR | glibc | sdio wifi | make pioneer3_ssc020a_s01a_demo_wifi_defconfig |
| SSD212 | QFN128 | 64M | SPI-NAND | glibc | NA | make pioneer3_ssc020a_s01a_spinand_demo_defconfig |
| SSD212 | QFN128 | 64M | SPI-NAND | glibc | sdio wifi | make pioneer3_ssc020a_s01a_spinand_demo_wifi_defconfig |
| SSD222 | QFN128 | 64M | SPI-NOR | glibc | NA | make pioneer3_ssc020a_s01a_demo_camera_defconfig |
| SSD222 | QFN128 | 64M | SPI-NOR | glibc | sdio wifi | make pioneer3_ssc020a_s01a_demo_camera_wifi_defconfig |
| SSD222 | QFN128 | 64M | SPI-NAND | glibc | NA | make pioneer3_ssc020a_s01a_spinand_demo_camera_defconfig |
| SSD222 | QFN128 | 64M | SPI-NAND | glibc | sdio wifi | make pioneer3_ssc020a_s01a_spinand_demo_camera_wifi_defconfig |
| SSD222 | QFN128 | 64M | SPI-NAND | glibc | 2lane sensor | make pioneer3_ssc020a_s01a_spinand_demo_camera_2lane_defconfig |
| SSD222D | QFN128 | 128M | SPI-NOR | glibc | NA | make pioneer3_ssc020a_s01a_demo_camera_defconfig |
| SSD222D | QFN128 | 128M | SPI-NOR | glibc | sdio wifi | make pioneer3_ssc020a_s01a_demo_camera_wifi_defconfig |
| SSD222D | QFN128 | 128M | SPI-NAND | glibc | NA | make pioneer3_ssc020a_s01a_spinand_demo_camera_defconfig |
| SSD222D | QFN128 | 128M | SPI-NAND | glibc | sdio wifi | make pioneer3_ssc020a_s01a_spinand_demo_camera_wifi_defconfig |
| SSD222D | QFN128 | 128M | nor+emmc | glibc | nor配合emmc | make pioneer3_ssc020a_s01a_emmc-nor_demo_camera_defconfig |
| SSD222D | QFN128 | 128M | sdmmc | glibc | sd-boot | make pioneer3_ssc020a_s01a_sdmmc_demo_camera_defconfig |
| SSD222Q | QFN128 | 256M | SPI-NOR | glibc | NA | make pioneer3_ssc020b_s01a_defconfig |
| SSD222Q | QFN128 | 128M | SPI-NOR | glibc | sdio wifi | make pioneer3_ssc020b_s01a_sdiowifi_defconfig |
| SSD222Q | QFN128 | 256M | SPI-NAND | glibc | NA | make pioneer3_ssc020b_s01a_spinand_defconfig |
| SSD222Q | QFN128 | 256M | SPI-NAND | glibc | sdio wifi | make pioneer3_ssc020b_s01a_spinand_sdiowifi_defconfig |
step3: clean and compile
#make clean;make -j8
If there are new kernel modules in the kernel, you need to add the corresponding module to kernel_mod_list/kernel_mod_list_late (ko in kernel_mod_list_late will be loaded after mi module)
Modify the path: project/kbuild/customize/$(KERNEL_VERSION)/$(CHIP)/$(PRODUCT)/kernel_mod_list
3.4. Compile SDK
When compiling sdk by default, build kernel will be used first , and the first compilation will be done by make clean; make image -j8 command. If you don't need build kernel , you can use make image-fast to replace make image.
step1: Set up the compilation environment
#declare -x ARCH="arm"
Or: export ARCH=arm

#declare -x CROSS_COMPILE="arm-linux-gnueabihf-"
Or: export CROSS_COMPILE=arm-linux-gnueabihf-
step2: select the appropriate config
| Chip | Packaging | Memory | Flash Type | Toolchain | Other | Defconfig |
|---|---|---|---|---|---|---|
| SSD210 | QFN68 | 64M | SPI-NOR | glibc | Without sensor | make dispcam_p3_nor.glibc-9.1.0-squashfs.s01a.64.qfn68.demo_defconfig |
| SSD210 | QFN68 | 64M | SPI-NOR | glibc | With sensor | make dispcam_p3_nor.glibc-9.1.0-squashfs.s01a.64.qfn68.demo_camera_defconfig |
| SSD212 | QFN128 | 64M | SPI-NOR | glibc | NA | make dispcam_p3_nor.glibc-9.1.0-squashfs.s01a.64.qfn128.demo_defconfig |
| SSD212 | QFN128 | 64M | SPI-NOR | glibc | sdio wifi | make dispcam_p3_nor.glibc-9.1.0-squashfs.s01a.64.qfn128.demo_wifi_defconfig |
| SSD222 | QFN128 | 64M | SPI-NOR | glibc | NA | make dispcam_p3_nor.glibc-9.1.0-squashfs.s01a.64.qfn128.demo_camera_defconfig |
| SSD222 | QFN128 | 64M | SPI-NOR | glibc | sdio wifi | make dispcam_p3_nor.glibc-9.1.0-squashfs.s01a.64.qfn128.demo_camera_wifi_defconfig |
| SSD222D | QFN128 | 128M | SPI-NOR | glibc | NA | make dispcam_p3_nor.glibc-9.1.0-squashfs.s01a.128.qfn128.demo_camera_defconfig |
| SSD222D | QFN128 | 128M | SPI-NOR | glibc | sdio wifi | make dispcam_p3_nor.glibc-9.1.0-squashfs.s01a.128.qfn128.demo_camera_wifi_defconfig |
| SSD222Q | QFN128 | 256M | SPI-NOR | glibc | NA | make dispcam_p3_nor.glibc-9.1.0-squashfs.s01a.256.qfn128_defconfig |
| SSD222Q | QFN128 | 256M | SPI-NOR | glibc | sdio wifi | make dispcam_p3_nor.glibc-9.1.0-squashfs.s01a.256.qfn128_sdiowifi_defconfig |
| SSD210 | QFN68 | 64M | SPI-NAND | glibc | Without sensor | make dispcam_p3_spinand.glibc-9.1.0-s01a.64.qfn68.demo_defconfig |
| SSD210 | QFN68 | 64M | SPI-NAND | glibc | With sensor | make dispcam_p3_spinand.glibc-9.1.0-s01a.64.qfn68.demo_camera_defconfig |
| SSD212 | QFN128 | 64M | SPI-NAND | glibc | NA | make dispcam_p3_spinand.glibc-9.1.0-s01a.64.qfn128.demo_defconfig |
| SSD212 | QFN128 | 64M | SPI-NAND | glibc | sdio wifi | make dispcam_p3_spinand.glibc-9.1.0-s01a.64.qfn128.demo_wifi_defconfig |
| SSD222 | QFN128 | 64M | SPI-NAND | glibc | NA | make dispcam_p3_spinand.glibc-9.1.0-s01a.64.qfn128.demo_camera_defconfig |
| SSD222 | QFN128 | 64M | SPI-NAND | glibc | sdio wifi | make dispcam_p3_spinand.glibc-9.1.0-s01a.64.qfn128.demo_camera_wifi_defconfig |
| SSD222D | QFN128 | 128M | SPI-NAND | glibc | NA | make dispcam_p3_spinand.glibc-9.1.0-s01a.128.qfn128.demo_camera_defconfig |
| SSD222D | QFN128 | 128M | SPI-NAND | glibc | sdio wifi | make dispcam_p3_spinand.glibc-9.1.0-s01a.128.qfn128.demo_camera_wifi_defconfig |
| SSD222 | QFN128 | 64M | SPI-NAND | glibc | 2lane sensor | make dispcam_p3_spinand.glibc-9.1.0-s01a.64.qfn128.demo_camera_2lane_defconfig |
| SSD222D | QFN128 | 128M | nor+emmc | glibc | nor配合emmc | make dispcam_p3_emmc-nor.glibc-9.1.0-ext4fs.s01a.128.qfn128.demo_camera_defconfig |
| SSD222D | QFN128 | 128M | sdmmc | glibc | sd-boot | make dispcam_p3_sdmmc.glibc-9.1.0-s01a.128.qfn128.demo_camera_defconfig |
| SSD222Q | QFN128 | 256M | SPI-NAND | glibc | NA | make dispcam_p3_spinand.glibc-9.1.0-s01a.256.qfn128_defconfig |
| SSD222Q | QFN128 | 256M | SPI-NAND | glibc | sdio wifi | make dispcam_p3_spinand.glibc-9.1.0-s01a.256.qfn128_sdiowifi_defconfig |
step3: clean and compile
make clean; make image -j8
The image generated after compilation is in project/image/output/images .
V011 and above defconfig are switched to the env dual backup mechanism by default, including two parts: uboot also uses the bin generated by the dual backup config by default; the partition file uses the dual backup configuration.
The non-dual-env backup version and the dual-env backup version cannot be upgraded directly through tftp. Start by programming the boot with the isp tool, and then upgrade through tftp.
| Version | Flash Type | boot | partition |
|---|---|---|---|
| Before V011 | NOR | project/board/p3/boot/nor/uboot/u-boot.xz.img.bin | nor.squashfs.partition.dispcam.config |
| Before V011 | NAND | project/board/p3/boot/spinand/uboot/u -boot_spinand.xz.img.bin | spinand.ubifs.partition.dispcam.config |
| After V011 | NOR | project/board/p3/boot/nor/uboot/u-boot_dualenv.xz.img.bin | nor.squashfs.partition.dualenv.dispcam.config |
| After V011 | NAND | project/board/p3/boot/spinand/uboot/u-boot_dualenv_spinand.xz.img.bin | spinand.ubifs.partition.dualenv.dispcam.config |
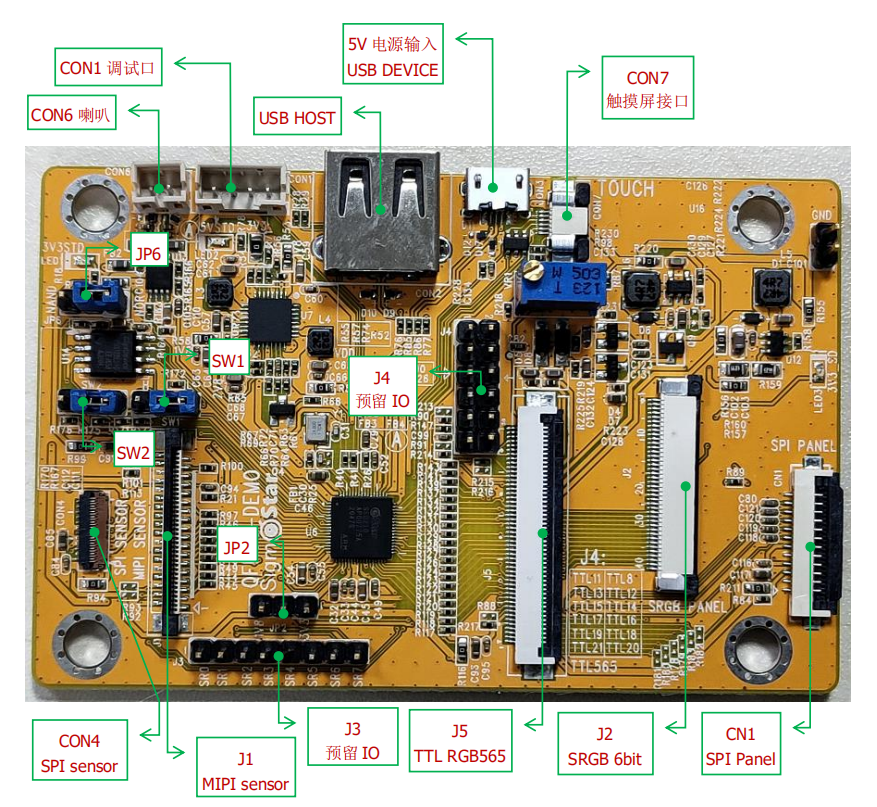
4. Demo board connection diagram
SSD221 SSD210 SSC9211 demo board connection diagram:
SSD212 demo board connection diagram:


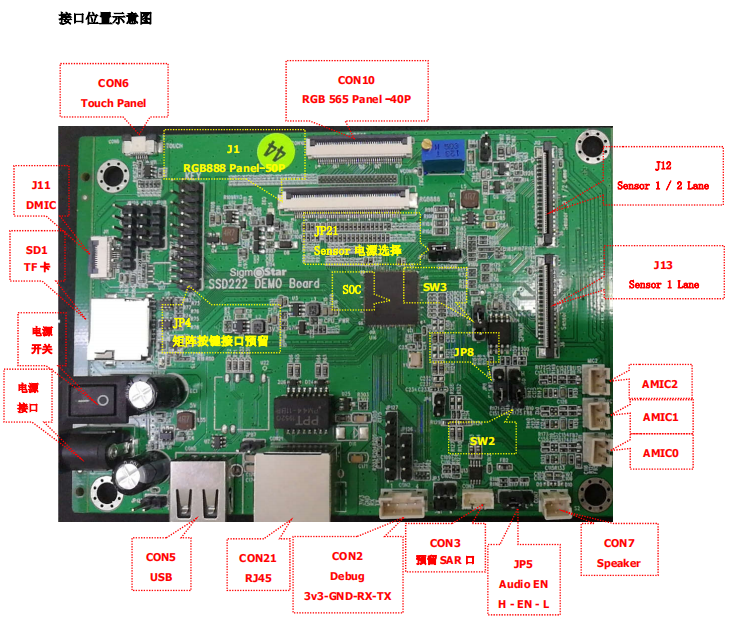
SSD222 SSD222D demo board connection diagram:
5. Burn the Image to the board
5.1. Burn empty flash
Burning on an empty board (or a board that cannot be run by uboot) needs to be connected and burned with the isp tool (this method is only used in the development stage, and the way to use the burner to burn the master film is officially produced). The specific method is as follows.
Before using isptool to connect, please disconnect the serial port to avoid isptool connection failure. The steps to disconnect the serial port are as follows:
-
Input
debugdirectly under the uboot console, and then close the serial terminal; -
Input
11111directly under the kernel, when the serial port displays disable uart, close the serial port terminal.
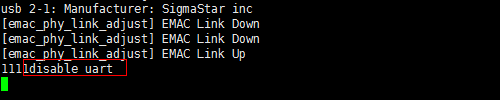
After closing uart, use isptool to burn as follows.
5.1.1. Burn SPI NOR Flash
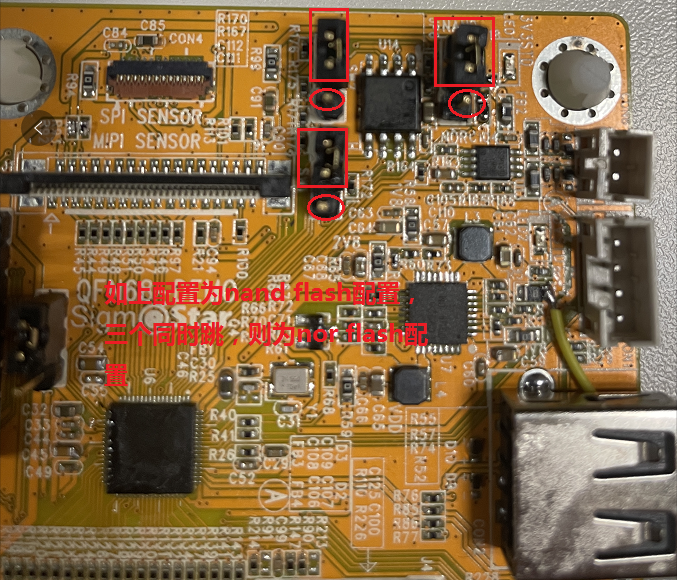
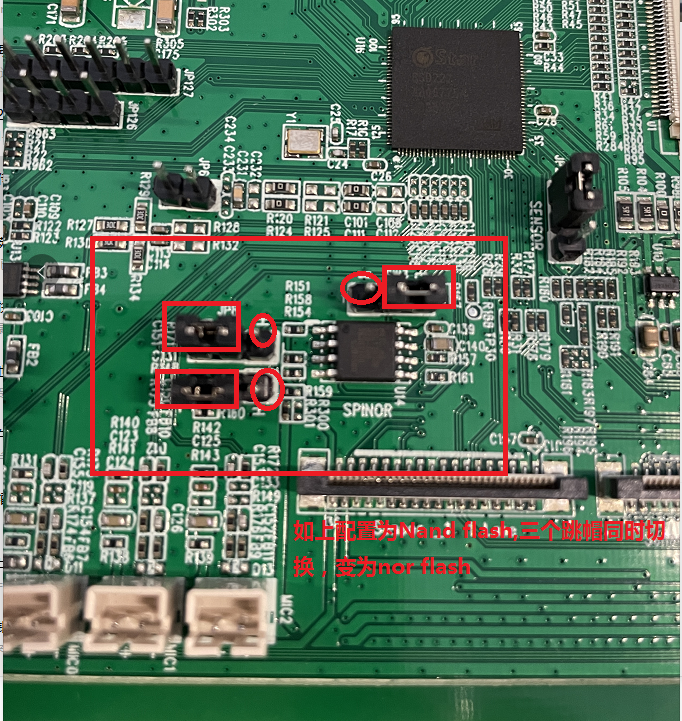
For the new flash architecture, nor flash only needs to program boot.bin, and nand flash only needs to program cis.bin and boot.bin. The specific methods are as follows:
-
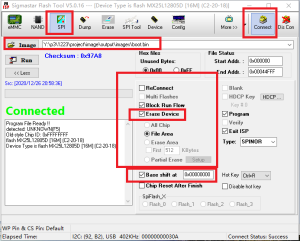
Open isptool, select spinor, and then click connect. The tool displays connected to indicate that the connection is successful.
-
Follow the steps in the red box below, select the boot.bin and the corresponding flash address to be burned (see below), and then click run. After the burning is completed, the tool displays pass, indicating that the burning has been successful.
Binary file offset Binary directory boot.bin 0x00000 $ 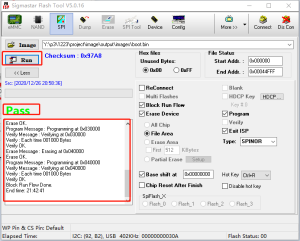
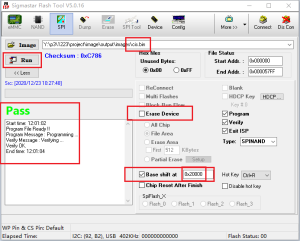
5.1.2. Burn SPI NAND Flash
For the new flash architecture, nor flash only needs to program boot.bin, and nand flash only needs to program cis.bin and boot.bin. The specific methods are as follows:
-
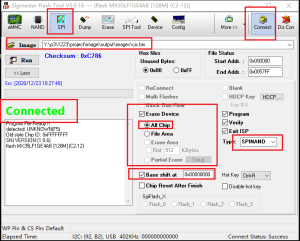
Open isptool, select spinand, and then click connect. The tool displays connected to indicate that the connection is successful.
-
Follow the steps in the red box below, select cis.bin and the corresponding flash address (see below) to be burned, and then click run. After the burning is completed, the tool displays pass, indicating that the burning has been successful.
Binary file offset Binary directory cis.bin 0x00000 $ cis.bin 0x20000 $ boot.bin 0x140000 $ 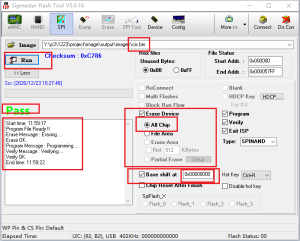
-
Burn the second cis.bin in the same steps ( Note that the address is different from the first one, and Erase Device is not checked ) and boot.bin ( Note that Erase Device is not checked ), pay attention to fill in the flash address of the corresponding partition:
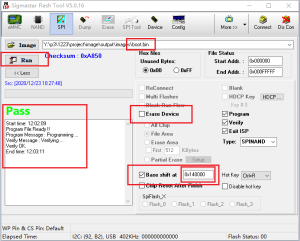
-
After burning uboot, close isptool and then reconnect the serial port. After the board is powered off and restarted, you can enter the uboot terminal and use tftp to upgrade the main program.
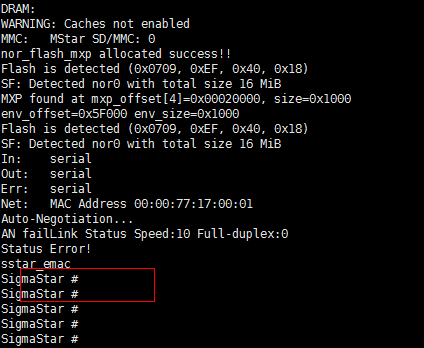
5.2. Burn image with tftp
The premise of using the tftp network to burn the image is that the board has the uboot program. If not, please refer to the isptool burning method to burn the uboot, and then use the tftp burning method as follows.
-
Open the tftp tool and point to the image path:
SDK\project\image\output\images\, and select the correct network card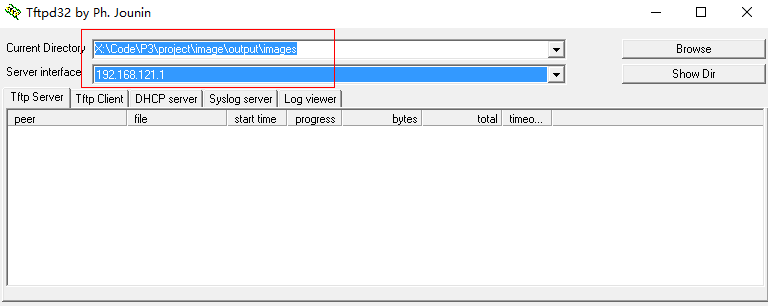
-
Connect the board to the network, and ensure that the board and the PC are in the same network segment (the PC needs to turn off the firewall)
-
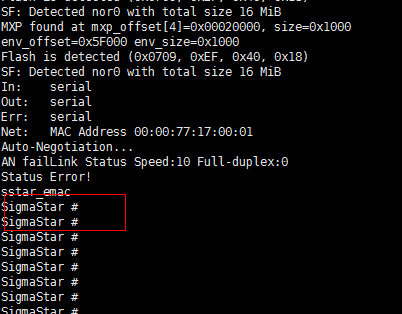
Power on the board, long press Enter to enter the uboot terminal
-
The IP address needs to be set for the first burning
#setenv gatewayip 192.168.1.1
#setenv ipaddr 192.168.1.127 //Set the IP used by FTP Client (EVB board)
#setenv netmask 255.255.255.0
#setenv serverip 192.168.1.100 //Set the IP of the FTP server (PC)
#saveenv
Note:
-
In order to ensure smooth burning, please ensure that the PC and the development board are in the same network segment.
-
Please use static method to assign IP fixedly. Prevent ip address jumping when burning.
-
You can also use an independent network card to directly connect the PC to the development board, fix the intranet ip address of the network card, and set the development board according to the above method.
-
Use the following command to burn in the uboot terminal
#estart (The default uboot is to close the network initialization, in order to save the boot time, the estart command can manually initialize the network parameters of uboot)

#estar (Or: estar auto_update.txt, specify a line of auto_update.txt to burn one of the partitions)
-