Sigmastar SSR931G GMAC网口使用指南
1. 前言
1.1. Support List
该SOP目前仅适用于:SSR931G demo board
1.2. 概述
该系列IC拥有两个GMAC控制器:GMAC0和GMAC1
从硬件角度看:
GAMC0: 支持 RGMII(external gphy)、RMII(external ephy)
GAMC1: 支持 RGMII(external gphy)、RMII(external ephy)、MII(internal ephy)
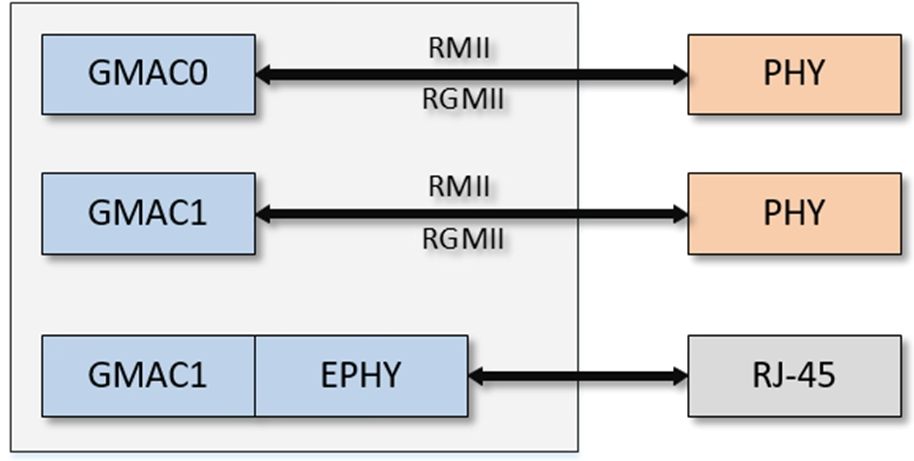
从软件角度看:
-
UBOOT
GAMC0: 支持 RGMII(external gphy)
GAMC1: 支持 MII(internal ephy)
但注意一次启动中仅能开启一个GMAC口
-
KERNEL
GAMC0: 支持 RGMII(external gphy)
GAMC1: 支持 MII(internal ephy)
一次启动中两个GMAC口均开启,可同时使用
2. UBOOT 2015 GMAC0 RGMII(EXTERNAL GPHY)
2.1. ENV配置要求
setenv ethact sstar_gmac0

setenv --f gmac_bustype rgmii

saveenv
重启生效。
2.2. 场景演示

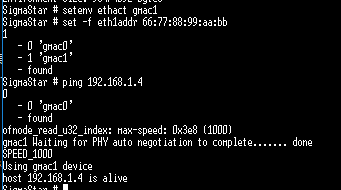
3. UBOOT 2015 GMAC1 MII(INTERNAL EPHY)
3.1. ENV配置要求
setenv ethact sstar_gmac1

setenv gmac_bustype mii

saveenv
重启生效。
3.2. 场景演示

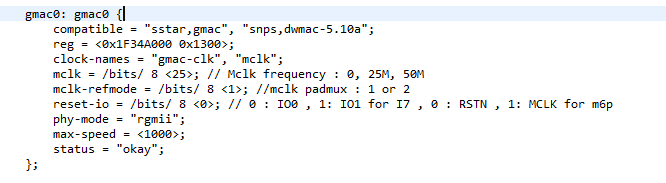
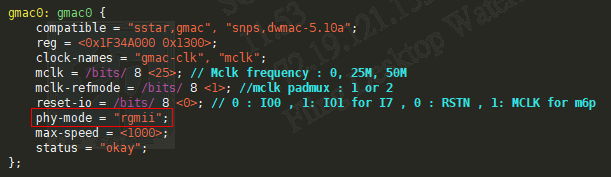
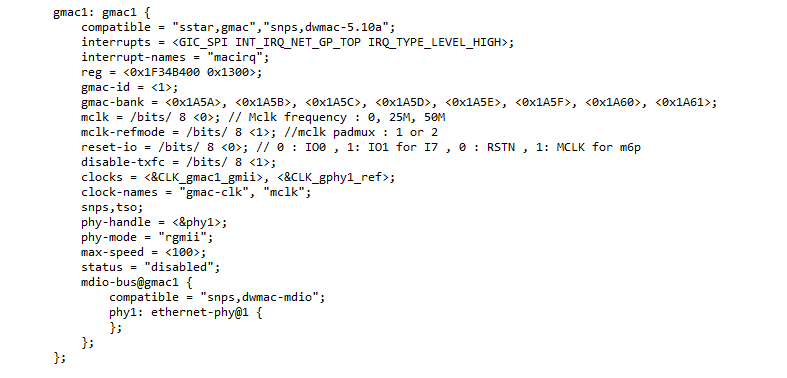
4. UBOOT 2021 DTS
目前在 dtsi 内含两个网络节点,分别是 gmac0 & gmac1,要修改配置时,需要根据使用的网口来修改对应的 dts node, 下面以网口 gmac0 为例 :
-
修改不同PHY接口,提供三种接口选择 :
phy-mode = "mii" / "rmii" / "rgmii"
-
限制 Auto Negotiation 最高速度,提供三个文件位选择 :
max-speed = <10> / <100> / <1000>
-
Driver 开关 :
status = "okay" / "disabled"
-
mclk与mclk-refmode (若想省PHY外挂晶振,可让主芯片产生指定clock频率给PHY):
mclk:可指定的频率, 0 : 不出clock, 25 : 25MHz, 50 : 50MHz
mclk-refmode :指定要输出的PAD,1 : RGMIIX_MCLK, 2: RGMIIX_RSTN
gmac0范例:
gmac0 : gmac0 {
    mclk = /bits/ 8 <25>;
    mclk-refmode = /bits/ 8 <1>;
}
由RGMII0_MCLK输出25MHz给PHY
mclk = /bits/ 8 <0>;或不写则为关闭
请注意此功能只限GMAC0 only, GMAC1不保证 mclk稳定性
-
reset-io : 指定给PHY做reset的pin,可选择RGMIIx_RSTN或RGMIIx_MCLK
gmac0范例:
reset-io = /bits/ 8 <0>
指定reset io为RGMII0_RSTN
reset-io = /bits/ 8 <1>
指定reset io为RGMII0_MCLK
reset-io不写则不控制io
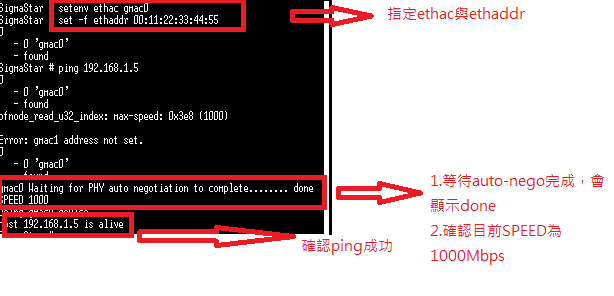
5. UBOOT 2021 GMAC0 RGMII (EXTERNAL YT8531 GPHY)
5.1. DTS配置
修改 "gmac0" dts node,将 phy-mode 设置为 "rgmii",需要透过DTS修改,无法透过Uboot ENV 设置
5.2. CONFIG配置
透过 Uboot Menuconfig 开启对应的PHY Driver,路径 :
Device Drivers  ---> Ethernet PHY (physical media interface) support  --->
[*]   YT Ethernet PHYs support
可同时与其他 Phy Driver 并存,Phy Driver会根据PHYID与对应的Driver适配。
5.3. ENV配置要求
setenv ethact gmac0
set -f ethaddr xx:xx:xx:xx:xx:xx
setenv ipaddr xxx.xxx.xxx.xxx
ping xxx.xxx.xxx.xxx
5.4. 场景演示
5.5. PHY DRIVER 路径
drivers/net/phy/motorcomm.c
6. UBOOT 2021 GMAC0 RGMII (EXTERNAL RTL8211 GPHY)
6.1. DTS配置
修改 "gmac0" dts node,将 phy-mode 设置为 "rgmii" ,PHY使用接口需要透过DTS修改,无法透过Uboot ENV 设置
6.2. CONFIG配置
RTL8211 默认使用Generic PHY Driver,无须特别开启。
6.3. ENV配置要求
setenv ethact gmac0
set -f ethaddr xx:xx:xx:xx:xx:xx
setenv ipaddr xxx.xxx.xxx.xxx
ping xxx.xxx.xxx.xxx
6.4. 场景演示
6.5. PHY DRIVER 路径
drivers/net/phy/phy.c
7. UBOOT 2021 GMAC0 RMII/RGMII
7.1. DTS配置
修改 "gmac0" dts node,将 phy-mode 设置为 "rmii" / "rgmii" ,PHY使用接口需要透过DTS修改,无法透过Uboot ENV 设置
7.2. CONFIG配置
不特别指定PHY Driver 时,默认使用Generic PHY Driver,无须特别开启。
7.3. ENV配置要求
setenv ethact gmac0
set -f ethaddr xx:xx:xx:xx:xx:xx
setenv ipaddr xxx.xxx.xxx.xxx
ping xxx.xxx.xxx.xxx
7.4. 场景演示
7.5. PHY DRIVER 路径
drivers/net/phy/phy.c
8. UBOOT 2021 GMAC1 MII(INTERNAL EPHY)
8.1. DTS配置
修改 "gmac1" dts node,将 phy-mode 设置为 "mii",PHY使用接口需要透过DTS修改,无法透过Uboot ENV 设置

8.2. CONFIG配置
透过 Uboot Menuconfig 开启对应的PHY Driver,路径 :
Device Drivers  ---> Ethernet PHY (physical media interface) support  --->
[*]   SigmaStar Ethernet PHYs support
可同时与其他 Phy Driver 并存,Phy Driver会根据PHYID与对应的Driver适配。
8.3. ENV配置要求
setenv ethact gmac1
set -f eth1addr xx:xx:xx:xx:xx:xx
setenv ipaddr xxx.xxx.xxx.xxx
ping xxx.xxx.xxx.xxx
8.4. 场景演示
8.5. PHY DRIVER 路径
drivers/net/phy/albany.c
9. UBOOT 2021 GMAC1 RMII/RGMII
9.1. DTS配置
修改 "gmac1" dts node,将 phy-mode 设置为 "rmii" / "rgmii",PHY使用接口需要透过DTS修改,无法透过Uboot ENV 设置
9.2. CONFIG配置
不特别指定PHY Driver 时,默认使用Generic PHY Driver,无须特别开启。
9.3. ENV配置要求
setenv ethact gmac1
set -f eth1addr xx:xx:xx:xx:xx:xx
setenv ipaddr xxx.xxx.xxx.xxx
ping xxx.xxx.xxx.xxx
9.4. 场景演示
9.5. PHY DRIVER 路径
drivers/net/phy/phy.c
10. KERNEL DTS相关说明
目前在dtsi内含两个网络节点,分别是gmac0 & gmac1,要修改配置时,需要根据使用的网口来修改对应的 dts node,对应关系分别为eth0:gmac0以及eth1:gmac1。
下面以网口eth1为例:
-
eth1 对应 gmac1 节点
-
修改不同PHY接口,提供三种接口选择 :
phy-mode = "mii" / "rmii" / "rgmii"
-
限制 Auto Negotiation 最高速度,提供三个文件位选择 :
max-speed = <10> / <100> / <1000>
-
Driver 开关 :
status = "ok" / "disabled"
-
强制speed和全/半双工,需要通过添加fixed-link控制,具有以下内容:
'speed'(整数,必填),表示链接速度,有10、100、1000供选择
'full-deplex'(可选),表示是否全双工,如果不填代表半双工
'pause'(可选),表示启用暂停
'asym-pause'(可选),表示启用asym-pause
'link-gpios'('gpio-list',可选),表示是否可以读取gpio确定链接是否正常
例如:
fixed-link {
    speed = <100>;
    full-duplex;
    pause;
};
表示强制为100M速度,全双工。
注意:
RMII 接百兆switch,一定要force 100 full-duplex。
RGMII 接千兆switch,一定要force 1000 full-duplex。
-
mclk与mclk-refmode (若想省PHY外挂晶震,可让主芯片产生指定clock频率给PHY):
mclk:可指定的频率, 0 : 不出clock, 25 : 25MHz, 50 : 50MHz
mclk-refmode : 指定要输出的PAD,1 : RGMIIX_MCLK, 2: RGMIIX_RSTN
gmac0范例:
gmac0 : gmac0 { mclk = /bits/ 8 <25>; mclk-refmode = /bits/ 8 <1>; } -
由RGMII0_MCLK输出25MHz给PHY,mclk = /bits/ 8 <0>或不写则为关闭。
请注意此功能只限GMAC0 only, GMAC1不保证 mclk稳定性
-
reset-io : 指定给PHY做reset的pin,可选择RGMIIx_RSTN或RGMIIx_MCLK
gmac0范例:
reset-io = /bits/ 8 <0>
指定reset io为RGMII0_RSTN
reset-io = /bits/ 8 <1>
指定reset io为RGMII0_MCLK
reset-io不写则不控制io
-
disable-txfc : 关闭 tx flow control
<0> : 开启tx flow control
<1> : 关闭tx flow control
11. KERNEL GMAC0 RGMII(EXTERNAL YT8531 GPHY)
11.1. DTS配置
修改 "gmac0" dts node,将 phy-mode 设置为 "rgmii"
11.2. CONFIG配置
透过 Menuconfig 开启对应的PHY Driver,路径 :
Device Drivers ---> Network device support ---> PHY Device support and infrastructure --->
<*> Motorcomm PHYs
可同时与其他 Phy Driver 并存,Phy Driver会根据PHYID与对应的Driver适配。
11.3. PHY Driver 路径
drivers/net/phy/motorcomm.c
12. KERNEL GMAC0 RGMII(EXTERNAL RTL8211 GPHY)
12.1. DTS配置
修改 "gmac0" dts node,将 phy-mode 设置为 "rgmii"
12.2. CONFIG配置
RTL8211 默认使用Generic PHY Driver,无须特别开启。
12.3. PHY Driver 路径
drivers/net/phy/phy_device.c
13. KERNEL GMAC1 MII(INTERNAL EPHY)
13.1. DTS配置
修改 "gmac1" dts node,将 phy-mode 设置为 "mii"
13.2. CONFIG配置
透过 Menuconfig 开启对应的PHY Driver,路径 :
Device Drivers ---> SStar SoC platform drivers ---> <*> SSTAR 10/100 PHYs
可同时与其他 Phy Driver 并存,Phy Driver会根据PHYID与对应的Driver适配。
13.3. PHY Driver 路径
drivers/sstar/netphy/sstar_100_phy.c
14. KERNEL MULTIQUEUE 配置
14.1. Kernel DTSI
请将下述DTS Node 新增至dtsi 内,主要新增两大节点,mtl_rx_setup & mtl_tx_setup,并在gmac node 内新增此两个节点(mtl_rx_setup/mtl_tx_setup)。
mtl_rx_setup: rx-queues-config {
snps,rx-queues-to-use = <4>;
snps,rx-sched-sp;
queue0 {
snps,dcb-algorithm;
snps,map-to-dma-channel = <0x0>;
};
queue1 {
snps,dcb-algorithm;
snps,map-to-dma-channel = <0x1>;
};
queue2 {
snps,dcb-algorithm;
snps,map-to-dma-channel = <0x2>;
snps,route-up;
};
queue3 {
snps,dcb-algorithm;
snps,map-to-dma-channel = <0x3>;
snps,route-multi-broad;
};
};
mtl_tx_setup: tx-queues-config {
snps,tx-queues-to-use = <4>;
snps,tx-sched-wrr;
queue0 {
snps,weight = <0x19>;
snps,dcb-algorithm;
};
queue1 {
snps,weight = <0x19>;
snps,dcb-algorithm;
};
queue2 {
snps,weight = <0x19>;
snps,dcb-algorithm;
};
queue3 {
snps,weight = <0x19>;
snps,dcb-algorithm;
};
};
gmac0 {
compatible = "sstar,gmac","snps,dwmac-5.10a";
interrupts =
interrupt-names = "macirq";
reg = <0x1F34A000 0x1000>;
gmac-id = <0>;
gmac-bank = <0x1A50>, <0x1A51>, <0x1A52>, <0x1A53>, <0x1A54>, <0x1A55>, <0x1A56>, <0x1A57>;
disable-txfc = <1>;
clocks = <&CLK_gmac0_gmii>;
clock-names = "gmac-clk";
snps,tso;
phy-handle = <&phy0>;
phy-mode = "rgmii";
max-speed = <1000>;
snps,mtl-rx-config = <&mtl_rx_setup>;
snps,mtl-tx-config = <&mtl_tx_setup>;
status = "ok";
mdio-bus@gmac0 {
compatible = "snps,dwmac-mdio";
phy0: ethernet-phy@0 {
};
};
};
14.2. Multiqueue DTS节点简介
Multiple RX Queues parameters:
- snps,rx-queues-to-use: number of RX queues to be used in the driver
- Choose one of these RX scheduling algorithms:
- snps,rx-sched-sp: Strict priority
- snps,rx-sched-wsp: Weighted Strict priority
- For each RX queue
- snps,map-to-dma-channel: Channel to map
- Specifiy specific packet routing:
- snps,route-avcp: AV Untagged Control packets
- snps,route-ptp: PTP Packets
- snps,route-dcbcp: DCB Control Packets
- snps,route-up: Untagged Packets
- snps,route-multi-broad: Multicast & Broadcast Packets
- snps,priority: RX queue priority (Range: 0x0 to 0xF), bitmask of the tagged frames priorities assigned to the queue
Multiple TX Queues parameters:
- snps,tx-queues-to-use: number of TX queues to be used in the driver
- Choose one of these TX scheduling algorithms:
- snps,tx-sched-wrr: Weighted Round Robin
- snps,tx-sched-wfq: Weighted Fair Queuing
- snps,tx-sched-dwrr: Deficit Weighted Round Robin
- snps,tx-sched-sp: Strict priority
- For each TX queue
- snps,weight: TX queue weight (Total 100%, using hex to present, EX: 0x19 = 25%)
- Choose one of these modes:
- snps,dcb-algorithm: TX queue will be working in DCB
- snps,avb-algorithm: TX queue will be working in AVB
[Attention] Queue 0 is reserved for legacy traffic
and so no AVB is available in this queue.
- Configure Credit Base Shaper (if AVB Mode selected):
- snps,send_slope: enable Low Power Interface
- snps,idle_slope: unlock on WoL
- snps,high_credit: max write outstanding req. limit
- snps,low_credit: max read outstanding req. limit
- snps,priority: TX queue priority (Range: 0x0 to 0xF)
14.3. Multiqueue Packet数量检视
Use ethtool to check irq number and packet count for each Queue.
ethtool –S | grep q[0-3]
14.4. Multiqueue XPS
动态分配SIRQ,透过指定TXQ 与CPU 之间的绑定关系:
echo CPU(hex) > /sys/class/net/
范例:
绑定TXQ3 与CPU3 的关系
echo 8 > /sys/class/net/eth0/queues/tx-3/xps_cpus
绑定TXQ2 与CPU2 的关系
echo 4 > /sys/class/net/eth0/queues/tx-2/xps_cpus
可透过 cat /proc/softirqs 观察NET_TX 软中断数量变化。
14.5. Multiqueue RPS
动态分配SIRQ,透过指定RXQ 与CPU 之间的绑定关系:
echo CPU(hex) > /sys/class/net/
范例:
绑定RXQ3 与CPU3 的关系
echo 8 > /sys/class/net/eth0/queues/rx-3/rps_cpus
绑定RXQ2 与CPU2 的关系
echo 4 > /sys/class/net/eth0/queues/rx-2/rps_cpus
可透过 cat /proc/softirqs 观察NET_RX 软中断数量变化。
15. 讯号调试
15.1. Tx driving
RGMII与RMII基本共pin,例如要调整RGMII_TXCTL driving,等同是调整RMII_TXEN driving,Clock、Data pin,都是相同脚位
Uboot 2021内调整Tx driving :
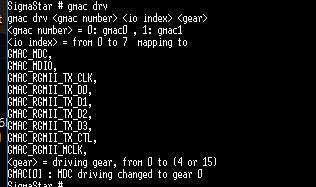
范例:将gmac0 txc driving调至挡位3(最高)

Kernel内调整Tx driving :
cat /proc/gmac_0/driving
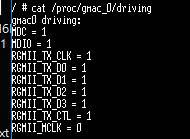
范例: 将gmac0 txc driving调至挡位3(最高)

代码里面修改默认driving(uboot/kernel都是一样的文件):
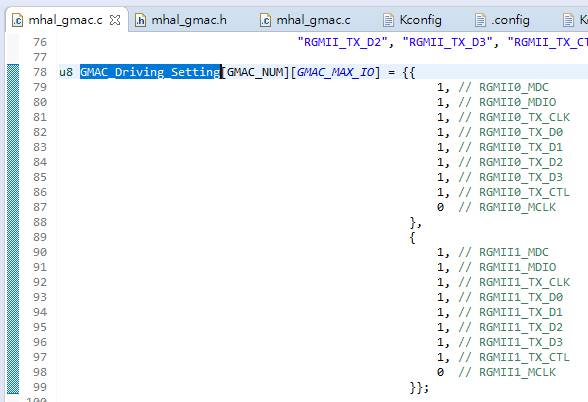
0即是挡位0
最大为3
有用到MCLK给PHY 25MHz clock的话建议RGMII_MCLK至少用1
15.2. Txc phase
使用背景:
1.大部分的GPHY在TXC上进入PHY内部后会自动delay 2ns以确保时序问题
但有遇到某些GPHY的delay不是很准的2ns,因此希望GPHY内部不delay,改成GMAC出讯号时delay(选相位)
2.如板子layout因素发现setup/hold time不够,也可以尝试调整phase来实验看是否有改善.
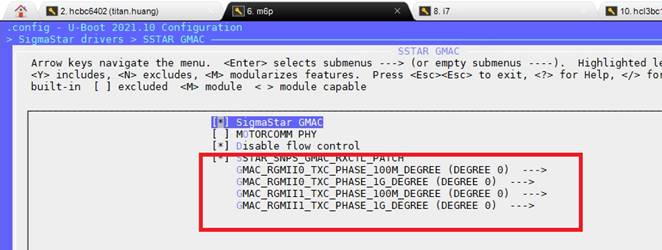
Uboot可使用以下config来选择TXC 100Mbps下与1Gbps下的phase(默认是degree 0)
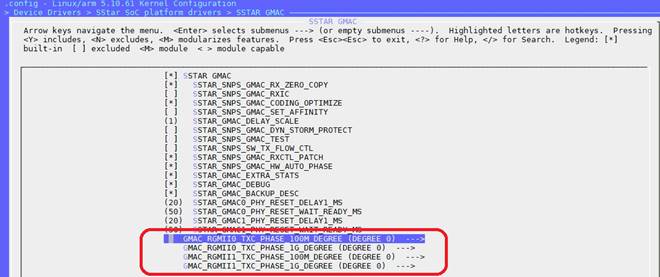
Kernel可使用以下config来选择TXC 100Mbps下与1Gbps下的phase(默认是degree 0)
若是想将GPHY内部delay取消,请参考GPHY datasheet,RTL8211+ GMAC0为例,只能改电阻来取消PHY内部delay。
并且将GMAC_RGMII0_TXC_PHASE_100M_DEGREE选至Degree 90
(default config内CONFIG_GMAC_RGMII0_TXC_PHASE_100M_DEGREE_90设成y)
与将GMAC_RGMII0_TXC_PHASE_1G_DEGREE选至Degree 90
(default config内CONFIG_GMAC_RGMII0_TXC_PHASE_1G_DEGREE_90设成y)