MISC Q&A
Q1:查看芯片温度
-
代码方式获取
#include <fcntl.h> #include <stdio.h> #include <ctype.h> #include <sys/ioctl.h> #include <sys/types.h> #include <stdlib.h> #include <string.h> #define MSYS_IOCTL_MAGIC 'S' #define IOCTL_MSYS_READ_PM_TSENSOR _IO(MSYS_IOCTL_MAGIC, 0x78) int main(int argc, char* argv[]) { int fd=-1,ret; int temprature=0; fd=open("/dev/msys",O_WRONLY); if(-1==fd) { printf("fail to open msys device\n"); return 0; } while(1){ ret = ioctl(fd,IOCTL_MSYS_READ_PM_TSENSOR,&temprature); if(ret == 0)printf("temprature = %d\n",temprature); else printf("get temprature fail\n"); sleep(2); } return 0; } -
命令行方式获取
cat /sys/devices/virtual/mstar/msys/TEMP_R
Q2:CPU Freq 频率如何调整?
系统启动时生成一个文件夹/sys/devices/system/cpu/cpu0/cpufreq,下面有几个节点:
cpuinfo_min_freq:平台支持的最小主频频率
cpuinfo_max_freq:平台支持的最大主频频率
cpuinfo_cur_freq/scaling_cur_freq:查看当前CPU主频
scaling_min_freq:允许调节器动态调节的范围最小值(只有允许调节器根据cpu loading动态调整cpu频率时才有用)
scaling_max_freq:允许调节器动态调节的范围最大值
scaling_governor:指定cpu频率调整模式(常用performance:固定cpu频率而不动态调节;ondemand:动态调整cpu频率)
检测CPU当前运行频率:
cat /sys/devices/system/cpu/cpu0/cpufreq/scaling_cur_freq
调整CPU主频跑1G:
方法1
echo 1000000 > /sys/devices/system/cpu/cpu0/cpufreq/scaling_max_freq
echo performance > /sys/devices/system/cpu/cpu0/cpufreq/scaling_governor
方法2
cd sys/devices/system/cpu/cpu0/cpufreq/

echo userspace > scaling_governor

echo 1200000 > scaling_max_freq

echo 400000 > scaling_min_freq

echo 1000000 > scaling_setspeed

cat scaling_cur_freq
Q3:调整中断,绑定指定CPU
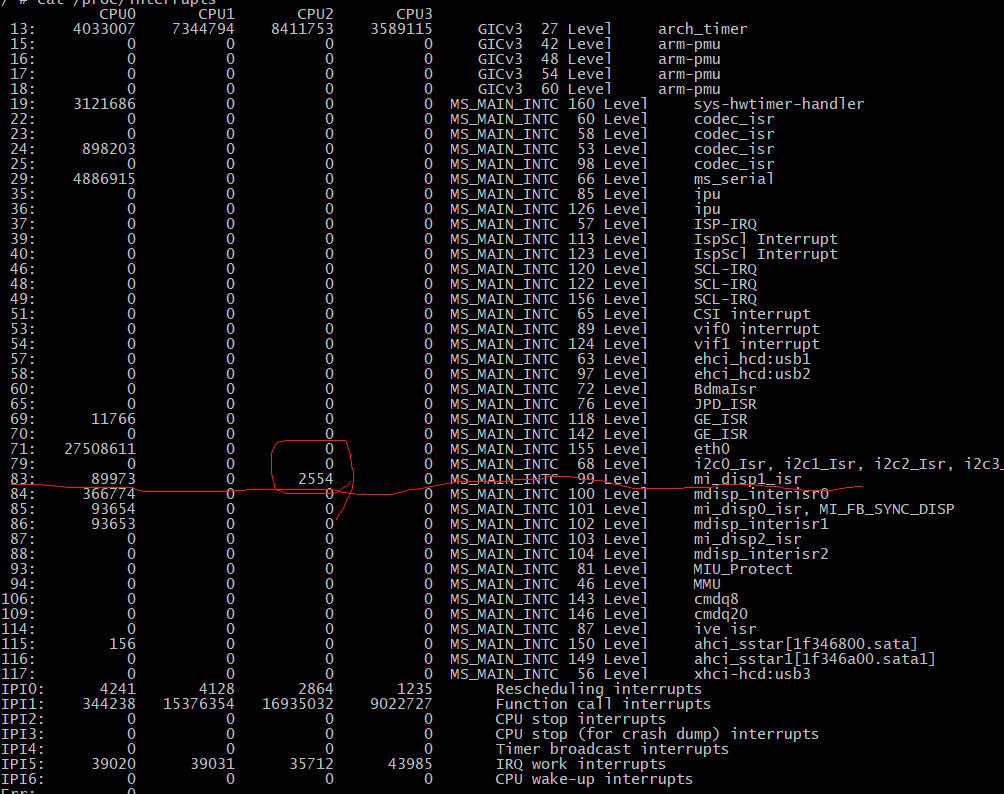
首先需要通过cat /proc/interrupts,确定需要调整的中断。如图,我们选择将mi_disp1_isr的中断调整到CPU2上。敲入echo 4 > /proc/irq/83/smp_affinity即可
命令解析:
CPU的指定:根据bit位来设置,设置CPU2,对应的是第3bit位 设置为1 (二进制:0100, 十进制:4)
中断的指定:根据cat /proc/interrupts 查找对应的中断ID


Q4:Vdec、Disp 绑定到特定CPU运行的方式
-
通过insmod参数的方式可将某个进程与某个CPU核心绑定,使得其仅在与之绑定的CPU核心上运行,通过掩码形式表示。例如:
insmod /config/modules/5.10/mi_vdec.ko g_u64CpuMaskAffinity=0x42
bit0 ~ bit3 代表dev0所在进程,2对应的二进制是10,第几个bit位代表的是第几个cpu,所以这里是绑定vdec0_P0_MAIN在cpu1上运行。
bit4 ~ bit7 代表dev1所在进程,4对应的二进制是100,所以这里是绑定vdec1_P0_MAIN在cpu2上运行。 这里g_u64CpuMaskAffinity是64位数据,最多可以支持8个device(SSR931G vdec和disp只有2个device)。
-
Disp 的绑定方法与Vdec相同,比如:
insmod /config/modules/5.10/mi_disp.ko g_u64CpuMaskAffinity=0x88
这代表绑定disp0_P0_MAIN和disp1_P0_MAIN在cpu3上运行。