SSD_Flash Master Make
1. Spinand Master Make
Because SPINAND has the property of bad blocks, it cannot be directly downloaded from the Flash Dump and then burned. You need to use the tools provided by the public version, then make the master slice according to the following steps.
1.1. Get the Mastering Kit
Click to download: Master Production Tool
1.2. Basic tool file introduction
-
Executable program SstarMakeBin (SstarMakeBin_dual_env)
-
Initialize the file SPINAND.INI (spinand)
The nandid of SPINAND.INI needs to be filled in according to the actual flash datasheet,
image_directorycorresponds to the image path that needs to be packaged:
-
The configuration file of the burner leap.def & snchk.def (leap burner uses leap.def, other burners generally use snchk.def)
-
The image files and burning scripts for making the master slice are placed in the images folder:

images folder is copied from the images under
project\image\output\images -
Script
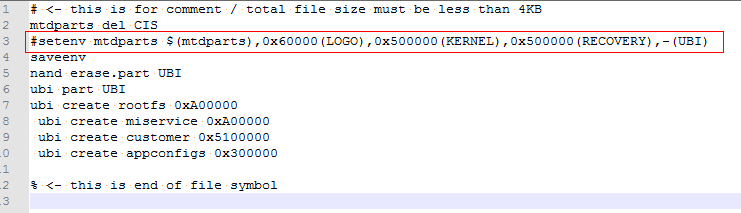
auto_update_spinand.txtto configure partition and image pathThe partition information of the dynpart line under
auto_update_spinand.txtmust be consistent with the mtdparts under uboot:
-
For the ubi file format, extra space is required to store the ubi information, so the ubi partition cannot be used up completely, and the following space needs to be reserved for storing the ubi information:
Common 1G bit, 2G bit, 4G bit NAND reserves are calculated as 9MB, 17MB, 34MB
Otherwise, the following error of insufficient peb will be reported when making the master slice:

Eg: The flash of the public version of spinand 128M, the total size of the ubi partition is 903 blocks, and the size to be reserved is > = 903 * 2 * 4k + 4 * 4k
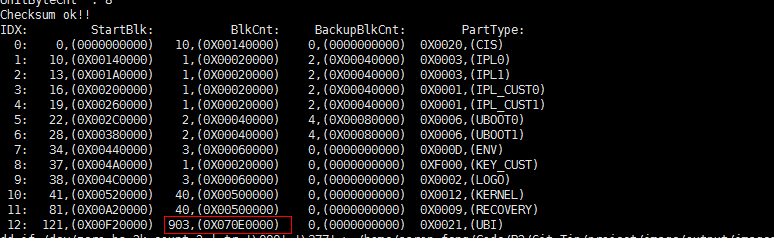
So in
project\image\configs\i2m\spinand.ubifs.p2.partition.config, the total size of ubi partition cannot exceed0X070E0000 - 903*2*4k + 4*4k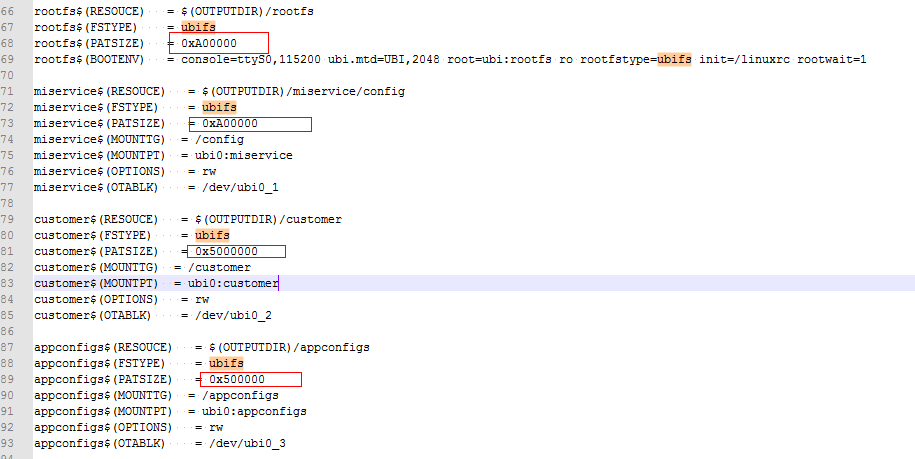
-
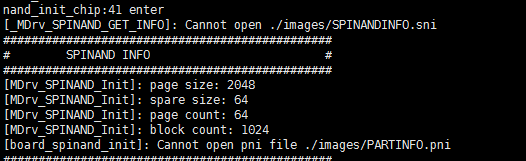
The default is to read the SPINANDINFO.sni & PARTINFO.pni files from the images directory, so before making the master, you need to copy the SPINANDINFO.sni & PARTINFO.pni under images\boot to the images, otherwise the following error will be reported :
1.3. Execute SstarMakeBin_dual_env (SstarMakeBin) to generate nand.bin
SstarMakeBin and SstarMakeBin_dual_env are bins with the same function, but the versions are different. Please pay attention to the version used. If you use it incorrectly, uboot may prompt ENV CRC ERROR after burning.
Before executing the packing command, you need to block the line under SpinandPackBinTool\images\scripts_bin\[[set_partition.es :
Then execute it in linux
-
Execute
./SstarMakeBin_dual_env -n SPINAND.INI(used after TAKOYAKI_DLS00V008 (not included)) -
Or
./SstarMakeBin -n SPINAND.INI(used before (including) TAKOYAKI_DLS00V008)
This will generate a nand.bin


This bin is the burning program, and then use the burner to burn it.
1.3. Error checking for mastering
-
If there is an error when executing the bin generation, first check whether the executed command is not supported. For example, the sd upgrade script needs to be changed to the tftp script form
-
Have some save commands been executed to re-save the partition information, causing the partition information to be inconsistent with the partition specified in auto_update_spinand.txt
-
If it is burned to the board and cannot run, first check whether the file information at the offset address of the generated bin file is correct according to the partition information. For example, the partition offset of IPL is 0x140000, then check the generated bin file address. Whether the content of the file at 0x140000 is the content of the IPL file
-
Check whether the oob area is disabled when the burner is burning
-
Use flash tool to dump the parts of the files at the beginning of the flash, the offset of the IPL partition, the offset of the IPL_CUST partition, the offset of the UBOOT partition, and the offset of the kernel partition on the board. Compare whether they are consistent with the burned bin file
1.5. List of supported FLASH
For the currently supported flash list, please refer to SSD_FLASH Support List
1.6. Programmer reference config (partition config file)
1.6.1. snchk.def description (usually used for non-leap programmer)
As shown below: def format is stored in big endian
-
Use binary to open the file, each line represents a description of a partition
-
The partition description in the red box:
-
In the red box 1, 4 bytes describe the starting block of the partition, such as the first line 00 00 00 00, which means the starting position is the 0th block
-
In the red box 2, 4 bytes describe the end block of the partition, such as the first line 09 00 00 00, which means the end position is the 9th block (including the 9th block)
-
In red box 3, 4 bytes describe the number of blocks occupied by the actual valid data of the partition, such as the first line 0A 00 00 00, which means 10 blocks are occupied

End block - start block >= valid data block
-
1.6.2. leap.def description (for leap programmer)
As shown below: def format is stored in big endian
-
Remove the first and last lines, each line is a description of a partition
-
The first line is the header information of leap, the burner manufacturer can judge whether it is needed or not, and it can be removed if it is not needed (varies by burner)
-
The first 4 bytes of each line are unique marks. Each writer manufacturer determines whether it is necessary or not. It can be removed if it is not needed (it varies by writer)
-
The partition description in the red box:
-
In the red box 1, 4 bytes describe the starting block of the partition, such as the first line 00 00 00 00, which means the starting position is the 0th block
-
In the red box 2, 4 bytes describe the end block of the partition, such as the first line 09 00 00 00, which means the end position is the 9th block (including the 9th block)
-
In red box 3, 4 bytes describe the number of blocks occupied by the actual valid data of the partition, such as the first line 0A 00 00 00, which means 10 blocks are occupied

End block - start block >= valid data block
-
1.6.3. Programmer config information
-
Application product information
CPU Brand/Model Software System Sigmastar Linux -
Whether Spare (OOB) data is included in the image file:
☐ Has Spare(OOB) data: _____ bytes
√ No Spare(OOB) data
-
Bad block management mode (with or without partition)
☐ Skip method: Skip IB
√ Partition: Multiple Partitions (with skip IB)
The partition table file needs to be provided (refer to 1.6.2 for the partition file)
-
Whether to use On-chip ECC (Only Flash with on-chip ECC function)
☐ Does not use On-chip ECC
Maximum allowable error bits parameter: _____(bits) / _____(bytes)
The image file must contain Spare(OOB) data
√ use On-chip ECC
-
Bad block marker
Marker position (address): 800h
Bad block marker data: 00h
1.6.4. Programmer config reference
The content of this chapter is for reference only, and the config of different programmers may be different.
Use the flash config for GD5F1GQ4UBYIG, refer to the following:

2. SPINOR Master Make
Because SPINOR Flash does not have bad blocks, SPINOR Flash can be directly dumped from a confirmed complete Flash for secondary programming. The making of master silces is much simpler than that of SPINAND. Here, use Flash_Tool to dump and program ( You can also use the programmer by yourself in the actual use process)
2.1. Get Flash_Tool.exe corresponding to SSD
2.2. Prepare a clean Flash
Assuming that Flash is in use, then use Flash_Tool to do full chip erasing. The erasing operation is as follows:
a. Boot into the uboot console (if possible), enter "debug" in the uboot console, and disconnect the serial terminal tool, as shown below:

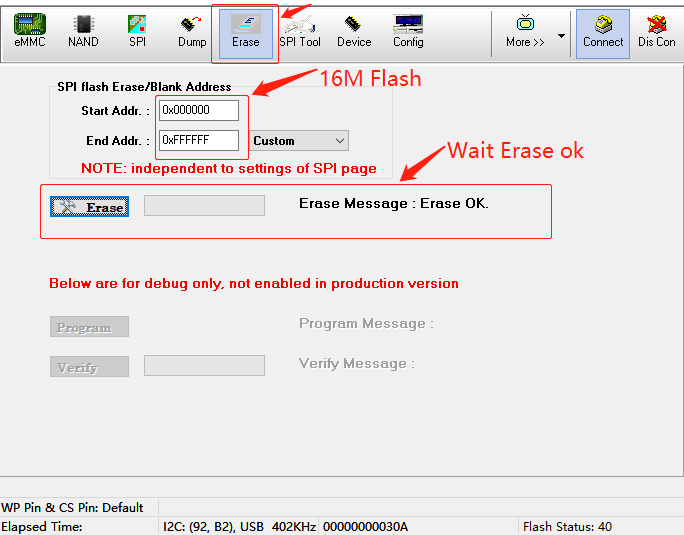
b. Use Flash_Tool to erase the entire Flash, as shown in the figure below, after the Flash_Tool is successfully connected, switch to the Erase interface, fill in the Start-End Addr erasing range (calculated by the size of the full Flash), click Erase and wait for ok.
2.3. Burn image
Please referring to SSD_Burning Instructions, choose a suitable method to burn the image to the clean NorFlash.
2.4. Dump flash
Use the Flash_Tool tool to dump the successfully burned Flash in a clean state, and the generated bin can be used as a master slice. The dump operation is as follows, just wait for the dump to be successful (note that the address of the dump should fill in the full range of the flash)

2.5. Verify the correctness of the master
To verify the correctness of the master slice, you can use Flash_Tool to burn in sequence from the 0 address of the Flash (the burning time may be longer). After the burning is successful, turn it on and see if it is normal.
