SSD_Environment setup
1. Overview
This article focuses on SSD20X and includes two parts:
-
Linux compilation environment
-
SDK compilation method
2. Build The Compilation Environment
2.1. Debugging Environment
Developing and debugging by cross-compilation, that is the form of "host + target". The host and the target generally use serial port connection or network connection. As shown below.
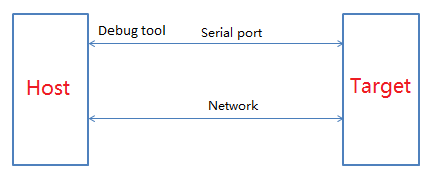
Figure 2-1 Debug connection
-
The serial port debugging is only used to get the log, you can directly use the serial device to connect to the RX/TX of uart0 (Cosole default baud is 115200).
-
Use SSD platform tools to debug/burn/read and write registers (such as Flash_Tool), you need to purchase special Debug Tool.
2.2. Linux Server
Recommended to use Ubuntu 16.04.
The installation process of lib and tool used in SDK compilation is as follows.
2.3. Install ubuntuserver
SSD201(64M DDR)
-
Install VMware Worksation.
-
Select the iso of 1604 and install it.
-
Click
Finishto complete the easy installation, the system will automatically complete the remaining steps. -
Install VMtools for copying, share the windows directory to ubuntu. Click here for reference.
The ubuntu installation is complete, then set up the development environment.
2.4. Install Lib And Tool
-
The first step to install ubuntu for the first time is to set the root password:
# sudo passwd, enter the password until the prompt is successful. -
Add
user accountwhen create virtual machine, personal accounts (such asbeal.wu) cannot be entered when creating ubuntu (the format error will be prompted), and the system will prompt that the account is illegal. After entering the system, use the command# sudo adduser beal.wu--forceto create it, When prompted to enter account information, just keep pressing Enter. -
After the account is created, install the relevant tools and compilation environment, execute the following commands:
# sudo apt-get

install libncurses5-dev

libncursesw5-dev
When prompted that
beal.wucannot execute sudoers, modify it as follows:sudo chmod u+w /etc/sudoers vi /etc/sudoers; reference root ALL=(ALL:ALL) ALL, add beal.wu ALL=(ALL:ALL) ALL
Then execute sudo to install, it is recommended to execute
#sudo apt-get updateafter installation. -
Install
sambato share linux files to windows.# sudo apt-get install samba samba-common # sudo smbpasswd -a beal.wu (add samba account for windows to access the linuxsamba directory) modify /etc/samba/smb.conf [beal.wu] path=/home/beal.wu public=yes writable=yes valid users=beal.wu available=yes browseable=yes guest ok = yesAfter this, samba configuration is complete, restart samba, test access to samba from windows: \\192.168.1.11 (your ubuntu ip)
-
Install
sshfor login debugging.sudo apt-get install openssh-server;
-
Some tools need to be installed for SDK compilation, or the compilation will fail.
# sudo apt-get install libc6-dev-i386
# sudo apt-get install lib32z1 lib32ncurses5
# sudo apt-get install libuuid1:i386
# sudo apt-get install cmake
# sudo apt-get install libncurses5-dev libncursesw5-dev
# sudo apt install bc
# sudo apt-get install xz-utils
# sudo apt-get install automake
# sudo apt-get install libtool
# sudo apt-get install libevdev-dev
# sudo apt-get install pkg-config
The above tool and lib are necessary and install all before compilation. You can try not to install first, and check related errors after compiling.
-
If the default is
sh, please change it tobash.Sudo rm /bin/sh Sudo ln –s /bin/bash /bin/sh
-
Install toolchain
-
Copy
gcc-arm-8.2-2018.08-x86_64-arm-linux-gnueabihf.tar.gzto/opt/directory -
Unzip toolchain
-
In order to avoid manual export every time, set the toolchain to the environment variable.
-
Add
export PATH=/opt/gcc-arm-8.2-2018.08-x86_64-arm-linux-gnueabihf/bin:$PATHin/etc/profile.
-
-
Execute compilation.
2.5. Install Cross Compilation Tool
We provide gcc-arm-8.2-2018.08-x86_64-arm-linux-gnueabihf to compile the glibc version.
Glibc: 2.28
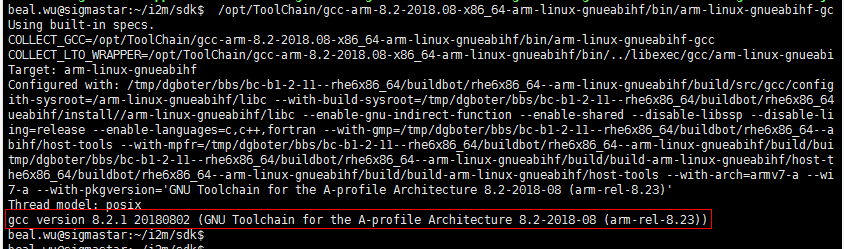
Figure2-2
3. SDK
3.1. Get SDK
Please consult FAE to obtain the corresponding SDK from FTP. The complete SDK code contains the following parts:

boot: Uboot source code
kernel: kernel source code, version: 4.9.84
project: the part for compiling and making image, including the non-open source part of lib/ko, and the external api header file reference
SDK: test Demo/application packaging framework
3.2. Unzip SDK
tar zxvf project-TAKOYAKI_DLC00V030.tar.gz
tar zxvf boot-TAKOYAKI_DLC00V030.tar.gz
tar zxvf kernel-TAKOYAKI_DLC00V030.tar.gz
tar zxvf sdk-TAKOYAKI_DLC00V030.tar.gz
4. Compile SDK
The SDK released supports Nor Flash and Nand Flash, which can be used according to actual conditions.
4.1. Specify compilation chain
Configure the compilation chain:
declare -x ARCH="arm"
declare -x CROSS_COMPILE="arm-linux-gnueabihf-"
4.2. Compile Boot
-
Enter the boot root directory
-
Select config according to Flash
Nand Flash Nor Flash make infinity2m_spinand_defconfig; make menuconfig; make infinity2m_defconfig; make menuconfig; -
Execute
make clean;make -j8(According to the server configuration, multi-threaded compilation can be supported) -
Generate image, please release it to the project when packaging
Nand Flash Nor Flash u-boot_spinand.xz.img.bin u-boot.xz.img.bin release to the project directory:
cp u-boot_spinand.xz.img.bin
project\board\i2m\boot\spinand\ubootrelease to the project directory:
cp u-boot.xz.img.bin
project\board\i2m\boot\nor\uboot
4.3. Compile Kernel
-
Enter the kernel root directory
-
Select config according to Flash
Nand Flash Nor Flash make infinity2m_spinand_ssc011a_s01a_minigui_defconfig;
make menuconfig;make infinity2m_ssc011a_s01a_minigui_defconfigmake ;
menuconfig; -
Execute
make clean;make -j8(According to the server configuration, multi-threaded compilation can be supported) -
Generate image, please release it to the project when packaging
Nand Flash Nor Flash arch/arm/boot/uImage.xz arch/arm/boot/uImage.xz release to the project directory:
project\release\nvr\i2m\011A\glibc\8.2.1\bin\kernel\spinandrelease to the project directory:
project\release\nvr\i2m\011A\glibc\8.2.1\bin\kernel\nor
4.4. Compile Project
-
Enter the project root directory
-
Choose config according to Flash_Type and DDR difference
Nand Flash SSD201(64M DDR) SSD202(128M DDR) ./setup_config.sh ./configs/nvr/i2m/8.2.1/spinand.glibc.011a.64 ./setup_config.sh ./configs/nvr/i2m/8.2.1/spinand.glibc.011a.128 Nor Flash SSD201(64M DDR) ./setup_config.sh ./configs/nvr/i2m/8.2.1/nor.glibc-squashfs.011a.64 -
Release kernel related resources (This step needs to be performed only when changing to the config of kernel)
Nand Flash:
./release.sh -k ${kernel_path} -b 011A -p nvr -f spinand -c i2m -l glibc -v 8.2.1;Nor Flash:
./release.sh -k ${kernel_path} -b 011A -p nvr -f nor -c i2m -l glibc -v 8.2.1 -
Execute
make image(Does not support multi-threaded compilation) -
Generate image in
project/image/output/images
After the image is generated, refer to the burning instructions/master production to burn to the board.
5. Third-party IDE Instructions
Flyting development reference comake: http://dev.comake.online/thread-90-1-1.html