SSD_Burning Instructions
1. Burning Tool
-
Use Tftp32 to burn when booting to Uboot board normally;
-
Use Flash_Tool to burn when booting to the Uboot board abnormally.
1.1. Flash_Tool(ISP_Tool) Burning
It is suitable for empty burning or when the board cannot enter the Uboot console for burning.
-
Enter the Uboot console, enter debug (if you can enter normally), the uboot serial port is disabled
-
Close the serial port debugging tool
-
Booting to Uboot requires the necessary partition and the starting address of the partition
The difference between Nand/Nor is as follows:
-
Nand Flash
Partition file Initial address GCIS.bin 0x000000 IPL.bin 0x140000 IPL_CUST.bin 0x200000 u-boot_spinand.xz.img.bin 0x2C0000 -
Nor Flash
Partition file Initial address IPL.bin 0x00000 IPL_CUST.bin 0x10000 MXP_SF.bin 0x20000 u-boot.xz.img.bin 0x30000
-
-
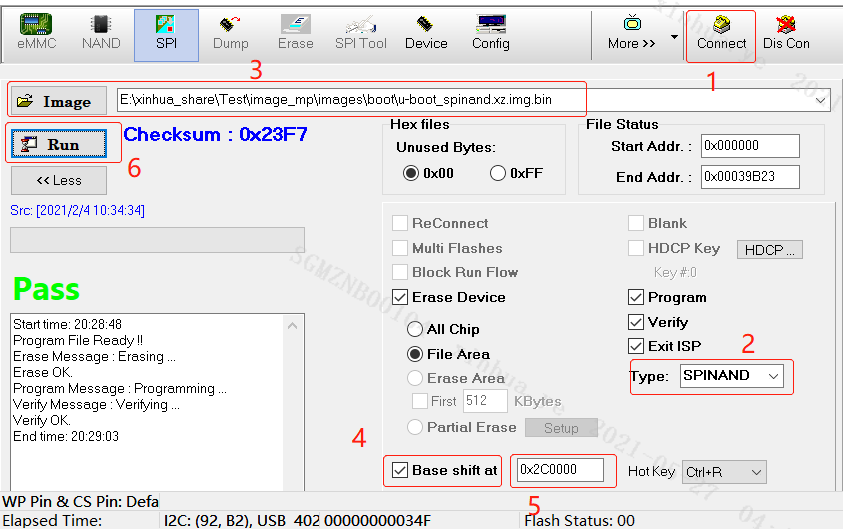
Open Flash_Tool and burn sequentially according to the above partition and address
-
Click Connect(Ensure that the serial port tool is closed to avoid contention for serial port resources)
-
Select Flash Type (Nand Flash/Nor Flash)
-
Select the img corresponding to the partition to be burned, take u-boot_spinand.xz.img.bin as an example
-
Check
Base shift at, choose to start from base address 0 -
Fill in the starting address of the corresponding img partition (u-boot_spinand.xz.img.bin corresponds to 0x2C0000)
-
Click Run and wait until Pass.
-
-
Burn the partition in step 3 according to the Flash Type, and restart after burning
1.2. Tftp Burning
It is only for the case where you can enter the Uboot console.
-
Open tftpd32, select the image directory that needs to be burned

-
Enter the Uboot console and set the IP
setenv serverip 172.19.24.145; //IP of the environment where Tftp is located

setenv ipaddr 172.19.24.X; //Set the ip of the board; ensure that it is in the same network segment as Tftp

saveenv;
-
Enter estart (If the NIC is disabled by default in the Uboot phase)
-
Enter estar (The difference with full burning is that you can estar the script in
auto_update.txt, and burn any single partition)