ISP HDR Tuning Guide
Version 0.2
1. HDR TUNING GUIDE
High Dynamic Range (HDR) combines images from two different exposure conditions to produce a higher dynamic range than traditional single exposure (linear) mode.

Figure 1-1: HDR On / HDR Off
The adjustment of HDR is mainly focused on the distribution of screen brightness, i.e. how to squeeze as much most-wanted information as possible into the 8-bit range of 0~255. So first we will start with the AE settings, then cut into the HDR/WDR adjustments related to brightness distribution, and finally to the NR/Edge collocation and trouble-shooting of some frequently asked questions.
1.1. AE Settings
HDR mode uses a combination of long and short exposures to synthesize an area that is easily overexposed with short exposure, and to thereby obtain the original information on the long exposure of the overexposed area. Therefore, the exposure ratio (HDR Ratio) of the long and short exposure frames is directly related to the dynamic range of HDR.
However, the HDR Ratio is not the larger the better. The short-exposure image must be multiplied by the HDR ratio to match the long-exposure image linearly. Therefore, the larger the HDR Ratio, the more gain is multiplied and the more serious the noise problem is with the image.
There are three main parameters in AE settings, as follows:
-
Max Short Shutter
-
HDR Ratio
-
AE Target
Max Short Shutter: This parameter is related to the frames-per-second capability and the frequency of sensor operation. The maximum limit for this can be derived from the sensor spec. and our recommendation is to set this parameter to the maximum value available.
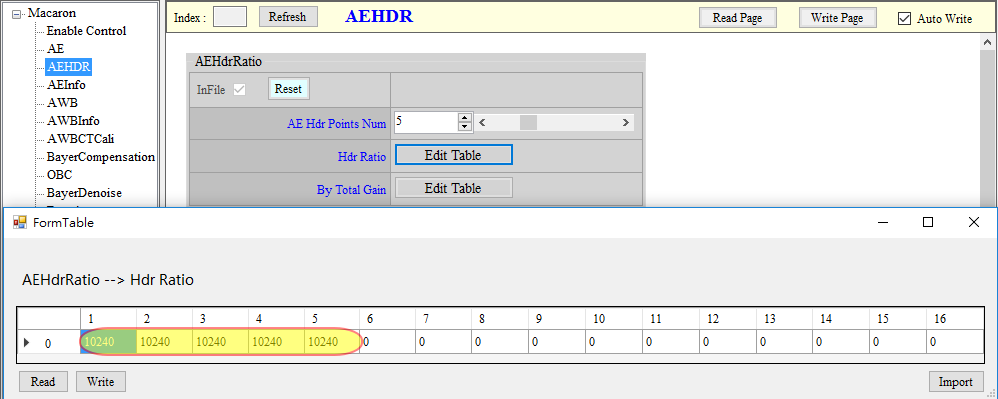
HDR Ratio: This parameter needs to be determined based on the dynamic range requirement of the scene involved. Note that the HDR ratio decides the “maximum” dynamic range of the HDR effect; the actual dynamic range of the screen depends on the settings of the Global Dark Tone Enhance feature in the subsequent WDR adjustment. Hence, the HDR ratio does not necessarily have to be very high. On the other hand, the HDR ratio, if too low, will restrict the exposure time of long exposure, causing the long exposure frame to be multiplied by the gain before the expected timing and producing a noise problem as a result. The value normally suggested is 10x (=10240). 16x (= 16384) is also supported.
AE Target: This parameter controls the global brightness of the screen, and is normally set to the same value as that used in single-frame linear mode. If the noise in dark area is not under good control with the final HDR effect after the WDR adjustment, you can adjust the target to allow AE to brighten the screen. The noise issue will be smaller than that with WDR.
-
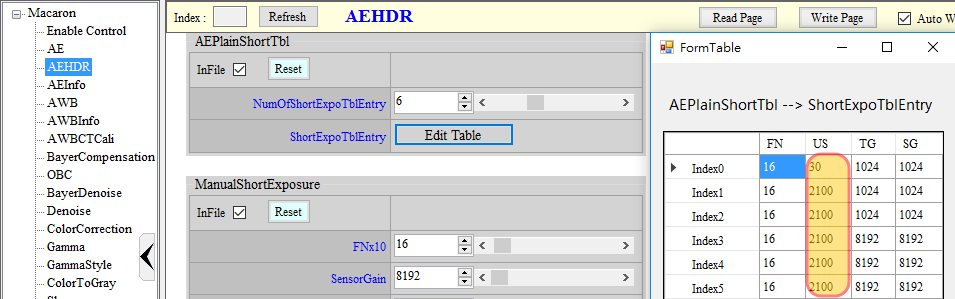
Calculate the longest and shortest exposure time for short exposure based on sensor spec and fps, and fill out the calculated results in the short exposure table separately. Then input the intended HDR ratio in the HDR ratio field. Different HDR ratio by total gain (represented by the horizontal axis) can be set.
-
According to the HDR Ratio, multiply the Shutter in the short exposure table by the HDR Ratio and fill it into the long exposure table (for example, short exposure 2100 μs, long exposure 21000 μs).

1.2. HDR Settings
The HDR API contains basic HDR parameter settings, wherein SensorExpRatio needs to be set according to the HDR ratio discussed in the preceeding AE section. The rest of the parameters are described below:
| NrEn | Extra 2DNR for short exposure frames Enabling this parameter can reduce the noise of short-exposure images; note, however, if there occurs a blurry image problem. |
|---|---|
| YwtTh1 & YwtTh2 | Upper and lower threshold of long and short exposure in HDR synthesis 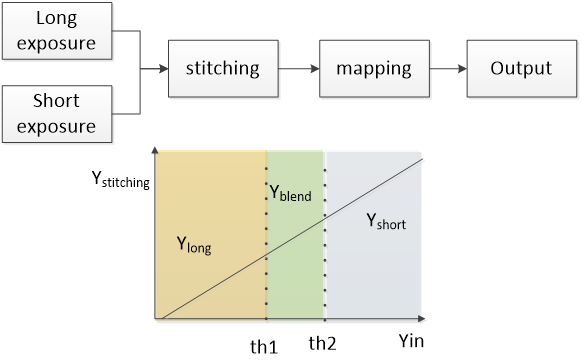 Long-exposure image data will be selected for brightness below Th1, short exposure will be used for Th2 and above, and blending of long and short exposures will be applied to brightness in between th1 and th2. To adjust, first set th2 to 0, then change th1 to the highest possible extent without any spot of color deviation caused by long exposure saturation in the image (See Note 1). Once Th1 is decided, set th2 to a value between th1 + (50~100). If th2 is large enough, the noise performance of the bright area will be improved, but it also means that the details will be lost (due to blending of over-exposed and detailless long exposure). |
| NoiseLevel | Noise level, for determination of motion The horizontal axis represents brightness. The larger the value, the more likely an area will be judged as static. Default value is recommended. Fine-tune the default value if needed. |
| MotionTh | Motion threshold If the difference between long and short exposures after alignment, minus NoiseLevel, is greater than MotionTh, the area is judged as a dynamic area, and the long and short exposures will be blended according to the degree of motion. If smaller than MotionTh, the area is judged as a static area, and the long and short exposures will be blended according to brightness. |
| MotionAdjLut | Horizontal axis of dynamic area long exposure table The horizontal axis represents the degree of motion from static to dynamic. The vertical axis represents the blended long exposure ratio. The larger the value, the more long exposure is applied; the smaller the value, the more short exposure is applied. Applying more short exposure will render the image noisier, but the ghost image problem will be reduced. In general, more long exposure is used for relatively more static area, while more short exposure used for relatively more dynamic area. Hence, the curve will be a decreasing curve. |
| SensorExpRatio | Sensor exposure ratio of Long and short exposure frames In normal cases, the value should be identical with the one provided for the HDR Ratio referred to in AE Settings section. |
| DynRatioEn | Dynamic long and short exposure brightness compensation If the sensor’s actual difference in brightness between long and short exposures deviates from the set SensorExpRatio value, enabling this function can remedy the difference to a certain degree (for example, when the calculated long and short exposure shutter value cannot exactly be a specified multiple due to precision issue, you can enable this function to eliminate the difference). |
| DynRatioSrcSel | Reference frame selection for dynamic long and short exposure brightness compensation 0: Long exposure, 1: Short exposure |
| YSrcSel | Static area brightness source The long and short exposure ratio for static area will be decided based on current brightness (Yin) and YwtTh1, YwtTh2 settings. The Yin value can be obtained by 4 methods: 0: Long exposure surrounding average, 1: Long exposure surrounding maximum value, 2: Short exposure surrounding average, 3: Short exposure surrounding maximum value. The default setting is 1; adjustment is not recommended. |
| NoiseLevelSrcSel | Horizontal axis of NosieLevel, representing the Y source Noise level will be determined by Y. The Y value can be obtained by 4 methods: 0: Long exposure, 1: Short exposure, 2: Smaller value of long and short exposure, 3: Greater value of long and short exposure. The default setting is 3; adjustment is not recommended. |
| MotionMaxVal | Maximum value of dynamic area The difference between long and short exposures after alignment, minus NoiseLevel, will be futher checked by this maximum value. The smaller the value, the smaller the maximum value. That is, a small difference will be regarded as a big motion; as a result, the place where noise occurs will more easily be judged as a dynamic area, causing more short exposure to be applied and the image noisier. The default setting is 3; adjustment is not recommended. |
| MotionLumaTh | Dynamic area full short exposure Y threshold If judged as a dynamic area and the Y value is greater than this threshold, full short exposure will be used. The default setting is 1000; adjustment is not recommended. |
| MotionAdjSft | Horizontal axis of dynamic area long exposure ratio The horizontal axis represents the difference between long and short exposures, minus NoiseLevel, namely, from static to dynamic. Adjustment is not recommended. |
Note 1: Since AWB gain is applied before HDR synthesis, areas where long-exposure image saturation occur are often left with various abnormal colors but not necessarily white. There is one thing in common, however -- details will be lost in all these areas. Therefore, you need to adjust th1 downward to prevent over-exposed long exposure section from appearing in the final image.

1.3. WDR Adjustment
After the long and short exposure images are synthesized in 16-bit space by HDR, the WDR Global Dark Tone Enhance will be used to re-allocate the brightness and reduce it to 12-bit. Generally, we need to use Global Dark Tone Enhance to make the long-exposure dark area data appear brighter, or have it restored to the brightness of the normal single frame. Only medium/high brightness area or overexposed area is integrated into the short exposure frame information through the curve.
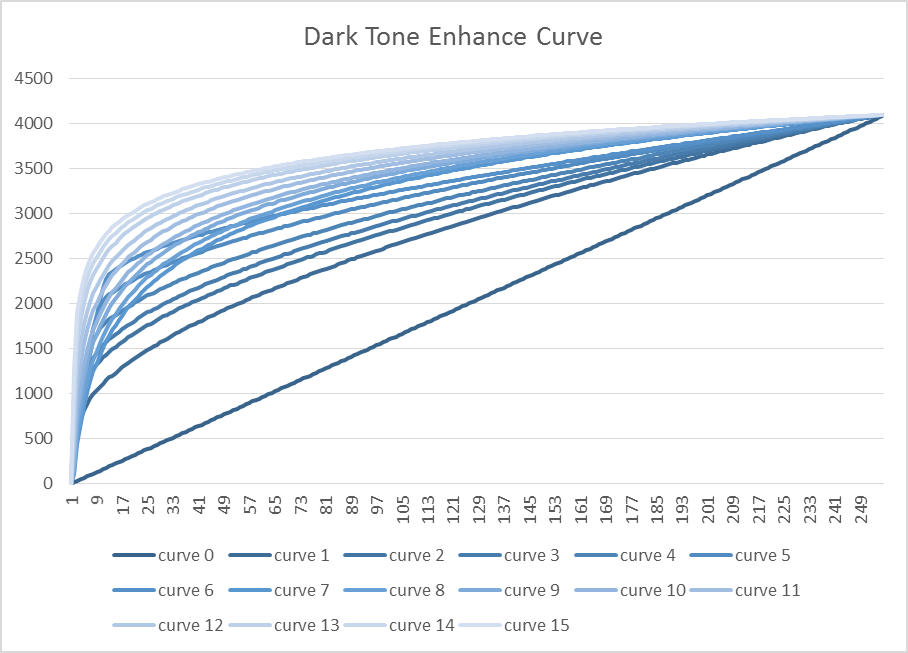
Global Dark Tone Enhance is pre-configured with 16 curves, where 0 is a curve that maintains linearity without brightness enhancement. As the number rises, the degree of brightness enhancement will increase gradually, but the amptitude of the 8th after the 7th curve will first decrease and then rise again. Curves 0~7 and curves 8~15 can be regarded as two different types of curves to achieve the brightness improvement. You can employ both to choose the one yielding more desirable effect. If there is still a dark area after the adjustment by Global Dark Tone Enhance function, you can try adjusting the main Gamma to brighten the dark area.
After Global Dark Tone Enhance brightens the global screen brightness, there usually exists a problem of poor contrast and insufficient permeability. In this case, you can increase WDR strength a little to add some LTM (Local Tone Mapping) effect to the curve, thereby enhancing the sense of hierarchy. The list of the other adjustment parameters is as follows:
| BoxNum | Change the scale of local analysis in Local Tone Mapping The larger the number, the smaller the scale of the analysis, and the smaller the range of brightness optimization can be observed; on the other hand, the larger the scale, the more natural the look and feel of the picture will be. It is recommended to set to the maximum and minimum values for effect comparison and then adjust the parameter in the preferred direction. It is not recommanded to change the curve by ISO since flicker might occur when the curve is changed. |
|---|---|
| PreEnhance | Ratio between bright area and dynamic area The greater the value, the bigger the dynamic area allocated to the bright area. Parameter range: 1~6; default is 2. Paramters 11~15 are provided for adjustment based on value 2. The greater the value, the brighter the dark area, but the hazier the overall picture. All other values are invalid. It is not recommanded to change the curve by ISO since flicker might occur when the curve is changed. PreEnhance will be of use once GammaSyncEn is enabled. |
| AutoDetailEnhance | Automatic Detail Enhancement If it is turned on, the system will automatically do corresponding sharpness enhancement during the process of brightening and darkening. |
| ManualDetailEnhance | Manual Detail Enhancement When the automatic detail enhancement is unchecked, the sharpness enhancement control that increases or decreases with WDR gain will refer to Manual Detail Enhance instead. 128 represents 1x gain. Values smaller than 128 will cause the image to become blurry, while values greater than 128 will render the image sharper. |
| GlobalDarkToneEnhance | Global Dark Tone Enhance Curve A total of 16 default curves are available for selection. For details, please refer to the descriptions in the first half of this chapter. It is not recommanded to change the curve by ISO since flicker might occur when the curve is changed. If different brightness is desired for different iso, you can use WDRStrByY and Strength to achieve the intended effect. GlobalDarkToneEnhance will be of no use once WDRCurve is enabled. |
| WDRStrByY | WDR Strength Control by Y The intensity of WDR can be controlled according to different brightness positions in the picture. The table from left to right corresponds to blocks from dark to bright. It is recommended to fine tune on the basis of the default setting. |
| Strength | Local Tone Mapping Strength Can be used to improve the contrast and layering of the picture after adjustment by GlobalDakToneEnhance. |
| DarkLimit | Dark area balancing strength limit After adjusting other parameters of WDR, if any adverse effects such as color abnormality and excessive noise emerge as a result of dark area balancing, try to adjust the DarkLimit setting to reduce these side effects by limiting the strength of dark area balancing. |
| BrightLimit | Bright area balancing strength limit Usage same as that of DarkLimit above, only the area is changed to bright area. |
| GammaSyncEn | The connection control between WDR and Gamma Connecting WDR with Gamma will get a better WDR effect but flicker might occur if the Gamma curve is changed. As an example, if the Gamma curve is changed by iso, we suggest GammaSyncEn be disabled. |
| WDRCurve | Global Dark Tone Enhance Curve Similar to GlobalDarkToneEnhance, this parameter provides manual control of the global dark tone enhance curve. |
2. FREQUENTLY ASKED QUESTIONS
-
Flicker
In HDR mode, since short-exposure shutters are often unable to be set to the shortest physical limit of de-flicker, flicker problems are often inevitable in short-exposure areas under cathode ray tube light sources. In this case, we recommend adjusting fps to a multiple of the power frequency to fix the banding problem without scrolling (e.g. 60Hz/30fps, 50Hz/25fps). Note that it is not yet possible to eradicate this problem.
-
Broken-like flashing in long and short exposure blending area

This problem is often caused by the mismatch between long and short exposure brightness. It is recommended to check whether the HDR Ratio setting in the AE is consistent with the SensorExpRatio setting in the HDR API, or disable the dynamic compensation mechanism of the Dynamic Ratio function to allow the long-short exposure synthesis to refer only to the setting of YwtTh1 & YwtTh2. Then observe whether there is a clear boundary at the junction of the long and short exposures, so as to clarify if there exists a problem of brightness mismatch.
-
Image ghosting

If this happens, making short-exposure image the main reference can eliminate the ghost image problem. Some useful measures include:
-
Lowing MotionTh to loosen the criteria for judgement of dynamic area. But if this parameter is set too low, flat area can be judged also as a dynamic area, thus causing short exposure to be used and the image to be noisier.
-
Lowering MotionAdjLut, to increase use of short exposure in dynamic area, but then the image will appear noisier too.
-
Fine-tuning NosieLevel, if adjustment by Y is needed.
-
-
Local color shift and detail loss in areas with medium to high brightness
To deal with this issue, try lower the YwtTh1 value of HDR API.
-
Indoor/outdoor/backlit face too dark

If this happens, try the following adjustment in the order indicated:
-
Set PreEnhance to a value in the range 11~15. The greater the value, the brighter the dark area and the blurrier the overall image.
-
Adjust WDRcruve to brighten up the dark area.
-
Increase the AE target, but then the detail in outdoor over-exposed area can be lost.
-
Set the number of BoxNum to a medium value, avoiding values overly large. Although a greater BoxNum can achieve a better contrast, face at a relatively dark area will appear darker.
-
For dark area, set WDRStrByY to a medium value, avoiding values overly small. If dark area balancing is to be limited, adjust the DarkLimit parameter.
-