3. Calibrator
3.1. 使用方法
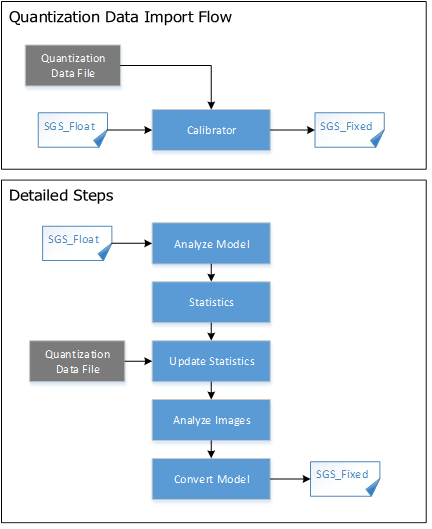
Calibrator工具的位置在 SGS_IPU_SDK/Scripts/calibrator/calibrator.py。 该工具是将SigmaStar浮点网络模型转换为SigmaStar定点网络模型。 在SGS_IPU_SDK ⽬录下运⾏以下脚本,输出Library的路径(已经做过该步骤可忽略):
cd ~/SGS_IPU_SDK
source cfg_env.sh
python3 calibrator.py \
-i ~/SGS_Models/resource/detection/coco2017_calibration_set32 \
-m ~/SGS_Models/tensorflow/ssd_mobilenet_v1/ssd_mobilenet_v1_float.sim \
-c Detection \
-n ~/SGS_Models/tensorflow/ssd_mobilenet_v1/ssd_mobilenet_v1.py \
--input_config ~/SGS_Models/tensorflow/ssd_mobilenet_v1/input_config.ini \
--num_process 20
或者可以使用传入 指定图片路径列表文件 的形式:
python3 calibrator.py \
-i ~/SGS_Models/resource/detection/file.list \
-m ~/SGS_Models/tensorflow/ssd_mobilenet_v1/ssd_mobilenet_v1_float.sim \
-c Detection \
-n ~/SGS_Models/tensorflow/ssd_mobilenet_v1/ssd_mobilenet_v1.py \
--input_config ~/SGS_Models/tensorflow/ssd_mobilenet_v1/input_config.ini \
--num_process 20
对该工具参数的具体说明如下:
3.1.1 必选参数
-i,--image : 图片文件或图片文件夹路径或 指定图片路径列表文件 。
-m, --model : 浮点网络模型文件路径。
-c, --category : 模型的类别,主要有Classification / Detection / Unknown
Classification: 模型有1个输出,会根据输出排序输出分数由高至低的前5个。Detection: 模型有4个输出,会根据输出转换为输入图片的bbox位置以及类别。只支持SigmaStar后处理方法 [SigmaStar后处理模块]。其他后处理请使用Unknown。Unknown: 模型输出不属于上述两种类型,会输出全部的Tensor数值。
--input_config : input_config.ini文件路径,该文件为input tensor的配置信息。 具体设置方法见 [input config配置信息设置]2.2. input config配置信息设置).
-n, --preprocess : 前处理方法,与图片前处理方法相关,详见[3.2. 图片前处理方法]。 也可以完成前处理文件配置后,给定前处理文件路径。
Please Note:
-
若模型为 多输入 时,
-n,--preprocess参数用法需要多个前处理方法,例如 -n preprocess1.py,preprocess2.py 或者 --preprocess preprocess1.py,preprocess2.py -
-i/--image参数传入 指定图片路径列表文件 的形式:
网络模型为单输入时:
~/SGS_IPU_SDK/image_test/2007000364.jpg
~/SGS_IPU_SDK/image_test/ILSVRC2012_test_00000002.bmp
...


网络模型为多输入时:
~/SGS_IPU_SDK/image_test/2007000364.jpg,~/SGS_IPU_SDK/image_test/ILSVRC2012_test_00000002.bmp
~/SGS_IPU_SDK/image_test/2007000365.jpg,~/SGS_IPU_SDK/image_test/ILSVRC2012_test_00000003.bmp
...
3.1.2 可选参数
-o, --output : 模型输出路径。指定定点网络模型输出数据位置:指定到文件夹,将自动以浮点网络模型文件前缀命名,后接fixed.sim;指定到具体路径和文件名,将以指定路径和文件名命名定点网络模型;不指定该参数,将以浮点网络模型文件路径储存定点网络模型。
--num_process : 进程数,运行同时运行的进程数。(可选参数,不加该参数默认为10个进程)。
--quant_level : 选择量化等级:[L1, L2, L3, L4, L5]。默认L5量化等级,等级越高,量化精度越高,量化速度会相应变慢。各量化等级说明:
L1: 采用最大最小值快速对比数据量化,速度较快。L2: 采用快速对比数据量化权重数据。L3: 对统计信息做进一步分析,近似拟合原有数据分布。L4: 近似拟合权重数据分布,并建议升级某些卷积为16bit量化。L5: 采用高精度数据分析方法,极大限度拟合原有数据分布,并建议升级某些卷积为16bit量化。
3.1.3 注意事项
- 浮点网络模型转换成定点网络模型需要30张左右训练图片用来分析和量化定点网络模型的数据,因此在转换中,
-i/--image参数后应接图片文件夹的路径。当然,如果-i/--image参数给定单张图片文件的路径,依然可以转换为定点网络模型,但是其模型精度可能会收到影响。另外,由于对精度要求不同,在转换网络中在input_config.ini文件中可以针对卷积配置不同的量化信息,从而获得精度和速度的平衡。 - calibrator工具会寻找系统变量从而获得对应阶段任务所需工具路径,因此默认情况下参数
-t/--tool不用指定相关工具的位置。 - 使用calibrator将浮点网络模型转换为定点网络模型时,会在运行目录下产生log目录,log目录下的tensor_min_max.txt文件记录了网络的每层输入和输出的最大与最小值,将在之后分析数据时有用。log目录下的内容会在下一次使用calibrator时删除,请注意保存。
3.2. 图片前处理方法
由于不同网络模型的前处理方式不尽相同,为了能够在转换网络时尽可能减小精度的丢失,应该使用与训练相同的图片前处理方式,每种前处理方式需独立编写python文件。 以下两种方式保存前处理Python文件均可被调用:
- 请将文件保存到 SGS_IPU_SDK/Scripts/calibrator/preprocess 文件夹内,并在preprocess_method/init.py 文件中增加文件名称。在使用calibrator或simulator时,
-n/--preprocess参数为编写的文件名称,不需要指定编写文件的路径。 -n/--preprocess参数为前处理Python的文件路径。
下面以caffe_resnet18网络为例,编写图片前处理文件。 编写图片处理函数(函数名称不限),返回np.array 格式的图片数据,函数必须包含2个参数:
-
图片路径
-
归一化标记(norm=True)
归一化标记是为了区分网络模型是否是浮点模型。因为在浮点网络模型阶段,图片的归一化需要在送进网络前处理好。但是定点网络模型和离线网络模型已经包含了input_config.ini文件的设置信息,能够将图片数据自行做归一化处理,因此送进网络模型的数据不需要做归一化,这与在SigmaStar硬件上处理方式相同。
import cv2
import numpy as np

def get_image(img_path, resizeH=224, resizeW=224, resizeC=3, norm=True, meanB=104.0, meanG=117.0, meanR=123.0, std=1.0, rgb=False, nchw=False):
    img = cv2.imread(img_path, flags=-1)
    if img is None:
        raise FileNotFoundError('No such image: {}'.format(img_path))

    try:
        img_dim = img.shape[2]
    except IndexError:
        img_dim = 1
    if img_dim == 4:
        img = cv2.cvtColor(img, cv2.COLOR_BGRA2BGR)
    elif img_dim == 1:
        img = cv2.cvtColor(img, cv2.COLOR_GRAY2BGR)
    img_float = img.astype('float32')
    img_norm = cv2.resize(img_float, (resizeW, resizeH), interpolation=cv2.INTER_LINEAR)

    if norm and (resizeC == 3):
        img_norm = (img_norm - [meanB, meanG, meanR]) / std
        img_norm = img_norm.astype('float32')
    elif norm and (resizeC == 1):
        img_norm = (img_norm - meanB) / std
        img_norm = img_norm.astype('float32')
    else:
        img_norm = np.round(img_norm).astype('uint8')

    if rgb:
        img_norm = cv2.cvtColor(img_norm, cv2.COLOR_BGR2RGB)

    if nchw:
        # NCHW
        img_norm = np.transpose(img_norm, axes=(2, 0, 1))

    return np.expand_dims(img_norm, 0)

def image_preprocess(img_path, norm=True):
    return get_image(img_path, norm=norm)
def image_preprocess(img_path, norm=True):
    return get_image(img_path, norm=norm)
在SGS_IPU_SDK/Scripts/calibrator/preprocess_method/init.py 文件中添加刚刚编写的python文件
_all_ = ['caffe_mobilenet_v2', 'caffe_resnet18', 'caffe_resnet50_conv', 'mobilenet_v1']
-n/--preprocess 参数为caffe_resnet18 即可调用刚刚编写的图片前处理文件。 如果不在SGS_IPU_SDK/Scripts/calibrator/preprocess_method/init.py 文件中增加,-n/--preprocess 参数为caffe_resnet18.py文件路径,也可以为图片做前处理。 3.3. 卷积量化选项
浮点网络模型转换到定点网络模型时,卷积量化支持 UINT8 和 INT16 两种量化方式。使用calibrator时, --quant_level 选择L2、L3或L4时会根据统计信息自动配置卷积的量化方式,如果需要强制指定,指定方式在 [2.2.3 CONV_CONFIG]中有说明。可对某些卷积层单独设置INT16量化,或者对全部卷积INT16量化;不设置时默认使用calibrator的推荐量化方式。
3.4. calibrator_custom.calibrator
calibrator_custom.calibrator是基于Python的快速量化和转换模型的模块。使用calibrator_custom.calibrator可以更方便灵活的对多输入、多段网络进行量化和转换。目前基于的docker环境,提供Python3.7的预编译的Python模块,使用方法和相关API接口如下:
import calibrator_custom
model_path = './mobilenet_v2_float.sim'
input_config_path = './input_config.ini'
model = calibrator_custom.calibrator(model_path, input_config_path)
calibrator_custom.calibrator 时,需要给定float.sim模型的路径和对应的input_config.ini的路径,用于创建calibrator的实例。参数给定错误,将无法成功创建calibrator实例,并返回ValueError。 3.4.1 calibrator_custom.calibrator方法
get_input_details
返回网络模型输入信息(list)
input_details = model.get_input_details()
>>> print(input_details)
[{'index': 0, 'shape': array([ 1, 513, 513, 3], dtype=int32), 'name': 'sub_7', 'dtype': <class 'numpy.float32'>}]
返回的list中根据模型输入个数包含以下dict信息:
index: 输入Tensor序号
name: 输入Tensor名称
shape: 输入Tensor的形状
dtype: 输入Tensor的数据类型
get_output_detail
返回网络模型输出信息(list)
output_details = model.get_output_details()
>>> print(output_details)
[{'index': 0, 'shape': array([ 1, 257, 257, 30], dtype=int32), 'name': 'MobilenetV2/Conv/Conv2D', 'dtype': <class 'numpy.float32'>}]
返回的list中根据模型输出个数包含以下dict信息:
index: 输出Tensor序号
name: 输出Tensor名称
shape: 输出Tensor的形状
dtype: 输出Tensor的数据类型
set_input
设置网络模型输入数据
model.set_input(0, img_data)
输入数据,0为输入Tensor的index,可以在get_input_details()的返回值里拿到。img_data是与model输入shape和dtype相同的numpy.ndarray格式数据,错误的shape或dtype,将导致set_input返回ValueError。如果模型有多个输入,可以多次调用set_input,根据get_input_details()的返回值里拿到index设置对应Tensor的输入数据。
invoke
模型运行一次
model.invoke()
调用invoke前请先使用set_input设置输入数据,未调用set_input直接调用invoke会返回ValueError。
get_output
获取网络模型输出数据
result = model.get_output(0)
获取输出数据,0为输出Tensor的index,可以在get_output_details()的返回值里拿到,返回numpy.ndarray格式输出数据。如果模型有多个输出,可以多次调用get_output,根据get_output_details()的返回值里拿到index获取对应Tensor的输出数据。
get_tensor_details
返回网络模型每个Tensor的信息(list)
tensor_details = model.get_tensor_details()
>>>print(tensor_details)
[{'dtype': 'FLOAT32', 'name': 'MobilenetV2/Conv/Conv2D', 'qtype': 'INT16', 'shape': array([ 1, 257, 257, 30], dtype=int32)}, {'dtype': 'FLOAT32', 'name': 'MobilenetV2/Conv/Conv2D_bias', 'qtype': 'INT16', 'shape': array([ 2, 30], dtype=int32)}, {'dtype': 'FLOAT32', 'name': 'MobilenetV2/Conv/weights/read', 'qtype': 'INT8', 'shape': array([30, 3, 3, 3], dtype=int32)}, {'dtype': 'FLOAT32', 'name': 'sub_7', 'qtype': 'UINT8', 'shape': array([ 1, 513, 513, 3], dtype=int32)}]
返回的list中根据模型Tensor个数包含以下dict信息:
name: Tensor名称
shape: Tensor的形状
dtype: Tensor的数据类型
qtype: 定点模型该Tensor可能的数据类型(quantization type)
3.4.2 calibrator_custom.SIM_Calibrator
对于多输入、多段网络同时转换时,提供calibrator_custom.SIM_Calibrator,方便进行简单定义后,统一转换。
calibrator_custom.SIM_Calibrator是已经实现好的class,当中只有forward方法未实现,使用时仅需实现该方法,即可转换完成。
下面以SGS_IPU_SDK/Scripts/examples/sim_calibrator.py为例,说明calibrator_custom.SIM_Calibrator的使用方法:
import calibrator_custom
class Net(calibrator_custom.SIM_Calibrator):
    def __init__(self):
        super().__init__()
        self.model = calibrator_custom.calibrator(model_path, input_config)
    def forward(self, x):
        out_details = self.model.get_output_details()
        self.model.set_input(0, x)
        self.model.invoke()
        result_list = []
        for idx in range(len(out_details)):
            result = self.model.get_output(idx)
            result_list.append(result)
        return result_list
定义forward方法,forward的参数为模型输入,如有多个输入,可增加forward的参数。
创建calibrator_custom.SIM_Calibrator的实例
net = Net()
调用calibrator_custom.SIM_Calibrator的convert方法
net.convert(img_gen, fix_model=[out_model_path])
convert方法必须输入两个参数:图片生成器、fixed.sim模型的保存路径list。
- 图片生成器(img_gen)
为方便多输入、多段网络转换模型,通过生成器方便组织输入图片的序列。如模型有多个输入,生成器应该按照定义forward时的输入顺序,返回有多个numpy.ndarray的list。
calibrator_custom.utils.image_preprocess_func使用预先定义好的前处理方法。
preprocess_func = calibrator_custom.utils.image_preprocess_func(model_name)

def image_generator(folder_path, preprocess_func):
    images = [os.path.join(folder_path, img) for img in os.listdir(folder_path)]
    for image in images:
        img = preprocess_func(image)
        yield [img]
img_gen = image_generator('./images', preprocess_func)
- fixed.sim模型的保存路径list
如果在__init__中定义多个模型,fixed模型的保存路径list应该按照__init__中定义模型的顺序,依次命名。
- 其他可选参数:
num_process: 进程数,运行同时运行的CPU数量

quant_level: 选择量化等级:[L1, L2, L3, L4, L5],默认L5量化等级,具体含义详见3.1.2节Calibrator的可选参数使用方法。

quant_param: 量化导入参数。如果已有对应模型的量化参数,可以将量化的参数在模型转换中导入。
3.4.3 导入量化参数规则
3.4.3.1. 量化策略和方法
-
Conv2D的量化方法
Conv2D的量化分为输入、Weights和输出,目前支持8bit,16bit量化。
根据统计得到的输入、Weights和输出的min和max值,首先提前将Weights量化到定点数据,保存在fixed的网络内部,再在网络运行时动态量化输入和输出数据。Weights的min和max值的个数由kernel的个数决定,输入和输出的min和max值的个数由输入输出的C维度决定。如果使用8bit量化,Conv2D的输入为UINT8(相当于INT9的表达能力),Weights为INT8;如果使用16bit量化,Conv2D的输入和Weights均为INT16。
-
DepthwiseConv2D的量化方法
DepthwiseConv2D的量化分为输入、Weights和输出,目前支持8bit,16bit量化。
根据统计得到的输入、Weights和输出的min和max值,首先提前将Weights量化到定点数据,保存在fixed的网络内部,再在网络运行时动态量化输入和输出数据。Weights、输入和输出的min和max值的个数均由对应Tensor的C维度决定。如果使用8bit量化,DepthwiseConv2D的输入为UINT8(相当于INT9的表达能力),Weights为INT8;如果使用16bit量化,DepthwiseConv2D的输入和Weights均为INT16。
-
其他Op量化方法
网络中其他算子的量化min和max均基于C维度数量,仅支持16bit量化。调用calibrator_custom.calibrator的get_tensor_details方法可以从qtype中得知该Tensor在定点模型时的data type。
3.4.3.2. 量化参数的内容
基于上述量化的策略和方法,需要为Tensor提供如下信息:
-
Tensor的名字(name)[str]
-
算子类型提供对应数量的min,max。[list]
-
量化bit位。[int]
-
常量Tensor数据(data)(可选)[numpy.ndarray]
下表展示了对应的参数方式,整个参数为list,其中每个item是一个dict,包含上述信息。
[
    {
        "name": "FeatureExtractor/MobilenetV2/Conv2d_0/weights",
        "min": [-4.555312, -2.876907, -1.234419],
        "max": [7.364561, 3.960804, 6.0],
        "bit": 8
    },
    {...},
    ...
]
示例SGS_IPU_SDK/Scripts/examples/sim_calibrator.py中已完成了参数导入,可以提供json和pkl文件的读取和导入。
3.4.3.2.1 量化模型量化参数导出工具
量化模型量化参数导出工具位置 SGS_IPU_SDK/Scripts/examples/save_quant_param.py 使用示例:--output_mode参数支持JSON或Pickle格式量化参数数据的导出。
python3 save_quant_param.py \
-m fixed.sim \
--output_mode {JSON,Pickle}
3.4.3.3. 导入量化数据流程
为了兼容原有量化流程,原有量化所采用的策略依然进行。
原始模型在转成SGS_Float模型以后,一些算子会被合并和优化,计算图与原框架的模型有较大差异。所提供的量化文件内容需基于已转成的SGS_Float模型针对性调整,如Tensor名称等信息。
为方便修改被合并和优化的层,可以使用calibrator_custom.calibrator的get_tensor_details方法获取Tensor的基本信息。可以获得每个Tensor的name,shape,dtype,qtype信息。
转换好的fixed模型可以使用calibrator_custom.fixed_simulator的get_tensor_details方法获取Tensor的基本信息,可以获得每个Tensor的name,shape,min,max,quantization,dtype信息。
根据模型Tensor信息,更新原始模型的量化文件后,即可导入量化数据文件。
解析完量化文件后,会匹配已有量化信息与导入的量化信息。优先使用导入的量化信息,但不排除在合并时由于导入信息的不合理而放弃使用。