Pure Linux eFuse-Digest Security Boot Flow SOP
1. SECURITY BOOT介绍
1.1. 概述
Security Boot需要做的工作总体上包括:
-
签章(或加密+签章)
-
验签(或验签+解密)
验签即签章的验证,其中加密和解密为可选,用户可根据自身需求取舍。
一般情况下加密是为了防止信息被泄露,而验签是为了防止信息被篡改。
加密(详见加密Security Boot流程章节)和签章(详见签章介绍章节)的工作将使用脚本完成,而验签和解密的工作将由固件中Software完成。Security Boot的验签和解密总体流程如下。
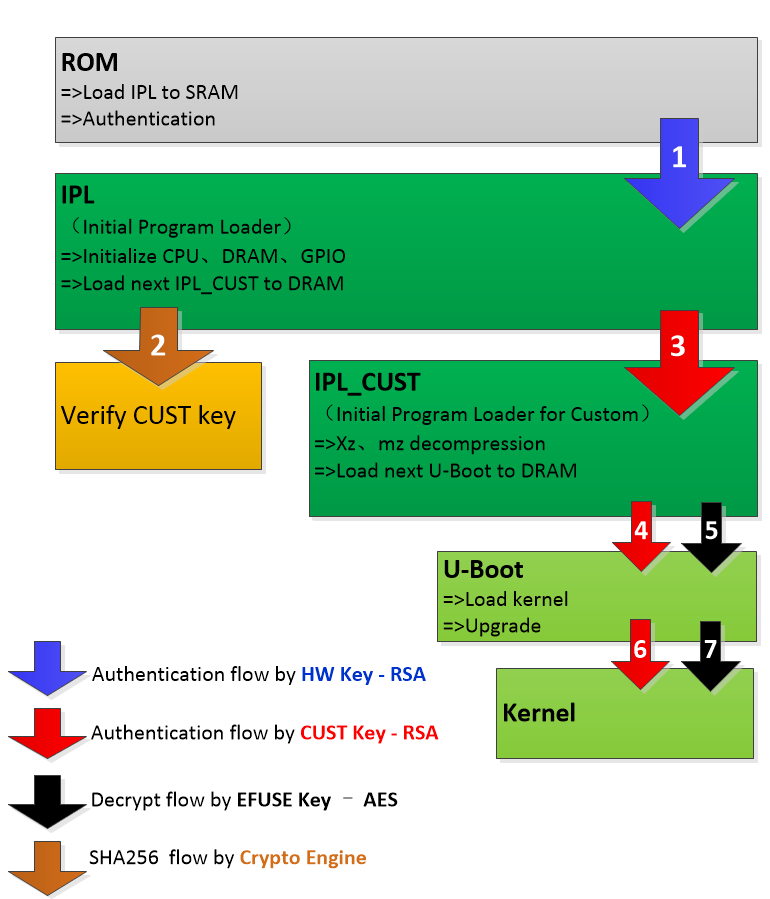
图1-1 验签和解密总体流程
1.1.1. 秘钥介绍
从秘钥使用的角度看,签章和验签分别使用了RSA Private Key和RSA Public Key,加密和解密使用同一把AES Key。
-
验签流程中所用的
RSA Public Key有两把。第一把为
HW Key,也称Sigmastar Key,该把Key在使用的时候,由Hardware载入到crypto engine,用来做签章验证的动作,这边Software是无法介入的。HW Key的内容固定不变,由Sigmastar维护。第二把为
CUST Key,该Key会嵌在IPL和IPL_CUST的bin文件中,通过Software在整个boot flow中用来做签章验证的动作。CUST Key的内容可自由改变,由用户维护。 -
验签流程中所用的
AES Key为eFuse Key,该把Key使用之前需要烧录到eFuse存储单元中,在使用的时候,由Hardware载入到crypto engine进行使用,可以在整个boot flow中用来做AES解密的动作。eFuse Key的内容由用户自定义,所以由用户维护。
1.1.2. 流程介绍
-
Authenticate IPL by HW Key-RSA
该流程为ROM code阶段使用Hardware中的RSA Public Key,对IPL进行签章的验证,如图1-1的步骤1。由于HW Key是不可被改写和替换的,从而保证了IPL不会被篡改。
-
Authenticate CUST Key-RSA by HW Key-RSA
该流程为IPL对事先已烧录至eFuse中CUST Key-RSA的Digest(即CUST Key-RSA的SHA-256计算值)和当前Software取到的CUST Key-RSA的Digest'进行比对,若一致则证明当前Software取到的CUST Key-RSA是合法的Key,如图1-1的步骤2。通过这个设计来确保CUST Key-RSA不被篡改。
-
Authenticate IPL_CUST by CUST Key-RSA
该流程为IPL读取事先嵌在IPL_CUST里的CUST RSA Public Key,对IPL_CUST进行签章的验证,如图1-1的步骤3。由于CUST RSA Public Key不会被篡改,从而保证了IPL_CUST也不会被篡改。
-
Authenticate U-Boot/kernel by CUST Key-RSA
该流程为IPL_CUST读取事先嵌在IPL_CUST的CUST RSA Public Key后,对U-Boot进行签章的验证,如图1-1的步骤4。同样U-Boot也读取这把Key对下一阶段的Linux Kernel进行签章验证,如图1-1的步骤6。
-
Decrypt U-Boot/kernel by eFuse Key–AES
如果开启加密机制,U-Boot及Linux Kernel会通过AES128(ECB)来做加密动作,在Boot流程中,IPL_CUST使用eFuse中事先烧录好的AES Key对U-Boot执行解密动作,同样U-Boot也对Linux Kernel执行解密动作,如图1-1的步骤5、7。
1.2. HW Key
HW Key存在于Sigmastar IC的Hardware中,是一把RSA Public Key,用来验证IPL的签章,由N-key 及E-key组成。在crypto engine需要使用的时候,由Hardware自动载入,无需Software获取。
1.3. CUST Key
在签章过程中,根据customer的需求分两种情况,使用"签章"和使用"签章+加密"。至于如何区分所使用的是"签章"还是"签章+加密"是由Sigmastar提供的IPL_CUST binary差异决定的,Sigmastar将会根据用户需求提供相应的IPL_CUST binary。
1.3.1. CUST RSA Key
Cust RSA Key由RSA Public Key (RSA-2048,长度为2048 bit) 及AES Key (ECB-128,长度为128 bit) 所组成,只要有使用签章功能,则IPL_CUST的bin文件需嵌入RSA Public Key,用于验签。IPL_CUST的bin组成结构变化情况如下。
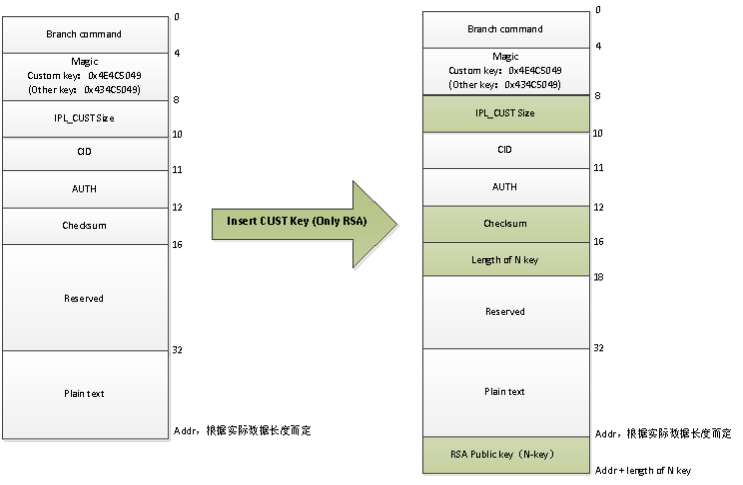
图1-2 IPL_CUST结构
1.3.2. eFuse AES Key
eFuse AES Key长度为128bit,若使用"签章+加密"则会用到eFuse AES Key,需要在使用之前就将Key烧录于eFuse存储单元中(烧写eFuse相关内容后面章节会提及)。
1.4. Boot Flow结构
Boot Flow请参考图1-3,该图解为从ROM到Linux Kernel的Boot Flow结构,其中Signature为签章数据部分,每个Flow的Signature均会嵌入到相应bin文件的最后,每个Flow均包含Get Key和Authenticate的动作直到Linux Kernel,部分Flow支持解密(是否开启解密取决于需求)。Get Key有三种,HW RSA Key和eFuse AES Key均由Hardware获取,CUST RSA Key由Software获取。需要注意的是IPL_CUST是Insert CUST RSA Key后才进行签章的,所以其Signature嵌入在CUST RSA Key后面。
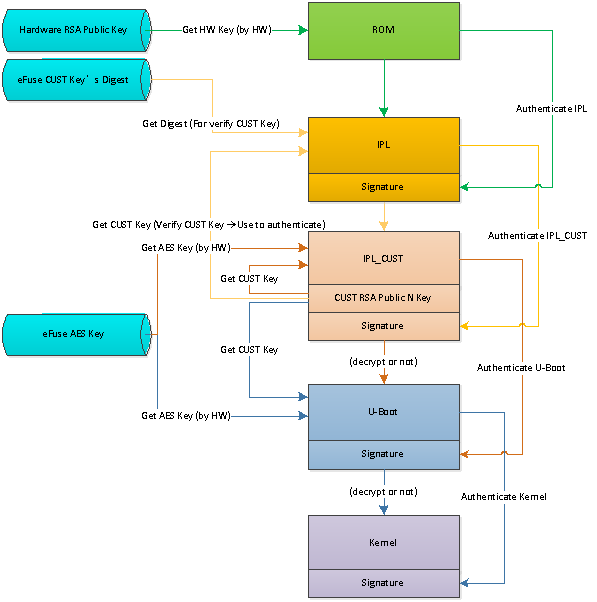
图1-3 Boot Flow结构
1.5. eFuse开启Security Boot
ROM->IPL->U-Boot启动Security Boot必须要烧录eFuse中Secure_Boot enable相应的栏位。
注:开启后无法关闭,每次启动都将会强制走Security Boot flow。
1.6. 普通Security Boot流程
如下图所示,==Generate Signature==是在local端执行,这部分目前方案是使用Python脚本完成(后面章节会详细提及),先对Image file进行SHA-256的计算,生成Digest,再通过RSA-2048做加密动作,最后生成256Bytes的signature,再将signature嵌入至Image后端。
==Verify Signature==是在boot flow中执行,各阶段的boot code会对下一段的Image进行SHA-256计算,生成Digest,并取出signature来做RSA-2048的解密生成Digest',然后对比Digest和Digest',若对比一致,则Verify success,否则Verify fail。
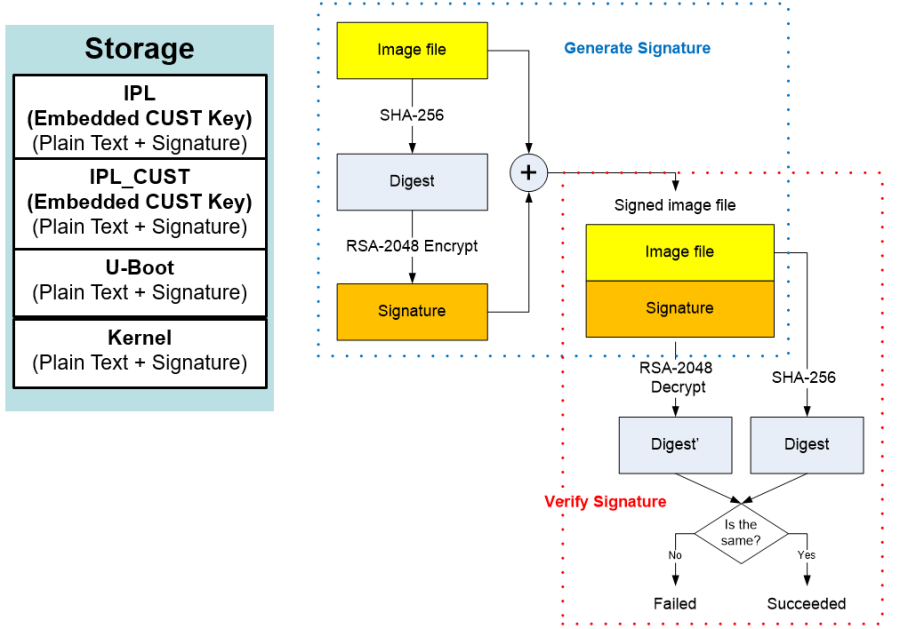
图1-4 普通Security Boot流程
1.7. 加密Security Boot流程
如下所示,==Generate Signature==是在local端执行,这部分目前方案是使用Python脚本完成(后面章节会详细提及)。
先将Image file通过AES-128(ECB)加密成Cipher file,再对Cipher file进行SHA-256计算,生成Digest,再通过RSA-2048做加密动作,最后生成256Bytes的signature,再将signature嵌入至Image后端。
==Verify Signature==是在boot flow中,各阶段的boot code会对下一段的Image进行SHA-256计算,生成Digest,并取出Signature来做RSA-2048的解密后,生成Digest',最后对比Digest和Digest'。如对比成功,则对Cipher file进行AES-128(ECB) 解密的动作,最后解密为能开机的image。

图1-5 加密Security Boot流程
2. EFUSE烧录
2.1. 烧录工具说明
eFuse的烧录需要借助Sigmastar提供的专用工具,这边以sb_util_v3工具为例(具体适用的版本请与相关FAE确认)。
工具参数说明:
-
sb_util_w -j
Write security register to disable jTag
-
sb_util_w -b
Write security register to enable security boot.
-
sb_util_w -s
Write security register to enable security boot and lock security boot setting.
-
sb_util_w -js
Disable jTag and enable security boot and lock security boot setting.
-
sb_util_w -aes 0x00 0x01 0x02 0x03 0x04 0x05 0x06 0x07 0x08 0x09 0x0a 0x0b 0x0c 0x0d 0x0e 0x0f (总共16 bytes)
Write AESKEY data to efuse
-
sb_util_w -digest 0x00 0x01 0x02 0x03 0x04 0x05 0x06 0x07 0x08 0x09 0x0a 0x0b 0x0c 0x0d 0x0e 0x0f 0x10 0x11 0x12 0x13 0x14 0x15 0x16 0x17 0x18 0x19 0x1a 0x1b 0x1c 0x1d 0x1e 0x1f (总共16 bytes)
Write public key digest data to efuse
-
sb_util_w -wp
AESKEY data lock write protected, after writing AESKEY data to efuse
-
sb_util_w -rp
AESKEY data lock write protected, after AESKEY data is checked to be correct.
2.2. SecurityBoot相关烧录项
-
eFuse SecurityBoot Enable
Command:sb_util_w –b
-
eFuse AES Key
例如制作AES Key:echo '000102030405060708090A0B0C0D0E0F' | xxd -r -ps > aesKey.bin
Command:sb_util_w -aes 0x00 0x01 0x02 0x03 0x04 0x05 0x06 0x07 0x08 0x09 0x0a 0x0b 0x0c 0x0d 0x0e 0x0f
-
eFuse AES Key Read Lock
Command:sb_util_w -wp
注: 需要注意的是开启该read lock功能后,会使eFuse中的AES Key无法被读取。
2.3. 总体烧录流程
ex: How to burn efuse?
-
电路连接GND_EFUSE = 1
-
$sb_util_w -j
$sb_util_w -b
$sb_util_w -aes 0x00 0x01 0x02 0x03 0x04 0x05 0x06 0x07 0x08 0x09 0x0a 0x0b 0x0c 0x0d 0x0e 0x0f (根据实际使用的AES Key而定)
$sb_util_w -digest 0x00 0x01 0x02 0x03 0x04 0x05 0x06 0x07 0x08 0x09 0x0a 0x0b 0x0c 0x0d 0x0e 0x0f 0x10 0x11 0x12 0x13 0x14 0x15 0x16 0x17 0x18 0x19 0x1a 0x1b 0x1c 0x1d 0x1e 0x1f (根据实际使用的public.pem生成digest而定)
-
$sb_util_r //检查是否成功写入disable jtag bit,enable security boot bit和 aes key。
$sb_util_w -wp
$sb_util_w -rp
$sb_util_w -l -
电路连接GND_EFUSE= 0
-
reset the platform
ex: How to burn efuse faster?
-
电路连接GND_EFUSE = 1
-
$sb_util_w -js
-
$sb_util_w -aes 0x00 0x01 0x02 0x03 0x04 0x05 0x06 0x07 0x08 0x09 0x0a 0x0b 0x0c 0x0d 0x0e 0x0f (根据实际使用的AES Key而定)
-
$sb_util_w -wrp
-
电路连接GND_EFUSE= 0
-
reset the platform
3. 安全镜像生成
3.1. 概述
此功能依据用户需求可分成是否进行明文内容的加密,如下两种制作流程,此流程能一路支持到Linux Kernel,如下章节会逐步介绍如何通过tool生成Images。如下是注意事项:
-
without AES
-
IPL.bin的签章必须是由Sigmastar Key所生成
-
IPL_CUST.bin需先Insert CUST RSA Key (Public Key),然后再通过CUST RSA Key (Private Key) 生成签章,这边Insert的CUST RSA Key (Public Key)为用来验证IPL_CUST、U-Boot和Linux Kernel的签章
-
with AES
-
IPL.bin的签章必须是由Sigmastar Key所生成
-
IPL_CUST.bin需先Insert CUST RSA Key (Public Key),然后再通过CUST RSA Key (Private Key) 生成签章,但不需要进行AES加密。这边Insert的CUST RSA Key (Public Key)为用来验证U-Boot和Linux Kernel的签章。
-
U-Boot和Linux Kernel都需要先进行AES加密,然后再通过CUST RSA Key (Private Key) 生成签章。

图3-1 签章流程
3.2. 制作CUST RSA Key
-
生成RSA私钥
openssl genrsa -out private.pem 2048
-
生成RSA公钥
openssl rsa -in private.pem -out public.pem -outform PEM -pubout
3.3. 制作eFuse AES-Key
这边通过xxd tool来生成AES-128 key binary file,请指定32bytes的key,通过如下command来生成。
echo '000102030405060708090A0B0C0D0E0F' | xxd -r -ps > aesKey.bin
3.4. 生成CUST RSA Key' Digest
使用Customer自己的RSA Public Key计算SHA-256值(若Digest是由Sigmastar代为烧录至eFuse,则Customer需要提供该Digest给Sigmastar)
- 通过
key_proc.py执行./key_proc.py --key2digest -f public.pem
3.5. 签章介绍
3.5.1. IPL.bin签章
- 由于IPL使用Sigmastar Key进行签章,所以由Sigmastar直接提供已签过章的IPL binary给Customer
3.5.2. IPL_CUST.bin 签章
IPL_CUST需要先Insert Key后再做签章,步骤如下:
-
Insert Key,通过
key_proc.py执行不包含AES加密:
./key_proc.py --insert --rsa=./public.pem -f ./IPL_CUST.bin执行后会生成
IPL_CUST.cipher.bin包含AES加密:
./key_proc.py --insert --rsa=./public.pem -f ./IPL_CUST.AES.bin执行后会生成
IPL_CUST.AES.cipher.bin -
制作签章,通过
key_proc.py执行不包含AES加密:
./key_proc.py --sign --rsa=./private.pem -f ./IPL_CUST.cipher.bin执行后会生成
IPL_CUST.cipher.bin.sig包含AES加密:
./key_proc.py --sign --rsa=./private.pem -f ./IPL_CUST.AES.cipher.bin执行后会生成
IPL_CUST.AES.cipher.bin.sig
3.5.3. U-Boot 签章
如下设定针对SPI NOR的U-Boot版本,其档名为u-boot.xz.img.bin,如为SPI-NAND版本,请改为u-boot_spinand.xz.img.bin,关于U-Boot的制作可区分为是否进行AES的加密。
-
制作签章
不包含AES加密:
不需做Image的加密动作,执行后会产生
u-boot.xz.img.bin.sig./key_proc.py --sign --rsa=./private.pem -f u-boot.xz.img.bin包含AES加密:
需要先对Image做AES加密,执行后会产生
u-boot.xz.img.aes.bin,之后再对加密后的Image进行签章,最后产生u-boot.xz.img.aes.bin.sig。./key_proc.py --encrypt --aes=./aesKey.bin -f ./u-boot.xz.img.bin ./key_proc.py --sign --rsa=./private.pem -f ./u-boot.xz.img.aes.bin
3.5.4. Linux Kernel 签章
-
制作签章
不包含AES加密:
不需做Image的加密动作,执行后会生成
kernel.sig./key_proc.py --sign --rsa=./private.pem -f kernel包含AES加密:
需要先对Image做AES加密,执行后会生成kernel.aes,之后再对加密后的Image进行签章,最后生成
kernel.aes.sig。./key_proc.py --encrypt --aes=./aesKey.bin -f ./kernel ./key_proc.py --sign --rsa=./private.pem -f ./kernel.aes
3.5.5. Linux Rootfs 签章
-
制作签章
不包含AES加密:
不需做Image的加密动作,执行后会生成
rootfs.sqfs.sig./key_proc.py --sign --rsa=./private.pem -f rootfs.sqfs包含AES加密:
非ramdisk属性的rootfs无法支持加解密机制
3.5.6. 签章验证
-
将完成签章的Images刻录至flash中,刻录后如能正常进入U-Boot,表示从IPL至U-Boot的签章是没有问题的。
-
在Uboot阶段需要设定环境变量来对Linux Kernel进行验证,请参考如下command进行设定(针对以下command,若load Kernel image改为实际size而非分区size,则可减少一定耗时):
不包含AES加密:
-
SPI-NOR
setenv bootcmd ' sf probe 0;sf read 0x22000000 ${sf_kernel_start} ${sf_kernel_size}; mxp r.info IPL_CUST; sf read 0x23C00000 ${sf_part_start} ${sf_part_size}; dcache off; sigauth 0x22000000 0x23C00000; dcache on; bootm 0x22000000; '
-
SPI-NAND
setenv bootcmd ' nand read.e 0x23C00000 IPL_CUST0 0x20000;nand read.e 0x22000000 KERNEL 0x500000; dcache off; sigauth 0x22000000 0x23C00000; dcache on; bootm 0x22000000; '
包含AES加密:
-
SPI-NOR
setenv bootcmd ' sf probe 0;sf read 0x22000000 ${sf_kernel_start} ${sf_kernel_size}; mxp r.info IPL_CUST; sf read 0x23C00000 ${sf_part_start} ${sf_part_size}; dcache off; sigauth 0x22000000 0x23C00000 --aes; dcache on; bootm 0x22000000; '
-
SPI-NAND
setenv bootcmd ' nand read.e 0x23C00000 IPL_CUST0 0x20000;nand read.e 0x22000000 KERNEL 0x500000; dcache off; sigauth 0x22000000 0x23C00000 --aes; dcache on; bootm 0x22000000; '
-
-
若customer有验签rootfs的需求,则在Uboot阶段需要设定环境变量来对Linux Rootfs进行验证,请参考如下command进行设定(针对以下command,若load image改为实际size而非分区size,则可减少一定耗时)
不包含AES加密:
-
SPI-NOR
setenv rootfs_size [size]
如实际烧录的rootfs size为0x1af100,则setenv rootfs_size 1af100; saveenv;
sf probe 0; mxp r.info rootfs; sf read 0x22000000 ${sf_part_start} ${sf_part_size}; mxp r.info IPL_CUST; sf read 0x23C00000 ${sf_part_start} ${sf_part_size}; dcache off; sigauth 0x22000000 0x23C00000; dcache on;
结合kernel的验签,bootcmd为:
Kernel验签+ rootfs验签:
setenv bootcmd ' dcache off; sf probe 0; mxp r.info rootfs; sf read 0x22000000 ${sf_part_start} ${sf_part_size}; mxp r.info IPL_CUST; sf read 0x23C00000 ${sf_part_start} ${sf_part_size}; sigauth 0x22000000 0x23C00000; sf read 0x22000000 ${sf_kernel_start} ${sf_kernel_size}; sigauth 0x22000000 0x23C00000; dcache on; bootm 0x22000000; '
Kernel(验签+解密)+ rootfs验签:
setenv bootcmd ' dcache off; sf probe 0; mxp r.info rootfs; sf read 0x22000000 ${sf_part_start} ${sf_part_size}; mxp r.info IPL_CUST; sf read 0x23C00000 ${sf_part_start} ${sf_part_size}; sigauth 0x22000000 0x23C00000; sf read 0x22000000 ${sf_kernel_start} ${sf_kernel_size}; sigauth 0x22000000 0x23C00000 --aes; dcache on; bootm 0x22000000; '
- SPI-NAND
setenv rootfs_size [size]
如实际烧录的rootfs size为0x1af100,则setenv rootfs_size 1af100; saveenv;
nand read.e 0x23C00000 IPL_CUST0 0x20000;nand read.e 0x22000000 rootfs 0x600000; dcache off; sigauth 0x22000000 0x23C00000; dcache on;结合kernel的验签,bootcmd为:
Kernel验签+ rootfs验签:
setenv bootcmd ' dcache off; nand read.e 0x23C00000 IPL_CUST0 0x20000; nand read.e 0x22000000 rootfs 0x600000; sigauth 0x22000000 0x23C00000; nand read.e 0x22000000 KERNEL 0x500000; sigauth 0x22000000 0x23C00000; dcache on; bootm 0x22000000; 'Kernel(验签+解密)+ rootfs验签:
setenv bootcmd ' dcache off; nand read.e 0x23C00000 IPL_CUST0 0x20000; nand read.e 0x22000000 rootfs 0x600000; sigauth 0x22000000 0x23C00000; nand read.e 0x22000000 KERNEL 0x500000; sigauth 0x22000000 0x23C00000 --aes; dcache on; bootm 0x22000000; '包含AES加密:
非ramdisk属性的rootfs无法支持加解密机制
- SPI-NAND
4. 注意事项
4.1. IPL
针对Secure Boot的功能,特定的IPL及IPL_CUST必须被使用。
4.1.1. 普通SecurityBoot流程
-
IPL:
IPL. bin
-
IPL_CUST:
IPL_CUST.bin
4.1.2. 加密SecurityBoot流程
-
IPL:
IPL.AES.bin
-
IPL_CUST:
IPL_CUST.AES.bin
4.2. 自编tool签章
针对U-Boot、Linux Kernel来生成签章文件时,仅使用其的Data部分来进行SHA计算,并通过RSA来产生256Bytes的签章,所以如用户使用自行编制的tool来产生签章,须注意应排除U-Boot和Linux Kernel前64Bytes的Header,仅以Data部分来进行计算。