Wi-Fi OPENING INSTRUCTION
1. Kernel Concentration
-
Spinand flash
make infinity2m_ssc011a_s01a_minigui_defconfig

make menuconfig
Enter
Networking support -> Wireless, and change the following option from module compilation tobuild-in.
Enter
Device Drivers->Generic Driver options, change the following compile method tobuild-in.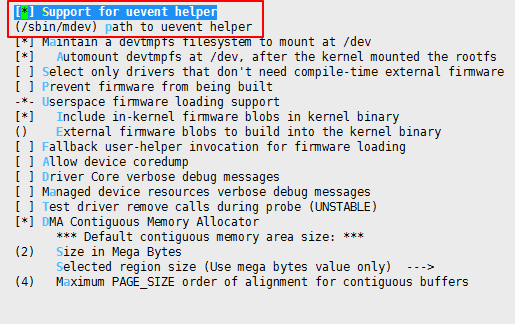
-
Nor flash
make infinity2m_ssc011a_s01a_minigui_defconfig

make menuconfig
Enter
Networking support -> Wireless, and change the following option from module compilation tobuild-in.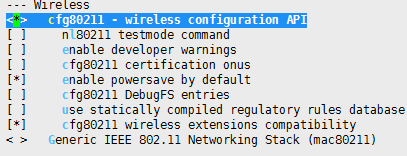
2. kernel compilation
make clean –j16;make –j16
Generate kernel/arch/arm/uImage.xz after success, copy it to SDK and replace the file with the same name.
The target path of Spinand: project/release/nvr/i2m/011A/glibc/8.2.1/bin/kernel/spinand
The target path of Nor: project/release/nvr/i2m/011A/glibc/8.2.1/bin/kernel/
Modify the configuration of SDK, add interface_wlan:=enable in project/release/customer_tailor/nvr_i2m_display_glibc_tailor.mk, and then compile SDK.
3. Enable/Disable WIFI in APP
Modify SSD_sample/jni/Makefile:
-
Enable wifi:

-
Disable wifi:

4. WIFI Test
Modify /appconfigs/wpa_supplicant.conf, and add AP:

The tested ssid is "SKY", password is "12345678".
-
wifi initialization
cd /config/wifi

./ssw01bDeInit.sh

export LD_LIBRARY_PATH=$LD_LIBRARY_PATH:/usr/local/lib:/lib:/config/wifi
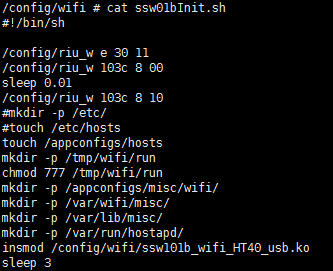
Copy the corresponding ko to
/config/wifiwhen the otherwifi koare used, then modifyssw01bInit.sh,insmodthe dependent ko. -
Test wifi connection
./wpa_supplicant -Dnl80211 -i wlan0 -c /appconfigs/wpa_supplicant.conf -d &

sleep 2

udhcpc -q -i wlan0 -s /etc/init.d/udhcpc.script &
-
WLAN scanning
./iwlist wlan0 scanning
5. Wifi Application Example
Source code:
Refer to wifiDemo.rar.
Steps:
-
Modify sample code, add the specified wifi information.

-
Modify
PROJECT_PATHin Makefile, use the local SDK path, and then compile the demo code: -
Copy the generated
testWifito the target board and runThe prompt is as follow:
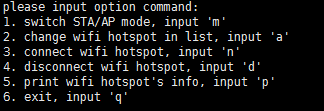
Enter 'm' to switch STA/AP mode, the default is STA mode;
In the code, you can preset the list of wifi to be connected, enter ‘a’ to switch to the next one, and start looping from 0 by default;
Enter 'n' to connect the designated wifi in STA mode, open the personal wifi in AP mode;
Enter 'd' to disconnect in STA mode, close the personal wifi in AP mode;
Enter 'p' to print the information currently scanned in STA mode, and print the connected device information in AP mode;
Enter 'q' to quit app.