Tools
DLA SDK
1. INTRODUCTION
SigmaStar模型为sim,全称Sigmastar IPU Model,查看工具使用**SGS_IPU_SDK/Netron/Netron Setup 3.4.3.exe**安装后打开。
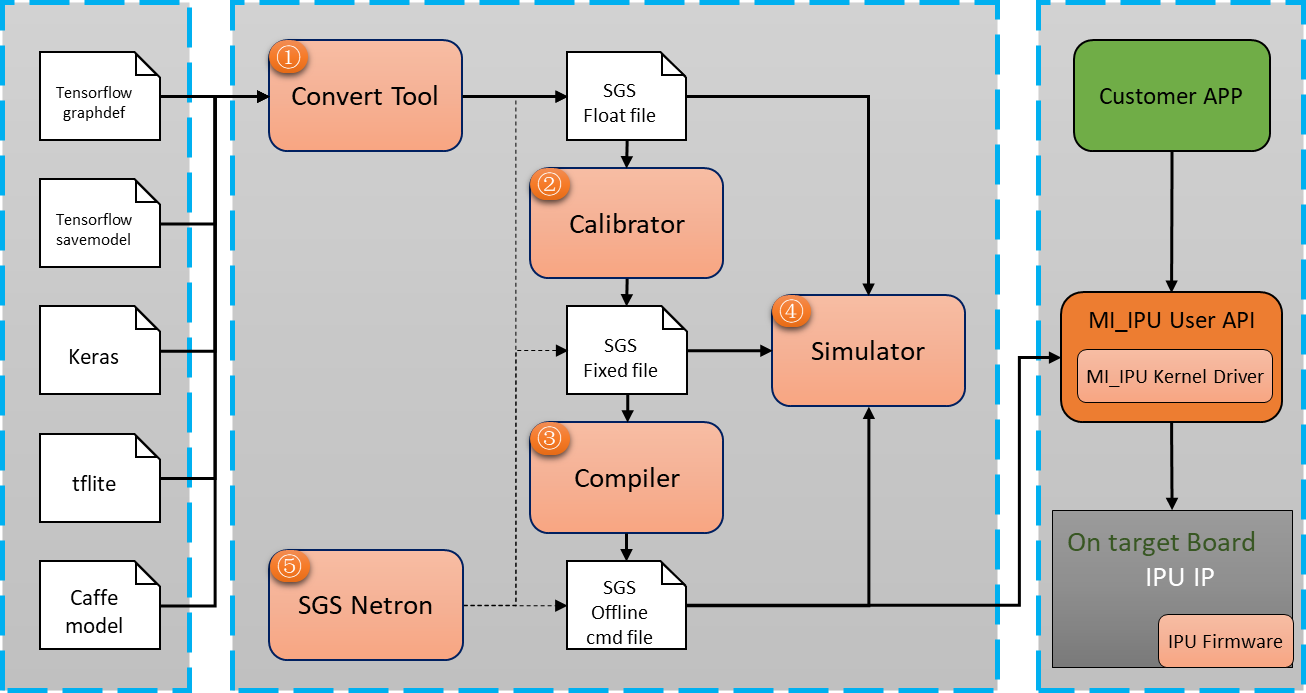
1.1. SigmaStar DLA SDK主要工具
① Convert Tool:将TensorFlow、Keras和Caffe框架训练的网络模型转换为SigmaStar浮点网络模型(SGS Float file);
② Calibrator:将SigmaStar浮点网络模型转化为SigmaStar定点网络模型(SGS Fixed file);
③ Compiler:将SigmaStar定点网络模型转化为SigmaStar离线网络模型(SGS Offline cmd file);
④ Simulator:对SGS Float file / SGS Fixed file / SGS Offline cmd file仿真运行。
⑤ SGS Netron:查看SGS Float file / SGS Fixed file / SGS Offline cmd file模型的结构。
1.2. DLA整体框架
1.3. DLA SDK的优势
① Convert Tool能根据硬件特性,将原网络框架的算子转换为SigmaStar DLA客制化算子,对网络模型无损优化;
② Calibrator统计FeatureMap的取值,将SGS Float file量化为8bit / 16bit定点模型;
③ Compiler将定点网络模型文件转化为离线指令文件,能够直接部署在SigmaStar的硬件产品上;
④ Simulator提供模拟SigmaStar硬件的PC端模拟器,能够完整运行SGS Float file / SGS Fixed file / SGS Offline cmd file,加快网络网络模型的调试部署;
⑤ SGS Netron不仅能够查看SigmaStar的SGS Float file / SGS Fixed file / SGS Offline cmd file模型,还能够查看原生框架的模型。
2. 环境搭建
2.1. 安装环境依赖
使用SigmaStar DLA SDK需要安装以下依赖库:
| Software | Installation command | Tested version |
|---|---|---|
| Python | 3.5 | |
| enum34 | pip install enum34==1.1.6 | ==1.1.6 |
| numpy | pip install numpy==1.16.4 | ==1.16.4 |
| protobuf | pip install protobuf | >=3.8.0 |
| six | pip install six | >=1.12.0 |
| OpenCV-python | pip install opencv-python | >=3.4.0.14 |
| TensorFlow | pip install tensorflow | ==1.14.0 |
| Cython | pip install cython | >=0.29.13 |
| pycocotools | pip install pycocotools | >=2.0.0 |
| matplotlib | pip install matplotlib | >=3.0.3 |
| SciPy | pip install scipy | >=1.3.1 |
| Pillow | pip install pillow | ==6.1.0 |
| python3-tk | sudo apt install python3-tk | |
| libc6 | sudo apt install libc6-dev-i386 | |
| libstdc++6 | sudo apt install libstdc++6 | |
| python-qt4 | sudo apt install python-qt4 |
SigmaStar DLA SDK基于AVX2指令集编写,请使用支援AVX2的Intel®处理器运行。如果使用docker等虚拟机环境,请保证虚拟机内最低分配6G内存。
| 推荐配置: CPU:Intel® CoreTM i7或者更高等级 内存:8G或者更高 | 最低配置: CPU:Intel® CoreTM i5 内存:6G |
|---|---|
2.2. 快速上手
本部分主要以示例方式介绍如何快速使用SigmaStar DLA SDK.
请将SGS_Models和SGS_IPU_SDK放到主目录 ~/ 下,以下命令均基于该目录结构进行。请使用Linux环境运行本工具。
快速安装环境依赖,可使用如下命令:
| sudo apt update sudo apt install python3-tk python-qt4 libc6-dev-i386 libstdc++6 cd ~/SGS_IPU_SDK pip3 install -r Scripts/calibrator/setup/requirements.txt \ –i https://pypi.tuna.tsinghua.edu.cn/simple |
|---|
2.2.1. 原始模型转化为SigmaStar浮点网络模型
在SGS_IPU_SDK ⽬录下运⾏以下脚本,输出Library的路径:
| cd ~/SGS_IPU_SDK source cfg_env.sh |
|---|
1)将SGS_Models中caffe的mobilenet_v2网络模型转换为SigmaStar浮点网络模型:
工具位置在SGS_IPU_SDK/Scripts/ConvertTool,ConvertTool具体用法请参阅第2章Convert Tool caffe。
新建文件夹
| cd ~/ mkdir caffe_mobilenet_v2 cd caffe_mobilenet_v2 |
|---|
使用ConvertTool进行转换:
| python3 ~/SGS_IPU_SDK/Scripts/ConvertTool/ConvertTool.py caffe \ --model_file ~/SGS_Models/caffe/caffe_mobilenet_v2/caffe_mobilenet_v2.prototxt \ --weight_file ~/SGS_Models/caffe/caffe_mobilenet_v2/caffe_mobilenet_v2.caffemodel \ --input_arrays data \ --output_arrays prob \ --output_file ./caffe_mobilenet_v2_float.sim \ --input_config ~/SGS_Models/caffe/caffe_mobilenet_v2/input_config.ini |
|---|
在当前目录下找到caffe_mobilenet_v2_float.sim 为生成的SigmaStar浮点网络模型。
2)将SGS_Models中tensorflow的ssd_mobilenet_v1网络模型转换为SigmaStar浮点网络模型:
工具位置在SGS_IPU_SDK/Scripts/ConvertTool,ConvertTool具体用法请参阅第2章Convert Tool tensorflow_graphdef。
新建文件夹
| cd ~/ mkdir tensorflow_ssd cd tensorflow_ssd |
|---|
使用ConvertTool进行转换Backbone网络模型:
| python3 ~/SGS_IPU_SDK/Scripts/ConvertTool/ConvertTool.py tensorflow_graphdef\ --graph_def_file ~/SGS_Models/tensorflow/ssd_mobilenet_v1/ssd_mobilenet_v1.pb \ --output_file ./ssd_mobilenet_v1_concat.sim \ --input_arrays normalized_input_image_tensor \ --output_arrays Squeeze,convert_scores \ --input_shapes 1,300,300,3 \ --input_config ~/SGS_Models/tensorflow/ssd_mobilenet_v1/input_config_concat.ini |
|---|
使用SigmaStar后处理模块转换后处理网络模型,后处理模块的具体使用方法请参阅第7章SigmaStar后处理模块。
| python3 ~/SGS_IPU_SDK/Scripts/postprocess/postprocess.py -n ssd_mobilenet_v1_postprocess |
|---|
使用concat_net工具连接Backbone网络模型和后处理网络模型:
| ~/SGS_IPU_SDK/bin/concat_net \ --mode append \ --transform ~/SGS_IPU_SDK/cfg/CompilerConfig.txt \ --input_config ~/SGS_Models/tensorflow/ssd_mobilenet_v1/input_config.ini \ --model1 ./ssd_mobilenet_v1_concat.sim \ --model2 ./ssd_mobilenet_v1_postprocess.sim \ --output ./ssd_mobilenet_v1_float.sim |
|---|
在当前目录下找到ssd_mobilenet_v1_float.sim 为生成的SigmaStar浮点网络模型。
2.2.2. SigmaStar浮点网络模型转化为SigmaStar定点网络模型
工具位置在SGS_IPU_SDK/Scripts/calibrator/calibrator.py,默认会使用10个进程运行。calibrator具体用法请参阅第3章Calibrator。
1)将刚刚生成的caffe_mobilenet_v2_float.sim转化为SigmaStar定点网络模型:
进入caffe_mobilenet_v2文件夹,运行
| python3 ~/SGS_IPU_SDK/Scripts/calibrator/calibrator.py \ -i ~/SGS_Models/resource/classify/ilsvrc2012_calibration_set32/ \ -m ./caffe_mobilenet_v2_float.sim \ -c Classification \ --input_config ~/SGS_Models/caffe/caffe_mobilenet_v2/input_config.ini \ -n caffe_mobilenet_v2 |
|---|
运行中会提示:
| Start to analysis images... [====> ]10.00% | ETA: 00:00:23 |
|---|
当出现以下提示,运行结束
| Run convert model OK. |
|---|
在当前目录下找到caffe_mobilenet_v2_fixed.sim为生成的SigmaStar定点网络模型。
2)将ssd_mobilenet_v1_float.sim转化为SigmaStar定点网络模型:
TensorFlow的ssd_mobilenet_v1浮点网络模型转换到定点网络模型与Caffe相似
进入tensorflow_ssd 文件夹,运行
| python3 ~/SGS_IPU_SDK/Scripts/calibrator/calibrator.py \ -i ~/SGS_Models/resource/detection/coco2017_calibration_set32/ \ -m ./ssd_mobilenet_v1_float.sim \ -c Detection \ --input_config ~/SGS_Models/tensorflow/ssd_mobilenet_v1/input_config.ini \ -n ssd_mobilenet_v1 |
|---|
2.2.3. SigmaStar定点网络模型转化为SigmaStar离线网络模型
工具位置在SGS_IPU_SDK/Scripts/calibrator/compiler.py ,compiler具体用法请参阅第4章Compiler。
1)将刚刚生成的caffe_mobilenet_v2_fixed.sim转换为SigmaStar离线网络模型:
进入caffe_mobilenet_v2 文件夹,运行
| python3 ~/SGS_IPU_SDK/Scripts/calibrator/compiler.py \ -m ./caffe_mobilenet_v2_fixed.sim |
|---|
当出现以下提示,运行结束
| Start to run convert offline network... Run Offline OK. Start to run pack tool... Run Pack Tool OK. |
|---|
在当前目录下找到caffe_mobilenet_v2_fixed.sim_sgsimg.img 为生成的SigmaStar离线网络模型。
2)将ssd_mobilenet_v1定点网络模型转换为SigmaStar离线网络模型:
TensorFlow的ssd_mobilenet_v1定点网络模型转换到离线网络模型与Caffe相似
进入tensorflow_ssd 文件夹,运行
| python3 ~/SGS_IPU_SDK/Scripts/calibrator/compiler.py \ -m ./ssd_mobilenet_v1_fixed.sim |
|---|
2.2.4. 模型仿真
工具位置在SGS_IPU_SDK/Scripts/calibrator/simulator.py,simulator具体用法请参阅第5章Simulator。
2.2.4.1. 使用simulator对分类网络数据集验证
对转出的caffe_mobilenet_v2_fixed.sim定点网络模型测试
| python3 ~/SGS_IPU_SDK/Scripts/calibrator/simulator.py \ -i ~/SGS_Models/resource/classify/ilsvrc2012_val_set100 \ -l ~/SGS_Models/resource/classify/caffe_labels.txt \ -m ./caffe_mobilenet_v2_fixed.sim \ -c Classification \ -t Fixed \ -n caffe_mobilenet_v2 \ --num_process 20 |
|---|
运行中会提示:
| Start to evaluate on ilsvrc2012_val_set100... [===================> ]40.00% | ETA: 00:00:20 |
|---|
当出现以下提示,运行结束
| 100 images top1: 65.00% top5: 84.00% |
|---|
2.2.4.2. 使用simulator对检测网络数据集验证:
对转出的ssd_mobilenet_v1_float.sim浮点网络模型测试
| python3 ~/SGS_IPU_SDK/Scripts/calibrator/simulator.py \ -i ~/SGS_Models/resource/detection/coco2017_val_set100 \ -l ~/SGS_Models/resource/detection/coco2017_val_set100.json \ -m ./ssd_mobilenet_v1_float.sim \ -c Detection \ -t Float \ -n ssd_mobilenet_v1 \ --num_process 20 |
|---|
运行结果
| Start to evaluate on coco2017_val_set100... [==================================================]100.00% | ETA: 00:00:00 Total time elapsed: 00:00:08 loading annotations into memory... Done (t=0.02s) creating index... index created! Loading and preparing results... DONE (t=0.01s) creating index... index created! Running per image evaluation... Evaluate annotation type *bbox* DONE (t=0.33s). Accumulating evaluation results... DONE (t=0.36s). Average Precision (AP) \@[ IoU=0.50:0.95 | area= all | maxDets=100 ] = 0.268 Average Precision (AP) \@[ IoU=0.50 | area= all | maxDets=100 ] = 0.423 Average Precision (AP) \@[ IoU=0.75 | area= all | maxDets=100 ] = 0.283 Average Precision (AP) \@[ IoU=0.50:0.95 | area= small | maxDets=100 ] = 0.032 Average Precision (AP) \@[ IoU=0.50:0.95 | area=medium | maxDets=100 ] = 0.194 Average Precision (AP) \@[ IoU=0.50:0.95 | area= large | maxDets=100 ] = 0.591 Average Recall (AR) \@[ IoU=0.50:0.95 | area= all | maxDets= 1 ] = 0.235 Average Recall (AR) \@[ IoU=0.50:0.95 | area= all | maxDets= 10 ] = 0.285 Average Recall (AR) \@[ IoU=0.50:0.95 | area= all | maxDets=100 ] = 0.285 Average Recall (AR) \@[ IoU=0.50:0.95 | area= small | maxDets=100 ] = 0.036 Average Recall (AR) \@[ IoU=0.50:0.95 | area=medium | maxDets=100 ] = 0.210 Average Recall (AR) \@[ IoU=0.50:0.95 | area= large | maxDets=100 ] = 0.613 Run evaluation OK. |
|---|
2.2.4.3. 使用simulator验证单张图片
对转出的caffe_mobilenet_v2_fixed.sim_sgsimg.img离线网络模型测试
| python3 ~/SGS_IPU_SDK/Scripts/calibrator/simulator.py \ -i ~/SGS_Models/resource/classify/ILSVRC2012_test_00000002.bmp \ -m caffe_mobilenet_v2_fixed.sim_sgsimg.img \ -l ~/SGS_Models/resource/classify/labels.txt \ -c Classification \ -t Offline \ -n caffe_mobilenet_v2 |
|---|
输出结果:
| Start to evaluate on ILSVRC2012_test_00000002.bmp... Image File: tmp_image/ILSVRC2012_test_00000002.bmp Label File: /home/jesse.li/SGS_Models/resource/classify/labels.txt Model File: /home/jesse.li/caffe_mobilenet_v2/caffe_mobilenet_v2_fixed.sim_sgsimg.img Net Category: Classification Skip label_image Preprocess Bmp File: True Model Mode: offline [Info ] [102 ] [_setInterpreterAddr] CMDQ enable: 1 BaseAddress[0]: 0x0 [Info ] [484 ] [SGS_TF_InterpreterSetInputs] Interpreter addr[16]: 0x0 [Info ] [102 ] [_setInterpreterAddr] CMDQ enable: 1 BaseAddress[6]: 0x0 [Info ] [102 ] [_setInterpreterAddr] CMDQ enable: 1 BaseAddress[0]: 0x0 [Info ] [102 ] [_setInterpreterAddr] CMDQ enable: 1 BaseAddress[6]: 0x0 [Info ] [111 ] [_setInterpreterAddr] CMDQ enable: 1 BaseAddress[14]: 0xf6cd3000 [Info ] [285 ] [SGS_TF_InterpreterCreateByModel] Interpreter addr[30]: 0xf6cd3000 [Info ] [286 ] [SGS_TF_InterpreterCreateByModel] Interpreter addr[31]: 0x82f1080 [Info ] [102 ] [_setInterpreterAddr] CMDQ enable: 1 BaseAddress[0]: 0x84aa100 [Info ] [538 ] [SGS_TF_InterpreterFlipInOutBuffer] Flip interpreter addr[16]: 0x84aa100 [Info ] [102 ] [_setInterpreterAddr] CMDQ enable: 1 BaseAddress[6]: 0x856e180 [Info ] [565 ] [SGS_TF_InterpreterFlipInOutBuffer] Flip interpreter addr[22]: 0x856e180 xxxxxxxxxxxxxx External Preprocess Data xxxxxxxxxxxxxx [Info ] [3501] [_sgs_tf_InvokeByDomain] sr[16 + 0] -> 84aa100 [Info ] [3501] [_sgs_tf_InvokeByDomain] sr[16 + 6] -> 856e180 [Info ] [3501] [_sgs_tf_InvokeByDomain] sr[16 + 14] -> f6cd3000 [Info ] [3501] [_sgs_tf_InvokeByDomain] sr[16 + 15] -> 82f1080 [Info ] [3340] [_sgs_doWorkThread] the dma 0 channel mem acess in bytes 2000 [Info ] [3340] [_sgs_doWorkThread] the dma 1 channel mem acess in bytes 2000 [Info ] [3340] [_sgs_doWorkThread] the dma 2 channel mem acess in bytes 0 [Info ] [3340] [_sgs_doWorkThread] the dma 3 channel mem acess in bytes 0 Order: 1 index: 18 0.998413 jay Order: 2 index: 91 0.000549 lorikeet Order: 3 index: 93 0.000183 bee eater Order: 4 index: 85 0.000153 peacock Order: 5 index: 96 0.000153 jacamar Run evaluation OK. |
|---|
2.2.4.4. 使用simulator绘制单张检测图片结果
对转出的ssd_mobilenet_v1_fixed.sim定点网络模型测试
| python3 ~/SGS_IPU_SDK/Scripts/calibrator/simulator.py \ -i ~/SGS_Models/resource/detection/coco2017_val_set100/000000002157.jpg \ -m ./ssd_mobilenet_v1_fixed.sim \ -c Detection \ -t Fixed \ -n ssd_mobilenet_v1 \ --draw_result ./results |
|---|
结果将在当前目录的results文件夹内。
3. Convert Tool
3.1. 使用方法
Convert Tool工具的位置在SGS_IPU_SDK/Scripts/ConvertTool/ConvertTool.py
目前Convert Tool支持从tensorflow_graphdef,tensorflow_savemodel,keras,tflite,caffe 五种框架模型转换为SGS浮点网络模型。
使用前先在SGS_IPU_SDK⽬录下运⾏以下脚本,输出Library的路径(已经做过该步骤可忽略):
| cd ~/SGS_IPU_SDK source cfg_env.sh |
|---|
下面是Convert Tool目前支持的platform information:
| python3 ConvertTool.py -h usage: ConvertTool.py [-h] {tensorflow_graphdef,tensorflow_savemodel,keras,tflite,caffe} ... Convert Tool positional arguments: {tensorflow_graphdef,tensorflow_savemodel,keras,tflite,caffe} platform info tensorflow_graphdef tensorflow graphdef commands tensorflow_savemodel tensorflow save_model commands keras keras commands tflite tflite commands caffe caffe commands optional arguments: -h, --help show this help message and exit |
|---|
如果想进一步看看各个平台转换所需要的参数信息,可以执行python3 ConvertTool.py {platform} –h,各个平台具体信息和查看指令如下:
3.1.1. tensorflow_graphdef 框架指令
| python3 ConvertTool.py tensorflow_graphdef -h usage: ConvertTool.py tensorflow_graphdef [-h] --graph_def_file GRAPH_DEF_FILE --input_arrays INPUT_ARRAYS --output_arrays OUTPUT_ARRAYS [--input_shapes INPUT_SHAPES] --input_config INPUT_CONFIG --output_file OUTPUT_FILE optional arguments: -h, --help show this help message and exit --graph_def_file GRAPH_DEF_FILE Full filepath of file containing frozen GraphDef --input_arrays INPUT_ARRAYS Names of the input arrays, comma-separated. --output_arrays OUTPUT_ARRAYS Names of the output arrays, comma-separated. --input_shapes INPUT_SHAPES Shapes corresponding to --input_arrays, colon- separated. For many models each shape takes the form batch size, input array height, input array width, input array depth. (default None) --input_config INPUT_CONFIG Input config path. --output_file OUTPUT_FILE Full filepath of out Model path. |
|---|
工具使用示例:
| python3 ConvertTool.py tensorflow_graphdef \ --graph_def_file ~/SGS_Models/tensorflow/resnet_v2_50/resnet_v2_50.pb \ --output_file ./resnet_v2_float.sim \ --input_arrays input \ --output_arrays resnet_v2_50/predictions/Reshape_1 \ --input_shapes 1,299,299,3 \ --input_config ~/SGS_Models/tensorflow/resnet_v2_50/input_config.ini |
|---|
相关参数说明:
-- graph_def_file:输入的模型为TensorFlow frozen的graphdef的pb格式文件路径。
--output_file:输出的模型文件,flatbuffer格式,sim后缀文件。
--input_arrays:网络输入Tensor的名字,以字符串类型指定,多个inputs的话,中间以逗号( , )分隔,如:--input_arrays='Input1','Input2'。
--output_arrays:网络输出Tensor的名字,以字符串类型指定,多个outputs的话,中间以逗号( , )分隔。
--input_shapes:网络输入Tensor的shape,格式为NHWC,dimention 之间以逗号( , )分隔,shape个数和inputs个数对应,多个shape之间以冒号( : )分隔。
--input_config:input_config.ini文件路径,该文件为input tensor的配置信息。具体设置方法见2.2节。
3.1.2. tensorflow_savemodel 框架指令
| python3 ConvertTool.py tensorflow_savemodel -h usage: ConvertTool.py tensorflow_savemodel [-h] --saved_model_dir SAVED_MODEL_DIR [--input_arrays INPUT_ARRAYS] [--input_shapes INPUT_SHAPES] [--output_arrays OUTPUT_ARRAYS] [--tag_set TAG_SET] [--signature_key SIGNATURE_KEY] --input_config INPUT_CONFIG --output_file OUTPUT_FILE optional arguments: -h, --help show this help message and exit --saved_model_dir SAVED_MODEL_DIR SavedModel directory to convert --input_arrays INPUT_ARRAYS Names of the input arrays, comma-separated. --input_shapes INPUT_SHAPES Shapes corresponding to --input_arrays, colon- separated. For many models each shape takes the form batch size, input array height, input array width, input array depth. (default None) --output_arrays OUTPUT_ARRAYS Names of the output arrays, comma-separated. --tag_set TAG_SET Set of tags identifying the MetaGraphDef within the SavedModel to analyze. All tags in the tag set must be present. (default None) --signature_key SIGNATURE_KEY Key identifying SignatureDef containing inputs and outputs. (default DEFAULT_SERVING_SIGNATURE_DEF_KEY) --input_config INPUT_CONFIG Input config path. --output_file OUTPUT_FILE Full filepath of out Model path. |
|---|
工具使用示例:
| python3 ConvertTool.py tensorflow_savemodel \ --saved_model_dir ~/test/tensorflow_model/save_model \ --input_config ~/test/tensorflow_model/input_config.ini \ --output_file ~/test/tensorflow_model/save_model_float.sim \ --tag_set test_saved_model \ --signature_key test_signature |
|---|
相关参数说明:
--saved_model_dir:输入的模型为TensorFlow saved_model.builder生成的文件路径。
--output_file:输出的模型文件,flatbuffer格式,sim后缀文件。
--input_config:input_config.ini文件路径,该文件为input tensor的配置信息。具体设置方法见2.2节。
可选参数:
--input_arrays:网络输入Tensor的名字,以字符串类型指定,多个inputs的话,中间以逗号( , )分隔,如:--input_arrays='Input1','Input2',若不指定则从saved_model_dir中获取。
--output_arrays:网络输出Tensor的名字,以字符串类型指定,多个outputs的话,中间以逗号( , )分隔。若不指定则从saved_model_dir中获取。
--input_shapes:网络输入Tensor的shape,格式为NHWC,dimention 之间以逗号( , )分隔,shape个数和inputs 个数对应,多个shape之间以冒号( : )分隔。若不指定则从saved_model_dir中获取。
--tag_set:需要和save model时所指定的tag匹配,如果不做设定,则默认为‘serve’。
--signature_key: 需要和save model时所指定的signature匹配。如果不做设定,则默认为 ‘DEFAULT_SERVING_SIGNATURE_DEF_KEY’
3.1.3. keras框架指令
| python3 ConvertTool.py keras -h usage: ConvertTool.py keras [-h] --model_file MODEL_FILE [--input_arrays INPUT_ARRAYS] [--input_shapes INPUT_SHAPES] [--output_arrays OUTPUT_ARRAYS] [--custom_objects CUSTOM_OBJECTS] --input_config INPUT_CONFIG --output_file OUTPUT_FILE optional arguments: -h, --help show this help message and exit --model_file MODEL_FILE Full filepath of HDF5 file containing the tf.keras model. --input_arrays INPUT_ARRAYS Names of the input arrays, comma-separated. (default None). --input_shapes INPUT_SHAPES Shapes corresponding to --input_arrays, colon- separated. For many models each shape takes the form batch size, input array height, input array width, input array depth. (default None) --output_arrays OUTPUT_ARRAYS Names of the output arrays, comma-separated. (default None) --custom_objects CUSTOM_OBJECTS Dict mapping names (strings) to custom classes or functions to be considered during model deserialization. (default None) --input_config INPUT_CONFIG Input config path. --output_file OUTPUT_FILE Full filepath of out Model path. |
|---|
工具使用示例:
| python3 ConvertTool.py keras \ --model_file ./TEST_h5/resnet50/resnet50.h5 \ --input_config ./TEST_h5/resnet50/input_config.ini \ --output_file ./TEST_h5/resnet50/resnet50_float.sim |
|---|
相关参数说明:
--model_file:输入的模型为keras h5格式文件路径。
--output_file:输出的模型文件,flatbuffer格式,sim后缀文件。
--input_config:input_config.ini文件路径,该文件为input tensor的配置信息。具体设置方法见2.2节。
可选参数:
--input_arrays:网络输入Tensor的名字,以字符串类型指定,多个inputs的话,中间以逗号( , )分隔,如:--input_arrays='Input1','Input2'。
--output_arrays:网络输出Tensor的名字,以字符串类型指定,多个outputs的话,中间以逗号( , )分隔。
--input_shapes:网络输入Tensor的shape,格式为NHWC,dimention 之间以逗号( , )分隔,shape个数和inputs 个数对应,多个shape之间以冒号( : )分隔。
--custom_objects:Dict mapping names (strings) to custom classes or functions to be considered during model deserialization. (default None)
3.1.4. tflite框架指令
| python3 ConvertTool.py tflite -h usage: ConvertTool.py tflite [-h] --input_file INPUT_FILE --input_config INPUT_CONFIG --output_file OUTPUT_FILE optional arguments: -h, --help show this help message and exit --model_file INPUT_FILE Full filepath of tflite file containing the tflite model. --input_config INPUT_CONFIG Input config path. --output_file OUTPUT_FILE Full filepath of out Model path. |
|---|
工具使用示例:
| python3 ConvertTool.py tflite \ --model_file ~/test/tensorflow_model/Debug_save_model_float.tflite \ --input_config ~/test/tensorflow_model/input_config.ini \ --output_file ~/test/tensorflow_model/save_model_float.sim |
|---|
相关参数说明:
--model_file:输入的模型为tflite格式文件路径(必须为非量化模型)。
--output_file:输出的模型文件,flatbuffer格式,sim后缀文件。
--input_config:input_config.ini文件路径,该文件为input tensor的配置信息。具体设置方法见2.2节。
3.1.5. caffe框架指令
| python3 ConvertTool.py caffe -h usage: ConvertTool.py caffe [-h] --model_file MODEL_FILE --weight_file WEIGHT_FILE [--input_arrays INPUT_ARRAYS] [--output_arrays OUTPUT_ARRAYS] --input_config INPUT_CONFIG --output_file OUTPUT_FILE optional arguments: -h, --help show this help message and exit --model_file MODEL_FILE Full filepath of tflite file containing the caffe model. --weight_file WEIGHT_FILE Full filepath of tflite file containing the caffe weight. --input_arrays INPUT_ARRAYS Names of the input arrays, comma-separated. (default None). --output_arrays OUTPUT_ARRAYS Names of the output arrays, comma-separated. (default None) --input_config INPUT_CONFIG Input config path. --output_file OUTPUT_FILE Full filepath of out Model path. |
|---|
工具使用示例:
| python3 ConvertTool.py caffe \ --model_file ~/SGS_Models/caffe/caffe_resnet50_conv/caffe_resnet50_conv.prototxt \ --weight_file ~/SGS_Models/caffe/caffe_resnet50_conv/caffe_resnet50_conv.caffemodel \ --input_arrays data \ --output_arrays prob \ --input_config ~/SGS_Models/caffe/caffe_resnet50_conv/input_config.ini \ --output_dir ./resnet50.sim |
|---|
相关参数说明:
--model_file:Caffe模型文件的路径
--weight_file:Caffe权重文件的路径
--input_arrays:Caffe模型输入的节点名称,使用input的名字
--output_arrays:模型输出的节点名称,使用最后layer的top名字,如有多个输出节点,请用逗号( , )分隔
--input_config:input_config.ini文件路径,该文件为input config的配置信息。具体设置方法见2.2节.
--output_dir:转换模型的输出路径。
3.1.5.1. Deprecated caffe convert tool command
Caffe Convert Tool工具的位置在SGS_IPU_SDK/Scripts/CaffeConvertTool/converter.py。该指令为了兼容老版本SDK,不建议使用该命令转换caffe model。
进入到该工具目录,工具使用示例:
| python3 converter.py \ --model_file ~/SGS_Models/caffe/caffe_resnet50_conv/caffe_resnet50_conv.prototxt \ --weight_file ~/SGS_Models/caffe/caffe_resnet50_conv/caffe_resnet50_conv.caffemodel \ --input_node data \ --output_node prob \ --input_config ~/SGS_Models/caffe/caffe_resnet50_conv/input_config.ini \ --output_dir ./resnet50.sim |
|---|
相关参数说明:
--model_file:Caffe模型文件的路径
--weight_file:Caffe权重文件的路径
--input_node:Caffe模型输入的节点名称,使用input的名字
--output_node:模型输出的节点名称,使用最后layer的top名字,如有多个输出节点,请用逗号( , )分隔
--input_config:input_config.ini文件路径,该文件为input config的配置信息。具体设置方法见2.2节。
--output_dir:转换模型的输出路径(默认为./Converted_Net_float.sim)。
3.1.6. 注意事项
Convert Tool转换工具转换完成后会生成两个文件,例如--output_dir指定为 ./resnet50.sim,转换完成后会生成Debug_resnet50.sim和resnet50.sim。其中,resnet50.sim是真正转换好的文件,Debug_resnet50.sim是经过转换后的中间文件,该文件未经过优化,与原框架模型拥有相同的网络结构,因此可以作为转换后调试使用,但是无法在DLA SDK中运行。
3.2. input config配置信息设置
工具的参数--input_config需要指定input tensor的配置信息文件input_config.ini路径,该文件的主要功能有:
-
配置网络模型图片前处理的归一化信息;
-
配置网络模型输入输出的量化处理信息;
-
配置网络模型中卷积的量化信息。
配置input_config.ini文件主要是为了能将网络模型快速适配到SigmaStar芯片中使用。在网络模型的训练中,不同的框架和训练数据集需要网络使用不同的图片归一化方法,而在实际使用中,为了能够让网络模型的预测更加准确,需要还原训练模型时的图片前处理归一化方法。将RGB三个通道的均值和std_value设置好后,在转换模型时会写入到模型内部,这样在硬件上实际使用时,仅需要将图片resize到网络模型的输入的尺寸,图片归一化的工作在网络内部完成。另外,实际硬件上使用时图片输入格式与训练时使用的RGB可能有很大区别,正确配置这些选项能使转换好的模型内拥有这些配置信息,能够直接在SigmaStar的硬件上部署。
模板如下:
| [INPUT_CONFIG] ;Names of the input arrays, comma-separated.image input must be the first. inputs='data'; ;Memory formats of input arrays, comma-separated. ;One of RGB, BGR, RGBA, BGRA, YUV_NV12, RAWDATA_S16_NHWC, RAWDATA_S16_NHWX, ;RAWDATA_U8_NHWC, RAWDATA_U8_NHWX ;Each entry in the list should match an entry in inputs arrays. training_input_formats=BGR; input_formats=BGR; ;Indicate the input data need qauntize or not. ;Each entry in the list should match an entry in inputs arrays. quantizations=TRUE; ;mean_values parameter for image models, ;Each entry in the list match RGB channel of(RGB,BGR,RGBA,BGRA,YUV_NV12) mean_red=0.0; mean_green=0.0; mean_blue=0.0; ;std_value parameter for image models, std_value=1.0; [OUTPUT_CONFIG] ;Names of the output arrays, comma-separated. outputs='prob'; ;Indicate the output data need deqauntize or not. ;Each entry in the list should match an entry in outputs arrays. dequantizations=TRUE; [CONV_CONFIG] tensor_arrays='conv1-1,conv2-1'; |
|---|
该文件主要分为三个设置信息:
[INPUT_CONFIG]
[OUTPUT_CONFIG]
[CONV_CONFIG]
针对这三个设置信息具体说明。
PS:String类型的值,如tensor name,需用('')将内容包含起来,例如outputs='detectionBoxes,detectionClasses,detectionScores,numDetections';
3.2.1. INPUT_CONFIG
inputs:网络输入Tensor的name,如果有多个输入Tensor,请用逗号( , )分隔。
training_input_formats:网络训练时的图片格式,数量和顺序与inputs一一对应,英文逗号( , )分隔。这些格式包括RGB,BGR,RGBA,BGRA,YUV_NV12,RAWDATA_S16_NHWC,RAWDATA_S16_NHWX, RAWDATA_U8_NHWC,RAWDATA_U8_NHWX其中之一。training_input_formats可以和input_formats 不一样。例如在在SigmaStar开发板上,input_formats是YUV_NV12,但是training input formats 是RGB。
input_formats:网络模型在SigmaStar芯片上运行的图片输入格式,数量和顺序与inputs一一对应,逗号( , )分隔,这些格式包括RGB,BGR,RGBA,BGRA,ARGB,ABGR,YUV_NV12,RAWDATA_S16_NHWC,AWDATA_S16_NHWX,RAWDATA_U8_NHWC,RAWDATA_U8_NHWX其中之一。
注意:灰度图片请按如下方式配置:
training_input_formats=RGB;
input_formats=GRAY;
quantizations:用来标识所有输入Tensor的数据是否需要做量化,TRUE或者FALSE,数量等于inputs 个数。如果有多个输入Tensor,以英文逗号( , )分隔。
mean_red / mean_green / mean_blue:网络训练阶段,一般会对图片做前处理,对于RGB通道的图片,使用如下公式对图片进行预处理:
mean_red / mean_green / mean_blue 就是相应通道上的mean值。如果这个网络没有做任何归一化处理,这个值设为0即可。
std_value:如上公式,如果没有做任何归一化处理,这个值设为1即可。
3.2.2. OUTPUT_CONFIG
outputs:网络输出Tensor的name,如果有多个输出Tensor,以英文逗号( , )分隔。转换带后处理网络时,Backbone网络的outputs与完整网络outputs的名称不同,其余设置应完全一致。
dequantizations:用来标识所有输出Tensor的数据是否需要做反量化,TRUE或者FALSE,数量等于outputs。如果有多个输出Tensor,以英文逗号( , )分隔。
3.2.3. CONV_CONFIG
input_format:指定网络中所有卷积的量化方式,默认ALL_UINT8,可选方案ALL_UINT8,ALL_INT16, CONV2D_INT16,DEPTHWISE_INT16。
ALL_UINT8:指定所有卷积按照UINT8量化(默认方式)。
ALL_INT16:指定所有卷积按照INT16量化。
CONV2D_INT16:只指定所有普通卷积按照INT16量化。
DEPTHWISE_INT16:只指定所有Depthwise 卷积按照INT16量化。
在UINT8模式下,卷积运行所占带宽小,运行速度快;在INT16模式下,可以极大的提高卷积的精度,但是运行的速度会有影响。
tensor_arrays:指定网络中某些层的卷积量化方式。整个网络卷积都采用默认的UINT8 ,但是某些卷积层需要更高的精度,这时直接填写那些卷积层的第一个输入的Tensor name即可。多层时,name以逗号( , )分隔。PS:卷积第一个输入Tensor的名字可通过netron工具查看。
4. Calibrator
4.1. 使用方法
Calibrator工具的位置在SGS_IPU_SDK/Scripts/calibrator/calibrator.py
该工具是将SigmaStar浮点网络模型转换为SigmaStar定点网络模型。
在SGS_IPU_SDK ⽬录下运⾏以下脚本,输出Library的路径(已经做过该步骤可忽略):
| cd ~/SGS_IPU_SDK source cfg_env.sh |
|---|
进入到该工具目录,工具使用示例:
| python3 calibrator.py \ -i ~/SGS_Models/resource/detection/coco2017_calibration_set32 \ -m ~/SGS_Models/tensorflow/ssd_mobilenet_v1/ssd_mobilenet_v1_float.sim \ -c Detection \ -n ssd_mobilenet_v1 \ --input_config ~/SGS_Models/tensorflow/ssd_mobilenet_v1/input_config.ini \ --num_process 20 |
|---|
对该工具参数的具体说明如下。
4.1.1. 必选参数
-i/--image:图片文件或图片文件夹路径。
-m/--model:浮点网络模型文件路径。
-c/--category:模型的类别,主要有Classification / Detection / Unknown
Classification:模型有1个输出,会根据输出排序输出分数由高至低的前5个。
Detection:模型有4个输出,会根据输出转换为输入图片的bbox位置以及类别。只支持SigmaStar后处理方法。其他后处理请使用Unknown。
Unknown:模型输出不属于上述两种类型,会输出全部的Tensor数值。
--input_config:input_config.ini文件路径,该文件为input tensor的配置信息。具体设置方法见2.2节。
4.1.2. 可选参数
-t/--tool:sgs_calibrator文件路径。
-n/--preprocess:前处理方法,与图片前处理方法相关,详见3.2节图片前处理方法。也可以按照3.2节完成前处理文件配置后,给定前处理文件路径。不加该参数,图片参数需要给原始数据,可采用--save_input保存图片数据后,根据该格式制定其他的原始数据。
-o/--output:模型输出路径。指定定点网络模型输出数据位置:指定到文件夹,将自动以浮点网络模型文件前缀命名,后接fixed.sim;指定到具体路径和文件名,将以指定路径和文件名命名定点网络模型;不指定该参数,将以浮点网络模型文件路径储存定点网络模型。
--num_process:进程数,运行同时运行的进程数。(可选参数,不加该参数默认为10个进程)。
--quant_level:选择量化等级:[L1, L2, L3, L4]。默认L4量化等级,等级越高,量化精度越高,量化速度会相应变慢。各量化等级说明:
L1:采用最大最小值快速对比数据量化,速度较快。
L2:采用快速对比数据量化权重数据。
L3:对统计信息做进一步分析,近似拟合原有数据分布。
L4:采用高精度数据分析方法,极大限度拟合原有数据分布。
--save_input:保存前处理后的文件,默认不保存。文件为文本文件,保存在运行路径下,文件名为“图片名.模型名.data”。
4.1.3. 注意事项
-
浮点网络模型转换成定点网络模型需要30张左右训练图片用来分析和量化定点网络模型的数据,因此在转换中, -i/--image参数后应接图片文件夹的路径。当然,如果-i/--image参数给定单张图片文件的路径,依然可以转换为定点网络模型,但是其模型精度可能会收到影响。另外,由于对精度要求不同,在转换网络中在input_config.ini文件中可以针对卷积配置不同的量化信息,从而获得精度和速度的平衡。
-
calibrator工具会寻找系统变量从而获得对应阶段任务所需工具路径,因此默认情况下参数-t/--tool不用指定相关工具的位置。
-
使用calibrator将浮点网络模型转换为定点网络模型时,会在运行目录下产生log目录,log目录下的tensor_min_max.txt文件记录了网络的每层输入和输出的最大与最小值,将在之后分析数据时有用。log目录下的内容会在下一次使用calibrator时删除,请注意保存。
4.2. 图片前处理方法
由于不同网络模型的前处理方式不尽相同,为了能够在转换网络时尽可能减小精度的丢失,应该使用与训练相同的图片前处理方式,每种前处理方式需独立编写python文件。
以下两种方式保存前处理Python文件均可被调用:
1. 请将文件保存到SGS_IPU_SDK/Scripts/calibrator/preprocess_method文件夹内,并在preprocess_method/init.py 文件中增加文件名称。在使用calibrator或simulator时,-n/--preprocess参数为编写的文件名称,不需要指定编写文件的路径。
- -n/--preprocess参数为前处理Python的文件路径。
下面以mobilenet_v1网络为例,编写图片前处理文件。
引入所需python包
| import cv2 import tensorflow as tf |
|---|
编写图片处理函数(函数名称不限),返回np.array 格式的图片数据,函数必须包含2个参数:
-
图片路径
-
归一化标记(norm=True)
归一化标记是为了区分网络模型是否是浮点模型。因为在浮点网络模型阶段,图片的归一化需要在送进网络前处理好。但是定点网络模型和离线网络模型已经包含了input_config.ini文件的设置信息,能够将图片数据自行做归一化处理,因此送进网络模型的数据不需要做归一化,这与在SigmaStar硬件上处理方式相同。
| def preprocess_mobilenet_v1(image_file, norm=True, resize_strategy=’cv’, central_crop=.875): im = cv2.imread(image_file, cv2.IMREAD_UNCHANGED) im_dim = np.ndim(im) if im_dim == 3: rgb = cv2.cvtColor(im, cv2.COLOR_BGR2RGB) elif im_dim == 4: rgb = cv2.cvtColor(im, cv2.COLOR_BGRA2RGB) else: rgb = cv2.cvtColor(im, cv2.COLOR_GRAY2RGB) # 1. central crop h, w = rgb.shape[0], rgb.shape[1] h_cropped = int(h * central_crop) w_cropped = int(w * central_crop) h_start = (h - h_cropped) // 2 h_end = h_cropped + h_start w_start = (w - w_cropped) // 2 w_end = w_cropped + w_start image = rgb[h_start:h_end, w_start:w_end, :] # 2. resize to target shape (scaled_w, scaled_h) = (224, 224) if resize_strategy == 'tf': import tensorflow as tf image = np.expand_dims(image, 0) tf_resized_image = tf.compat.v1.image.resize_bilinear(image, (scaled_w, scaled_h)) with tf.Session(): resized_image = tf_resized_image.eval() else: cv_resized_image = cv2.resize(image, (scaled_w, scaled_h)) resized_image = np.expand_dims(cv_resized_image, 0) if norm: # normalize to [-1,1] normalized_image = (2.0 / 255.0) * resized_image - 1.0 else: normalized_image = resized_image return normalized_image |
|---|
使用image_preprocess函数调用,此处务必按照该方法书写。
| def image_preprocess(img_path, norm=True): return preprocess_mobilenet_v1(img_path, norm=norm) |
|---|
保存为mobilenet_v1.py
在SGS_IPU_SDK/Scripts/calibrator/preprocess_method/init.py 文件中添加刚刚编写的python文件
| _all_ = ['caffe_mobilenet_v2', 'caffe_resnet18', 'caffe_resnet50_conv', 'mobilenet_v1'] |
|---|
使用calibrator或simulator时-n/--preprocess参数为mobilenet_v1 即可调用刚刚编写的图片前处理文件。
如果不在SGS_IPU_SDK/Scripts/calibrator/preprocess_method/init.py 文件中增加,-n/--preprocess参数为mobilenet_v1.py文件路径,也可以为图片做前处理。
4.3. 卷积量化选项
浮点网络模型转换到定点网络模型时,卷积量化支持UINT8和INT16两种量化方式。使用calibrator时,--quant_level选择L2、L3或L4时会根据统计信息自动配置卷积的量化方式,如果需要强制指定,指定方式在2.2节配置input_config.ini文件里的[CONV_CONFIG]中有说明。可对某些卷积层单独设置INT16量化,或者对全部卷积INT16量化;不设置时默认使用calibrator的推荐量化方式。
5. Compiler
Compiler工具位置在SGS_IPU_SDK/Scripts/calibrator/compiler.py
该工具是将SigmaStar定点网络模型转换为SigmaStar离线网络模型。
在SGS_IPU_SDK ⽬录下运⾏以下脚本,输出Library的路径(已经做过该步骤可忽略):
| cd ~/SGS_IPU_SDK source cfg_env.sh |
|---|
进入到该工具目录,工具使用示例:
| python3 compiler.py \ -m ~/SGS_Models/tensorflow/ssd_mobilenet_v1/ssd_mobilenet_fixed.sim |
|---|
相关参数说明:
-m/--model:网络模型文件路径。
可选参数:
-c/--category:模型的类别,主要有Classification / Detection / Unknown。
Classification:模型有1个输出,会根据输出排序输出分数由高至低的前5个。
Detection:模型有4个输出,会根据输出转换为输入图片的bbox位置以及类别。只支持SigmaStar后处理算子。其他后处理请使用Unknown。
Unknown:模型输出不属于上述两种类型,会输出全部的Tensor数值。
定点网络模型转换到离线网络模型时默认为Unknown。
-o/--output:模型输出路径。指定定点网络模型输出数据位置:指定到文件夹,将自动以浮点网络模型文件前缀命名,后接sgsimg.img;指定到具体路径和文件名,将以指定路径和文件名命名定点网络模型;不指定该参数,将以浮点网络模型文件路径储存定点网络模型。
6. Simulator
6.1. 使用方法
Simulator工具的位置在SGS_IPU_SDK/Scripts/calibrator/simulator.py
该工具具有以下功能:
-
对分类网络数据集验证;
-
对检测网络数据集验证(支持COCO数据集);
-
对单张图片预测;
-
绘制单张图片目标检测结果。
在SGS_IPU_SDK ⽬录下运⾏以下脚本,输出Library的路径(已经做过该步骤可忽略):
| cd ~/SGS_IPU_SDK source cfg_env.sh |
|---|
进入到该工具目录,工具使用示例:
测试COCO2017数据集,并返回模型检测结果:
| python3 simulator.py \ -i ~/SGS_Models/resource/detection/coco2017_val_set100 \ -m ~/SGS_Models/tensorflow/ssd_mobilenet_v1/ssd_mobilenet_v1_float.sim \ -l ~/SGS_Models/resource/detection/coco2017_val_set100.json \ -c Detection \ -t Float \ -n ssd_mobilenet_v1 \ --num_process 10 |
|---|
测试ILSVRC数据集,并返回模型精度结果:
| python3 simulator.py \ -i ~/SGS_Models/resource/classify/ilsvrc2012_val_set100/ \ -m ~/SGS_Models/tensorflow/mobilenet_v2/mobilenet_v2_float.sim \ -l ~/SGS_Models/resource/classify/tensorflow_labels.txt \ -c Classification \ -t Float \ -n mobilenet_v2 \ --num_process 20 |
|---|
测试单张图片,并将检测结果绘制在图片上,保存到./results/ 文件夹下:
| python3 simulator.py \ -i ~/SGS_Models/resource/detection/coco2017_val_set100/000000567877.jpg \ -m ~/SGS_Models/tensorflow/ssd_mobilenet_v1/ssd_mobilenet_v1_float.sim \ -c Detection \ -t Float \ -n ssd_mobilenet_v1 \ --draw_result ./results |
|---|
对该工具参数的具体说明如下。
6.1.1. 必选参数
-i/--image:图片文件 / 图片文件夹路径。
-m/--model:网络模型文件路径。
-c/--category:模型的类别,主要有Classification / Detection / Unknown。
Classification:模型有1个输出,会根据输出排序输出分数由高至低的前5个。
Detection:模型有4个输出,会根据输出转换为输入图片的bbox位置以及类别。只支持SigmaStar后处理算子。其他后处理请使用Unknown。
Unknown:模型输出不属于上述两种类型,会输出全部的Tensor数值。
-t/--type:模型的数据类型:
Float:浮点模型。
Fixed:定点在线模型。
Offline:定点离线模型。
6.1.2. 可选参数
-l/--label:数据集的标签文件路径 / 图片文字描述的标签。
-n/--preprocess:模型名称,与图片前处理方法相关,详见3.2节图片前处理方法。也可以按照3.2节完成前处理文件配置后,给定前处理文件路径。不加该参数,图片参数需要给原始数据,可采用--save_input保存图片数据后,根据该格式制定其他的原始数据。
--tool:sgs_simulator文件路径。
--num_process:进程数,运行同时运行的进程数。(可选参数,不加该参数默认为单线程)验证数据集必须加此参数且进程数 > 1。
--draw_result:绘制目标检测网络选框结果,参数为结果保存文件夹路径(文件夹不存在会自动创建)和画框的阈值,使用逗号( , )分隔保存路径与阈值。输入阈值画出大于阈值的检测结果,不输入阈值则画出全部检测结果。
--continue_run:接着上次数据集剩下的部分运行。
--save_input:保存simulator 前处理后的文件,默认不保存。文件为文本文件,会在运行路径下创建文件夹tmp_image,文件保存在./tmp_image/图片名。
6.1.3. 注意事项
-
simulator工具会寻找系统变量从而获得对应阶段任务所需工具路径,因此默认情况下参数-t/--tool不用指定相关工具的位置。
-
simulator工具每次运行结束后会在当前目录创建log目录,log目录下的output文件夹,存放模型推演的结果。
-
当-i/--image的参数为单张图片的路径时,simulator只对该图片推演;当-i/--image的参数为图片文件夹的路径时,simulator会对文件夹内的图片全部推演,此时增加--num_process(参数 > 1),可以开启多进程推演。
-
当-l/--label的参数为数据集标签文件路径时必须使用--num_process参数,数据集验证支持ImageNet(Top1、Top5)、COCO目标检测(mmAP);当-l/--label参数为图片文字描述标签时,不能使用选项--num_process。
-
-c/--category的参数选择Unknown时,在不同模型的数据类型下输出的结果维度会有区别。主要区别是浮点模型输出Tensor的维度与模型维度相同; 定点和离线模型的输出Tensor因为模拟了在硬件的储存方式,Tensor的最后一个维度会向上对齐,因此输出的维度为Tensor对齐的维度。在输出文件的开头会描述原Tensor和对齐后的Tensor维度:
| layer46-conv Tensor: { tensor dim:4, Original shape:[1 13 13 255], Alignment shape:[1 13 13 256] The following tensor data shape is alignment shape. tensor data: ... |
|---|
对于Fixed和Offline的模型,得到有用数据可以使用如下Python代码(假设变量Data 是维度为[1, 13, 13, 256]的np.array数据,真正有用的数据Useful_Data维度为[1, 13, 13, 255])
| Useful_Data = Data[:, :, :, :255] |
|---|
7. DumpDebug Tool
7.1. 主要功能
DumpDebug Tool工具的位置在SGS_IPU_SDK/DumpDebug/
该工具是主要功能如下:
-
解析网络模型数据;
-
对比不同阶段的网络模型数据;
-
绘制各层网络模型的Histogram图。
SigmaStar DLA SDK在转换网络时,Caffe和TensorFlow的网络模型与SigmaStar浮点网络模型的结果完全一致,SigmaStar定点网络模型与SigmaStar离线网络模型的结果完全一致。有精度差别的只有在SigmaStar浮点模型转换为SigmaStar定点这个阶段,因此在发现SigmaStar定点网络的结果与原有浮点的结果相差较多时,使用DumpDebug Tool可以检查转换后定点网络的错误。
7.2. 使用步骤
7.2.1. Dump网络模型中各层数据
-
在SGS_IPU_SDK/cfg文件夹中找到DebugConfig.txt文件,复制到当前运行路径下.
-
打开DebugConfig.txt,修改文件内容:
dumpTensor eliminateGarbage dequantFixed #dumpasstring #disableDomainFuseOps path= DebugConfig.txt各参数作用:
dumpTensor:Dump网络模型各层数据总开关。
eliminateGarbage:Dump网络模型数据时去除无用数据(建议开启)。
dequantFixed:针对定点网络模型,将整形数据转换为浮点数据(建议开启)。
dumpasstring:Dump网络模型数据为字符串类型,关闭选项为二进制文件类型。(需要6.2.2节功能,务必关闭此选项)
disableDomainFuseOps:转换定点网络模型时,取消网络层融合(建议关闭)。
path=:指定生成档案的输出全路径(path= 后面确保填写类似 /home/user 的绝对路径。如果path= 后面没有内容或根本没有 path= 的话,则会默认输出到 $HOME 位置。另外,绝对路径或 /home/user 不超过122字节)
-
运行simulator对单张图片推演。
-
推演完成后,会在path=参数指定的目录生成sigma_outtensor_dump.bin,即为Dump网络模型中各层的数据。
Please Note:
-
Dump完成后重命名sigma_outtensor_dump.bin文件,请勿修改文件后缀。新的Dump会复写sigma_outtensor_dump.bin文件。
-
DebugConfig.txt文件中disableDomainFuseOps 选项只在使用calibrator将浮点网络模型转换成定点网络模型时有用。其作用是取消网络融合功能,关闭该选项时,定点网络模型和离线网络模型能够在转换时优化网络模型的算子,加速模型的运行,但是也会影响网络的层级结构,使得部分算子的输出不会被Dump到sigma_outtersor_dump.bin文件中。如果需要网络模型的每一层数据,可以打开disableDomainFuseOps选项,重新运行calibrator转换定点网络模型,此时转出的模型没有融合优化,可以输出每层的数据。
-
对比浮点网络模型和定点网络模型,使用simulator中参数-t/--type和-m/--model指定不同阶段的模型,即可Dump出不同阶段的网络模型数据.
-
使用calibrator将浮点网络模型转换为定点网络模型时,会在SGS_IPU_SDK根目录下产生tensor_min_max.txt 文件,此文件记录了网络的每层输入和输出的最大与最小值,将在之后分析Dump数据时有用。
7.2.2. 使用auto_dump_debug.sh脚本分析数据
工具的位置在SGS_IPU_SDK/DumpDebug/auto_dump_debug.sh
auto_dump_debug.sh脚本能够对比样本 bin(sample)和基准 bin(benchmark)的相同output tensor层的MSE和RMSE,需使用第6.2.1节中Dump出浮点网络模型和定点网络模型的bin文件。
使用示例:
| ./auto_dump_debug.sh \ /home/user/SGS_IPU_SDK \ /home/user/sample.bin \ /home/user/benchmark.bin |
|---|
相关参数说明:
Param1:SGS_IPU_SDK 的路径,如果在当前位置,只需传目录夹名。
Param2:需要对比的已经 dump出来的sample bin路径,此处应为定点网络模型Dump出的bin文件路径。
Param3:作为参考的已经 dump出来的 benchmark bin路径,此处应为浮点网络模型Dump出的bin文件路径。
未开启disableDomainFuseOps选项时,完成分析后显示如下:(部分)
| 3.PRELU.xx.output0 MSE: 0.000613 RMSE: 0.012398 7.PRELU.xx.output0 MSE: 0.000177 RMSE: 0.009728 11.PRELU.xx.output0 MSE: 0.000177 RMSE: 0.015042 15.PRELU.xx.output0 MSE: 0.000338 RMSE: 0.015237 18.ADD.xx.output0 MSE: 0.000280 RMSE: 0.025092 22.PRELU.xx.output0 MSE: 0.000077 RMSE: 0.016650 26.PRELU.xx.output0 MSE: 0.000164 RMSE: 0.019770 30.ADD.xx.output0 MSE: 0.000442 RMSE: 0.024082 34.PRELU.xx.output0 MSE: 0.000061 RMSE: 0.017497 38.PRELU.xx.output0 MSE: 0.000190 RMSE: 0.022622 42.ADD.xx.output0 MSE: 0.000721 RMSE: 0.025237 46.PRELU.xx.output0 MSE: 0.000085 RMSE: 0.018998 50.PRELU.xx.output0 MSE: 0.000144 RMSE: 0.023337 54.ADD.xx.output0 MSE: 0.001094 RMSE: 0.026253 58.PRELU.xx.output0 MSE: 0.000072 RMSE: 0.019027 62.PRELU.xx.output0 MSE: 0.000149 RMSE: 0.023879 66.ADD.xx.output0 MSE: 0.001839 RMSE: 0.027463 70.PRELU.xx.output0 MSE: 0.000085 RMSE: 0.019654 74.PRELU.xx.output0 MSE: 0.000179 RMSE: 0.023511 |
|---|
开启disableDomainFuseOps选项时,完成分析后显示如下:(部分)
| 0.CONV_2D.xx.output0 MSE: 0.000115 RMSE: 0.013125 1.MUL.xx.output0 MSE: 0.000052 RMSE: 0.014715 2.ADD.xx.output0 MSE: 0.000052 RMSE: 0.009010 3.PRELU.xx.output0 MSE: 0.000613 RMSE: 0.012398 4.DEPTHWISE_CONV_2D.xx.output0 MSE: 0.000131 RMSE: 0.012308 5.MUL.xx.output0 MSE: 0.000205 RMSE: 0.012139 6.ADD.xx.output0 MSE: 0.000205 RMSE: 0.010149 7.PRELU.xx.output0 MSE: 0.000177 RMSE: 0.009728 8.CONV_2D.xx.output0 MSE: 0.000288 RMSE: 0.010647 9.MUL.xx.output0 MSE: 0.000096 RMSE: 0.010322 10.ADD.xx.output0 MSE: 0.000097 RMSE: 0.015406 11.PRELU.xx.output0 MSE: 0.000177 RMSE: 0.015042 12.DEPTHWISE_CONV_2D.xx.output0 MSE: 0.000175 RMSE: 0.012607 13.MUL.xx.output0 MSE: 0.000341 RMSE: 0.015203 14.ADD.xx.output0 MSE: 0.000340 RMSE: 0.015815 15.PRELU.xx.output0 MSE: 0.000338 RMSE: 0.015237 16.CONV_2D.xx.output0 MSE: 0.001314 RMSE: 0.017981 17.MUL.xx.output0 MSE: 0.000280 RMSE: 0.017896 18.ADD.xx.output0 MSE: 0.000280 RMSE: 0.025092 19.CONV_2D.xx.output0 MSE: 0.000515 RMSE: 0.021607 20.MUL.xx.output0 MSE: 0.000058 RMSE: 0.020196 21.ADD.xx.output0 MSE: 0.000058 RMSE: 0.016901 22.PRELU.xx.output0 MSE: 0.000077 RMSE: 0.016650 23.DEPTHWISE_CONV_2D.xx.output0 MSE: 0.000031 RMSE: 0.015780 24.MUL.xx.output0 MSE: 0.000205 RMSE: 0.017166 25.ADD.xx.output0 MSE: 0.000205 RMSE: 0.019608 26.PRELU.xx.output0 MSE: 0.000164 RMSE: 0.019770 27.CONV_2D.xx.output0 MSE: 0.000515 RMSE: 0.019849 28.MUL.xx.output0 MSE: 0.000206 RMSE: 0.019482 29.ADD.xx.output0 MSE: 0.000205 RMSE: 0.024898 30.ADD.xx.output0 MSE: 0.000442 RMSE: 0.024082 31.CONV_2D.xx.output0 MSE: 0.000564 RMSE: 0.020957 32.MUL.xx.output0 MSE: 0.000060 RMSE: 0.020904 33.ADD.xx.output0 MSE: 0.000060 RMSE: 0.016908 34.PRELU.xx.output0 MSE: 0.000061 RMSE: 0.017497 35.DEPTHWISE_CONV_2D.xx.output0 MSE: 0.000025 RMSE: 0.017512 36.MUL.xx.output0 MSE: 0.000202 RMSE: 0.018841 37.ADD.xx.output0 MSE: 0.000230 RMSE: 0.021284 38.PRELU.xx.output0 MSE: 0.000190 RMSE: 0.022622 39.CONV_2D.xx.output0 MSE: 0.000527 RMSE: 0.025046 40.MUL.xx.output0 MSE: 0.000307 RMSE: 0.024525 41.ADD.xx.output0 MSE: 0.000307 RMSE: 0.028914 42.ADD.xx.output0 MSE: 0.000721 RMSE: 0.025237 43.CONV_2D.xx.output0 MSE: 0.001055 RMSE: 0.023402 44.MUL.xx.output0 MSE: 0.000069 RMSE: 0.023331 45.ADD.xx.output0 MSE: 0.000069 RMSE: 0.016965 46.PRELU.xx.output0 MSE: 0.000085 RMSE: 0.018998 47.DEPTHWISE_CONV_2D.xx.output0 MSE: 0.000047 RMSE: 0.021232 48.MUL.xx.output0 MSE: 0.000201 RMSE: 0.022115 49.ADD.xx.output0 MSE: 0.000201 RMSE: 0.022252 50.PRELU.xx.output0 MSE: 0.000144 RMSE: 0.023337 51.CONV_2D.xx.output0 MSE: 0.000366 RMSE: 0.023290 52.MUL.xx.output0 MSE: 0.000422 RMSE: 0.022033 53.ADD.xx.output0 MSE: 0.000422 RMSE: 0.031603 54.ADD.xx.output0 MSE: 0.001094 RMSE: 0.026253 55.CONV_2D.xx.output0 MSE: 0.001533 RMSE: 0.024841 56.MUL.xx.output0 MSE: 0.000054 RMSE: 0.024913 57.ADD.xx.output0 MSE: 0.000054 RMSE: 0.017645 58.PRELU.xx.output0 MSE: 0.000072 RMSE: 0.019027 59.DEPTHWISE_CONV_2D.xx.output0 MSE: 0.000045 RMSE: 0.023088 60.MUL.xx.output0 MSE: 0.000183 RMSE: 0.025761 61.ADD.xx.output0 MSE: 0.000183 RMSE: 0.024929 62.PRELU.xx.output0 MSE: 0.000149 RMSE: 0.023879 63.CONV_2D.xx.output0 MSE: 0.000392 RMSE: 0.018255 64.MUL.xx.output0 MSE: 0.000784 RMSE: 0.017033 65.ADD.xx.output0 MSE: 0.000784 RMSE: 0.033283 66.ADD.xx.output0 MSE: 0.001839 RMSE: 0.027463 67.CONV_2D.xx.output0 MSE: 0.003494 RMSE: 0.024530 68.MUL.xx.output0 MSE: 0.000092 RMSE: 0.024449 69.ADD.xx.output0 MSE: 0.000092 RMSE: 0.016809 70.PRELU.xx.output0 MSE: 0.000085 RMSE: 0.019654 71.DEPTHWISE_CONV_2D.xx.output0 MSE: 0.000090 RMSE: 0.015396 72.MUL.xx.output0 MSE: 0.000182 RMSE: 0.015847 73.ADD.xx.output0 MSE: 0.000182 RMSE: 0.024309 74.PRELU.xx.output0 MSE: 0.000179 RMSE: 0.023511 |
|---|
7.3. 使用histogram.py绘制各层网络模型的Histogram图
工具的位置在SGS_IPU_SDK/DumpDebug/histogram.py
该工具可对Dump出来的数据绘制各层的数据分布,使用该工具需Dump出的数据文件,以及使用calibrator 工具将浮点网络模型转换成定点网络模型时在运行目录下log/tensor_min_max.txt文件.
工具使用示例:
| python3 histogram.py sigma_outtensor_dump.bin tensor_min_max.txt |
|---|
运行中如下提示
| [===============================================> ]97.61% |
|---|
绘制的Histogram图如下所示
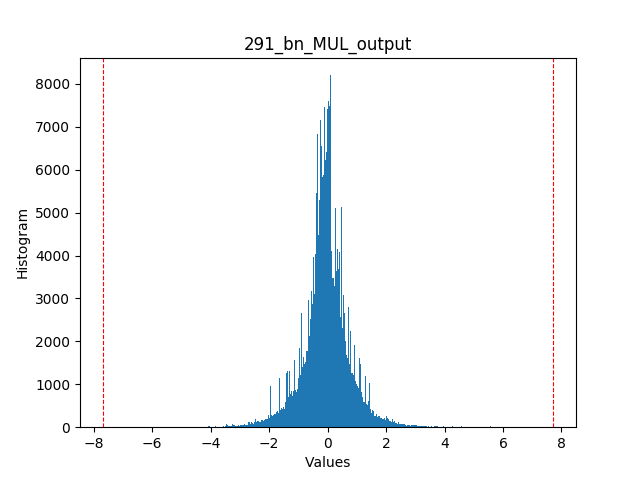
图中蓝色部分是该层网络数据的出现次数,左右两边的红色虚线是最小值和最大值。
Please Note:
-
工具在运行当前路径下,会创建Histograms文件夹,里面包含各网络层的数据Histogram图片。
-
对不同Dump数据绘制网络模型的Histogram图时,应该重命名当前路径下的Histograms文件夹,或移动至其他路径,histogram.py工具会在运行时删除当前路径下的Histograms文件夹。
7.4. 相关问题汇总
DumpDebug Tool提供了模型量化后精度下降问题的排查方法,可用于针对实际问题参考。
使用calibrator时,--quant_level选择L2、L3或L4时会根据统计信息自动配置卷积的量化方式,如果calibrator未能将下列情况的卷积修改成”INT16”卷积模式,请手动开启。
(1)在将SigmaStar浮点网络模型转化为SigmaStar定点网络模型时,注意保存在运行目录下的log/tensor_min_max.txt文件,该文件记录了在转换过程中各层的最大和最小值。如果卷积输入层的最大值和最小值相差过大(一般认为差值大于30),需要在对应网络的input_config.ini文件中开启该层的”INT16”卷积模式,具体修改方法请参考2.2节input_config配置信息。修改input_config.ini文件后需要重新从原始框架训练的模型转换。
(2)使用7.2.2节的auto_dump_debug.sh脚本对比数据后,如果RMSE值较大(一般认为大于0.5),可将该层前的卷积输入层开启”INT16”卷积模式。修改input_config.ini文件后需要重新从原始框架训练的模型转换。
(3)使用7.3节histogram.py工具绘制Histogram图应使用SigmaStar浮点网络的Dump数据和对应的tensor_min_max.txt。如果图中的数据分布很集中,但是最大值和最小值范围较大(一般认为最大值和最小值的差值大于30),可以考虑对该层卷积的输入开启”INT16”卷积模式。修改input_config.ini文件后需要重新从原始框架训练的模型转换。
8. SigmaStar后处理模块
8.1. 模块介绍
SigmaStar后处理模块位置在SGS_IPU_SDK/Scripts/postprocess
该模块主要以TFLitePostProcess类实现了一套生成TFLite Flatbuffer的API和一个检测网络后处理BBOX的通用生成方法。使用该模块时,先根据后处理方法编写python后处理文件,生成独立的后处理模型文件,再使用网络连接程序将Backbone网络模型和后处理模型连接成一个网络模型文件。编写的python文件可参考SGS_IPU_SDK/Scripts/postprocess/postprocess_method文件夹下的示例。
编写完成后,生成方法:
1. 编写文件保存在SGS_IPU_SDK/Scripts/postprocess/postprocess_method,在SGS_IPU_SDK/Scripts/postprocess/postprocess_method/ini.py中添加刚刚保存的文件名称,以caffe_yolo_v2_postprocess.py文件为例,然后在目录SGS_IPU_SDK/Scripts/postprocess/处输入命令:
| python3 postprocess.py -n caffe_yolo_v2_postprocess |
|---|
2. 编写后处理网络python文件,运行postprocess.py时,-n/--model_name参数给定编写的后处理python文件路径。
连接网络程序在SGS_IPU_SDK/bin/concat_net
后处理网络的输入名称在设置时需与Backbone网络输出的名称相符,否则在连接网络模型时会发生错误。
concat_net的参数说明如下:
--mode:网络连接模式:concat或append。连接Backbone网络与后处理网络请使用append模式。
--transform:配置文件,路径为SGS_IPU_SDK/cfg/CompilerConfig.txt。
--input_config:input_config.ini文件,需使用完整网络的配置文件。完整网络的配置文件与Backbone网络的配置文件仅在outputs的名称不同,其余设置应完全一致。
--model1:Backbone网络模型sim路径。
--model2:后处理网络模型sim路径。
--output:合成网络模型的输出路径。
以下章节详细介绍封装好的后处理流程和自定义后处理流程的python文件编写,用以生成后处理网络模型文件。
8.2. bbox坐标解码模块使用
为方便使用,Sigmastar分析了SSD、YOLOv1、YOLOv2、YOLOv3等网络的后处理,针对bbox坐标的提取已经抽象出一套解码流程,不同网络在结构上一样,不同点在部分的算子使用和anchor参数的传入。因此可以通过配置config字典变量,即可生成bbox坐标的后处理网络模型。bbox坐标解码网络如下图所示:

生成bbox坐标解码网络模型,可修改config字典变量,该变量参数意义如下表所示:
| 参数名 | 参数类型 | 描述信息 |
|---|---|---|
| shape | [int] | bbox tensor的形状,比如[1,837] |
| tx_func | (tflite.BuiltinOperator,str) | 1. tflite.BuiltinOperator为tflite内置算子类型; 2. str为字符串`x_scale`或者`None`:当1中指定的算子为单口算子时str填`None`,如果为双口算子,这里填`x_scale`并在成员变量`x_scale`中指定其值。 |
| ty_func | (tflite.BuiltinOperator,str) | 1. tflite.BuiltinOperator为tflite内置算子类型; 2. str为字符串`y_scale`或者`None`:当1中指定的算子为单口算子时str填`None`,如果为双口算子,这里填`y_scale`并在成员变量`y_scale`中指定其值。 |
| tw_func | (tflite.BuiltinOperator,str) | 1. tflite.BuiltinOperator为tflite内置算子类型; 2. str为字符串`w_scale`或者`None`:当1中指定的算子为单口算子时str填`None`,如果为双口算子,这里填w_scale并在成员变量w_scale中指定其值。 |
| th_func | (tflite.BuiltinOperator,str) | 1. tflite.BuiltinOperator为tflite内置算子类型; 2. str为字符串`h_scale`或者`None`:当1中指定的算子为单口算子时str填`None`,如果为双口算子,这里填`h_scale`并在成员变量`h_scale`中指定其值。 |
| x_scale | float | tx_func[1]为`x_scale`时指定的值 |
| y_scale | float | tx_func[1]为`y_scale`时指定的值 |
| w_scale | float | tx_func[1]为`w_scale`时指定的值 |
| h_scale | float | tx_func[1]为`h_scale`时指定的值 |
| anchor_selector | str | `constant `或者为`None` 指定pw和ph是`constant `还是有pw_func和ph_func生成 |
| pw | [float] | 如果anchor_selector为`constant `时pw指定为一个float列表 |
| ph | [float] | 如果anchor_selector为`constant `时ph指定为一个float列表 |
| ppw | [float] | 如果anchor_selector为`constant `时ppw指定为一个float列表 |
| pph | [float] | 如果anchor_selector为`constant `时pph指定为一个float列表 |
| px | [float] | px指定为一个float列表 |
| py | [float] | py指定为一个float列表 |
| sx | [float] | sx指定为一个float列表 |
| sy | [float] | sy指定为一个float列表 |
| sw | [float] | sw指定为一个float列表 |
| sh | [float] | sh指定为一个float列表 |
8.3. 创建节点TFlite Flatbuffer 节点API
8.3.1. buildBuffer
| buildBuffer(buffer_name, buffer_data=None) |
|---|
创建一个buffer。
| :param buffer_name:一个字符串用来在coding时标识buffer,不会存入模型内部。 :param buffer_data:默认如果创建的buffer是用于variable tensor使用,则使用默认None值即可。如果是常量tensor的buffer则传入data的字节流。 :return:返回编码后的偏移量 |
|---|
8.3.2. buildTensor
| buildTensor(shape, name, buffer=0,type=tflite.TensorType.TensorType().FLOAT32) |
|---|
创建一个tensor。
| :param shape:[int] int列表标识tensor的形状 :param name:字符串标识创建tensor的名字 :param buffer:int类型的索引值,标识在buffer array中的index :param type:tensor类型tflite.TensorType,默认为FLOAT32 :return:返回创建的tensor在subgraph的tensor array中的index,如果是已经存在的tensor则直接返回index |
|---|
8.3.3. buildOperatorCode
| buildOperatorCode(opcode_name, builtin_code, custom_code=None) |
|---|
创建或返回一个已经创建的OperatorCode。
| :param opcode_name:一个字符串,是用户用来标识记录区分算子的名字,实作会保障同一类型的OperatorCode只有一个存在于OperatorCode array中。 :param builtin_code:tflite.BuiltinOperator类型,即内置算子类型 :param custom_code:用户指定的字符串客户标记符 :return:返回OperatorCode的index |
|---|
8.3.4. buildOperator
| buildOperator(op_code_name, input_names, output_names,builtin_options_type=None, builtin_options=None, custom_options=None, is_custom=False) |
|---|
创建operator,创建的operator在subgraph中使用。
| :param op_code_name:buildOperatorCode中指定的OperatorCode标识符,使用名字来获取返回OperatorCode的index :param input_names:[str]输入tensor的名字列表 :param output_names:[str]输出tensor的名字列表 :param builtin_options_type:tflite.BuiltinOptions类型,如果需要指定必须的option参数,这里指定是哪一类算子的参数。 :param builtin_options:int类型,对应builtin_options_type的算子参数内容的flatbuffer的offset,使用如createReshapeOptions等API创建的flatbuffer。目前TFLitePostProcess.py只实现了少数几个option的flatbuffer encoding。如果有其他没有实现的可以参照createReshapeOptions实作新的方法。 :param custom_options:[byte] 用flexbuffer encoding后的bytearray。如果是custom算子,在这里指定参数,对应的算子解析自己的参数。 :param is_custom:是否为客制化算子,默认为False :return:返回subgraph中operators的index。 |
|---|
8.3.5. buildSubGraph
| buildSubGraph(input_tensor_names, output_tensor_names, subgraph_name) |
|---|
创建一个subgraph,将创建的buffer一起编进一个subgraph。
| :param input_tensor_names:[str]类型,subgraph的输入tensor名字列表,必须依据使用buildTensor创建过的tensor的名字 :param output_tensor_names:[str]类型,subgraph的输出tensor名字列表,必须依据使用buildTensor创建过的tensor的名字 :param subgraph_name:str类型,指定一个名字标识subgraph :return:返回subgraph的flatbuffer offset |
|---|
8.3.6. createModel
| createModel(version, operator_codes, subgraphs, description, buffers, metadata_buffer=None) |
|---|
将所有encoded data 编码成完整的tflite flatbuffer。
| :param version:uint; tflite版本。传入3即可。 :param operator_codes:[OperatorCode]; OperatorCode列表,使用buildOperatorCode创建,保存在TFLitePostProcess.operator_codes中。 :param subgraphs:[SubGraph];SubGraph列表,保存在TFLitePostProcess.subgraphs中。 :param description:string;用户指定一个描述字符串。 :param buffers:[Buffer];buffer列表,使用buildBuffer创建,保存在TFLitePostProcess.buffers列表中。 :param metadata_buffer:[int];目前没使用到,传None。 :return:返回创建的完整tflite flatbuffer句柄 |
|---|
8.3.7. createFlexBuffer
| createFlexBuffer(lib, values) |
|---|
OperatorCode类型为tflite.BuiltinOperator.BuiltinOperator().CUSTOM算子参数传递。
| :param lib:the flexbuffer handle ,TFLitePostProcess.lib即可。 :param values:tuple类型的列表,tuple的类型为(str, int/float, str): 第一项为value名称,算子实作者使用这个名字来解析value 第二项为value, 第三项为value类型的字符串,标识第二项的类型,如果第二项为int 这里填'int';如果是float类型,这里填'float'。目前仅支持float和int类型。 :return:返回编码后的bytearray。 |
|---|
使用sample:
| cus_options = [(b"input_coordinate_x1",0,"int"), (b"input_coordinate_y1",1,"int"), (b"input_coordinate_x2",2,"int"), (b"input_coordinate_y2",3,"int"), (b"nms_score_threshold",0.4,"float"), (b"nms_iou_threshold",0.45,"float")] options = sgs_builder.createFlexBuffer(sgs_builder.lib, cus_options) |
|---|
8.3.8. buildBoxDecoding
| buildBoxDecoding(unpacked_box) |
|---|
输入bbox坐标解码网络前,分离Backbone网络的输出bbox坐标。
| :param unpacked_box:bbox的输入tensor名字列表,为四个tensor :return:返回x1,y1,x2,y2 四个decoded tensor的名字列表。 |
|---|
8.4. SigmaStar定制后处理算子
SigmaStar定制的后处理算子OperatorCode类型为tflite.BuiltinOperator.BuiltinOperator().CUSTOM,因此需要使用createFlexBuffer的API来传递参数,参数传递必须使用三项的tuple类型且为(str, int/float, str)。
8.4.1. PostProcess_Unpack
PostProcess_Unpack算子目的是将Backbone网络的输出分离,支持最大分离出7个分支。
使用方法如下:
| cus_options = [(b"x_offset",0,"int"), (b"x_lengh",1,"int"), (b"y_offset",1,"int"), (b"y_lengh",1,"int"), (b"w_offset",2,"int"), (b"w_lengh",1,"int"), (b"h_offset",3,"int"), (b"h_lengh",1,"int"), (b"confidence_offset",0,"int"), (b"confidence_lengh",0,"int"), (b"scores_offset",0,"int"), (b"scores_lengh",0,"int"), (b"max_score",0,"int")] |
|---|
根据网络的不同,修改每行的第二个参数。如果该分支不需要,则对应的offset和lengh填0。
| x_offset:分出坐标x偏移量 x_lengh:坐标x长度,一般为1 y_offset:分出坐标y偏移量 y_lengh:坐标y长度,一般为1 w_offset:分出坐标w偏移量 w_lengh:坐标w长度,一般为1 h_offset:分出坐标h偏移量 h_lengh:坐标h长度,一般为1 confidence_offset:分出confidence偏移量 confidence_lengh:confidence长度,一般为1 scores_offset:分出scores偏移量 scores_lengh:scores长度,为网络的分类数量。 max_score:一般为1 |
|---|
通过参数设置不同,结合bbox坐标解码模块,PostProcess_Unpack有如下后处理网络示例:
- 分离bbox坐标

- 分离bbox坐标、confidence、scores、max_score

- 分离分离bbox坐标、confidence、scores

8.4.2. TFLite_Detection_NMS
TFLite_Detection_NMS算子将NMS操作组合成为一个算子,与PostProcess_Unpack算子配合,最大支持7个输入,输出为4个或5个。
使用方法如下:
| cus_options = [(b"input_coordinate_x1",1,"int"), (b"input_coordinate_y1",0,"int"), (b"input_coordinate_x2",3,"int"), (b"input_coordinate_y2",2,"int"), (b"input_class_idx",5,"int"), (b"input_score_idx",4,"int"), (b"input_confidence_idx",-1,"int"), (b"input_facecoordinate_idx",-1,"int"), (b"output_detection_boxes_idx",0,"int"), (b"output_detection_classes_idx",1,"int"), (b"output_detection_scores_idx",2,"int"), (b"output_num_detection_idx",3,"int"), (b"output_detection_boxes_index_idx",-1,"int"), (b"nms",0,"float"), (b"clip",0,"float"), (b"max_detections",10,"int"), (b"max_classes_per_detection",1,"int"), (b"detections_per_class",1,"int"), (b"num_classes",90,"int"), (b"bmax_score",0,"int"), (b"num_classes_with_background",1,"int"), (b"nms_score_threshold",9.99999994e-09,"float"), (b"nms_iou_threshold",0.600000024,"float")] |
|---|
根据网络的不同,修改每行的第二个参数。如果该参数不需要,则对应参数填-1。
| input_coordinate_x1:对应PostProcess_Unpack算子x_offset的序号。 input_coordinate_y1:对应PostProcess_Unpack算子y_offset的序号。 input_coordinate_x2:对应PostProcess_Unpack算子w_offset的序号。 input_coordinate_y2:对应PostProcess_Unpack算子h_offset的序号。 input_class_idx:对应类别的输入序号。 input_score_idx:对应PostProcess_Unpack算子score的序号。 input_confidence_idx:对应PostProcess_Unpack算子confidence的序号。 input_facecoordinate_idx:默认为-1。 output_detection_boxes_idx:输出检测bbox的坐标序号。 output_detection_classes_idx:输出对应检测的类别序号。 output_detection_scores_idx:输出对应检测的分值序号。 output_num_detection_idx:输出共检测到的目标个数序号。 output_detection_boxes_index_idx:输出检测到目标排序下标的序号。 nms:0为Fast NMS,1为Normal NMS。 clip:是否截断越界的bbox坐标值,1为截断,0为保留。 max_detections:最大输出目标个数。 max_classes_per_detection:默认为1。 detections_per_class:默认为1。 num_classes:网络模型类别数量(不包含背景,此选项仅为SSD后处理设置)。 bmax_score:对应PostProcess_Unpack算子max_score时,为1,否则为0。 num_classes_with_background:默认为1。 nms_score_threshold:NMS分数阈值。 nms_iou_threshold:NMS的IoU阈值。 |
|---|
8.4.2.1. 选择是否需要NMS输出index信息
NMS可以选择4个或5个输出,其中必选4个输出为:检测bbox坐标、检测类别、检测分值、检测个数,可选1个输出为:检测bbox对应的下标。
如果需要增加检测bbox对应的下标输出,按照如下方法修改后处理python文件。
以下示例以ssd_mobilenet_v1模型的后处理为例,完整代码详见SGS_IPU_SDK/Scripts/postprocess/postprocess_method/ssd_mobilenet_v1_index_postprocess.py
创建“detectionIndex”Tensor,插在“numDetections”Tensor后面,红框内为添加内容:
| sgs_builder.buildTensor(model_config["out_shapes"][3],"numDetections") nms_out_tensors.append("numDetections") |
|---|
| sgs_builder.buildTensor(model_config["out_shapes"][4],"detectionIndex") nms_out_tensors.append("detectionIndex") |
cus_code = 'TFLite_Detection_NMS'
sgs_builder.buildOperatorCode("SGS_nms",tflite.BuiltinOperator.BuiltinOperator().CUSTOM,cus_code)
修改TFLite_Detection_NMS算子参数,output_detection_boxes_index_idx填4:
| cus_options = [(b"input_coordinate_x1",1,"int"), (b"input_coordinate_y1",0,"int"), (b"input_coordinate_x2",3,"int"), (b"input_coordinate_y2",2,"int"), (b"input_class_idx",5,"int"), (b"input_score_idx",4,"int"), (b"input_confidence_idx",-1,"int"), (b"input_facecoordinate_idx",-1,"int"), (b"output_detection_boxes_idx",0,"int"), (b"output_detection_classes_idx",1,"int"), (b"output_detection_scores_idx",2,"int"), (b"output_num_detection_idx",3,"int"), |
|---|
| (b"output_detection_boxes_index_idx",4,"int"), |
(b"nms",0,"float"),
(b"clip",0,"float"),
(b"max_detections",10,"int"),
(b"max_classes_per_detection",1,"int"),
(b"detections_per_class",1,"int"),
(b"num_classes",90,"int"),
(b"bmax_score",0,"int"),
(b"num_classes_with_background",1,"int"),
(b"nms_score_threshold",9.99999994e-09,"float"),
(b"nms_iou_threshold",0.600000024,"float")]
创建网络模型输出Tensor名称:
| network_out_tensors = [] network_out_tensors.append("detectionBoxes") network_out_tensors.append("detectionClasses") network_out_tensors.append("detectionScores") network_out_tensors.append("numDetections") network_out_tensors.append("detectionIndex") sgs_builder.subgraphs.append(sgs_builder.buildSubGraph(model_config["input"],network_out_tensors,model_config["name"])) |
|---|
修改模型配置参数,out_shapes增加detectionIndex的输出shape:
| model_config = {"name":"ssdlite_mobilenet_v2", "input" : ["Squeeze","convert_scores"], "input_shape" : [[1,1917,4],[1,1917,91]], "shape" : [1,1917], "out_shapes" : [[1,10,4],[1,10],[1,10],[1],[1,10]]} |
|---|
修改完成后,生成的后处理模型NMS输出就有5个输出。
Please Note:
连接backbone网络时请先修改input_config.ini文件中outputs,因为多了一个输出Tensor,避免连接网络时发生错误。
8.5. 获取离线anchor数据
Caffe网络中如果PriorBox节点中数据是离线生成的,可以通过以下方法获取。
修改prototxt文件,将输出节点整合进SigmaStar后处理节点TFLite_CaffeSSD_Detection_PostProcess。
| layer { name: "TFLite_CaffeSSD_Detection_PostProcess" type: "SGS_SSD_Postprocess" bottom: "mbox_loc" bottom: "mbox_conf_flatten" bottom: "mbox_priorbox" top: "detectionBoxes" top: "detectionClasses" top: "detectionScores" top: "numDetections" } |
|---|
对应修改input_config.ini文件的[OUTPUT_CONFIG]
| [OUTPUT_CONFIG] ;Names of the output arrays, comma-separated. outputs=detectionBoxes,detectionClasses,detectionScores,numDetections; ;Indicate the output data need deqauntize or not. ;Each entry in the list should match an entry in outputs arrays. dequantizations=TRUE,TRUE,TRUE,TRUE; |
|---|
使用CaffeConvertTool转换模型,--output_node 的参数对应修改为
| --output_node detectionBoxes,detectionClasses,detectionScores,numDetections |
|---|
转换完成后,使用Netron工具打开转换模型,找到TFLite_CaffeSSD_Detection_PostProcess节点

点击红框中的保存按钮,即可将anchor的数据保存为.npy文件。
在配置bbox坐标解码模块时,使用numpy.load读取.npy文件,配置好对应的变量。如果已有anchor数据,可以不用此方法,直接使用anchor数据。
在转换Backbone网络时,请在prototxt文件中删除TFLite_CaffeSSD_Detection_PostProcess节点,修改对应的input_config.ini文件和CaffeConvertTool转换命令,再次转换Backbone网络部分。
8.6. 举例使用
以下示例以caffe_yolo_v2模型的后处理为例,具体代码详见SGS_IPU_SDK/Scripts/postprocess/postprocess_method/caffe_yolo_v2_postprocess.py
8.6.1. 创建一个TFLitePostProcess实例
首先配置config字典变量,根据bbox坐标解码的实际计算方法配置config的各个参数。
配置参数:
| box_num = 5 side_x = 13 side_y = 13 ppw = anchor.ones(845) px = anchor.index_div_linear(1,1,0,box_num ,side_x,side_y) pph = anchor.ones(845) py = anchor.index_div_linear(1,1,0,side_x*box_num,side_y,1) pw = anchor.ones(845) ph = anchor.ones(845) sx = anchor.ns(845,1.0/13) sy = anchor.ns(845,1.0/13) biases= [[1.3221,1.73145],[3.19275,4.00944],[5.05587,8.09892],[9.47112,4.84053],[11.2364,10.0071]] sw = [x[0]/(2*13) for x in biases ]*(13*13) sh = [x[1]/(2*13) for x in biases ]*(13*13) |
|---|
配置config字典变量:
| config = {"shape" : [1,845], "tx_func" : (tflite.BuiltinOperator.BuiltinOperator().LOGISTIC,None), "ty_func" : (tflite.BuiltinOperator.BuiltinOperator().LOGISTIC,None), "tw_func" : (tflite.BuiltinOperator.BuiltinOperator().RESHAPE,None), "th_func" : (tflite.BuiltinOperator.BuiltinOperator().RESHAPE,None), "x_scale" : 0.1, "y_scale" : 0.1, "w_scale" : 1, "h_scale" : 1, "anchor_selector" : "constant", "pw" : pw, "ph" : ph, "pw_func" : (None,None), "ph_func" : (None,None), "ppw" : ppw, "px" : px, "pph" : pph, "py" : py, "sx" : sx, "sy" : sy, "sw" : sw, "sh" : sh } |
|---|
创建TFLitePostProcess实例:
| yolov2 = TFLitePostProcess(config) |
|---|
8.6.2. 创建常量Tensor
将float列表pack成bytearray
| py_vector=[] for value in self.py: py_vector += bytearray(struct.pack("f", value)) |
|---|
使用bytearray创建常量buffer
| self.buildBuffer("py_buffer",py_vector) |
|---|
使用常量buffer创建tensor
| self.buildTensor([len(self.py)],"py_tensor",self.getBufferByName("py_buffer")) |
|---|
8.6.3. 创建一个算子
创建一个双口Mul算子:
| score1_out_tensors = [] score1_in_tensors = [] score1_in_tensors.append("confidence_tensor") score1_in_tensors.append("score0_tensor") sgs_builder.buildTensor([1,845], "SGS_score1") score1_out_tensors.append("SGS_score1") sgs_builder.buildOperatorCode("SGS_score_mul",tflite.BuiltinOperator.BuiltinOperator().MUL) sgs_builder.buildOperator("SGS_score_mul",score1_in_tensors,score1_out_tensors) |
|---|
创建一个Reshape算子,需要创建常量Tensor:
| reshape_out_shape1 = [1,4695,4] reshape_out_tensors1 = [] reshape_in_tensors1 = [] sgs_builder.buildBuffer('NULL') sgs_builder.buildTensor([1,4695,1,4], '283_in') reshape_in_tensors1.append('283_in') reshape_vector1 = [] for value in reshape_out_shape1: reshape_vector1 += bytearray(struct.pack("i", value)) sgs_builder.buildBuffer("reshape_vector1",reshape_vector1) sgs_builder.buildTensor([len(reshape_out_shape1)],"reshape_shape1",sgs_builder.getBufferByName("reshape_vector1"),tflite.TensorType.TensorType().INT32) reshape_in_tensors1.append("reshape_shape1") sgs_builder.buildTensor(reshape_out_shape1,"reshape_tensor1") reshape_out_tensors1.append("reshape_tensor1") sgs_builder.buildOperatorCode("SGS_reshape1",tflite.BuiltinOperator.BuiltinOperator().RESHAPE) reshape_newshape1 = sgs_builder.createReshapeOptions(reshape_out_shape1) sgs_builder.buildOperator("SGS_reshape1",reshape_in_tensors1, reshape_out_tensors1,tflite.BuiltinOptions.BuiltinOptions().ReshapeOptions,reshape_newshape1) |
|---|
8.6.4. 创建客制化算子
创建OperatorCode
| sgs_builder.buildOperatorCode("SGS_nms",tflite.BuiltinOperator.BuiltinOperator().CUSTOM,cus_code) cus_options = [(b"input_coordinate_x1",0,"int"), (b"input_coordinate_y1",1,"int"), (b"input_coordinate_x2",2,"int"), (b"input_coordinate_y2",3,"int"), (b"input_class_idx",6,"int"), (b"input_score_idx",5,"int"), (b"input_confidence_idx",4,"int"), (b"input_facecoordinate_idx",-1,"int"), (b"output_detection_boxes_idx",0,"int"), (b"output_detection_classes_idx",1,"int"), (b"output_detection_scores_idx",2,"int"), (b"output_num_detection_idx",3,"int"), (b"output_detection_boxes_index_idx ",-1,"int"), (b"nms",0,"int"), (b"clip",0,"int"), (b"max_detections",100,"int"), (b"max_classes_per_detection",1,"int"), (b"detections_per_class",1,"int"), (b"num_classes",20,"int"), (b"bmax_score",1,"int"), (b"num_classes_with_background",1,"int"), (b"nms_score_threshold",0.4,"float"), (b"nms_iou_threshold",0.45,"float")] |
|---|
创建flexbuffer
| options = sgs_builder.createFlexBuffer(sgs_builder.lib, cus_options) |
|---|
使用flexbuffer创建Operator
| sgs_builder.buildOperator("SGS_nms", nms_in_tensors, nms_out_tensors, None, None, options) |
|---|
8.6.5. 创建model并保存为模型文件
创建subgraph
| sgs_builder.subgraphs.append(sgs_builder.buildSubGraph(['conv23'],nms_out_tensors,'caffe_yolo_v2')) |
|---|
创建model
| sgs_builder.model = sgs_builder.createModel(3, sgs_builder.operator_codes, sgs_builder.subgraphs, 'caffe_yolo_v2', sgs_builder.buffers) file_identifier = b'TFL3' sgs_builder.builder.Finish(sgs_builder.model, file_identifier) |
|---|
输出模型
| buf = sgs_builder.builder.Output() |
|---|
保存模型到文件
| outfilename = 'caffe_yolo_v2_postprocess.sim' with open(outfilename, 'wb') as f: f.write(buf) |
|---|
9. 如何添加新的Layer
9.1. 概述
本节仅适用于caffe模型。对于sigmastar还未实现的layer,用sigmastar提供底层算子来组合实现。底层算子与tensorflow的算子类似,支持的算子参考10.2 节TensofFlow支持算子
转换流程如下图
CaffeConvert Tool(代码位置:SGS_IPU_SDK/Scripts/CaffeConvertTool) caffe模型转换工具借鉴了小米开源框架mace的设计,要添加新的layer,请先到`https://github.com/XiaoMi/mace`下载原始代码,按照mace官方文档配置好编译环境,或者直接使用我们提供的docker环境。
下面以`reorg layer`为例子,讲解如何添加新的layer,主要修改以下几个文件
9.2. Caffe proto文件修改
9.2.1. 修改caffe proto
Mace原始代码下载后,用SGS_IPU_SDK/Scripts/CaffeConvertTool/third_party/caffe/caffe.proto 替换掉mace工程路径下mace/third_party/caffe下caffe.proto文件。因为sigmastar在mace基础上做了二次开发,所以sigmstar支持的caffe layer已经远远多于原生的mace支持数量。要添加新的layer,请以sigmastar的caffe proto文件作为基础添加。
| optional ReorgParameter reorg_param = 157; } message ReorgParameter { optional uint32 stride = 1; optional bool reverse = 2 [default = false]; } |
|---|
9.2.2. 编译proto文件
在mace开发环境中
| cd pathToMace/ bazel build third_party/caffe/caffe_py |
|---|
在bazel-genfiles下生成caffe_pb2.py
将上面修改后的caffe.proto和生成的caffe_pb2.py替换SGS_IPU_SDK/Scripts/CaffeConvertTool/third_party/caffe同名文件,然后按照如下顺序修改代码
9.3. 修改caffe_converter.py
文件路径SGS_IPU_SDK/Scripts/CaffeConvertTool/mace/python/tools/converter_tool/caffe_converter.py
该文件的作用是把caffe模型转换为mace模型,并保存该layer的参数
| Reorg':self.convert_Reorg, ... ... def convert_Reorg(self, caffe_op): op = self.convert_general_op(caffe_op) op.type = "Reorg" param = caffe_op.layer.reorg_param stride_arg = op.arg.add() stride_arg.name = "stride" stride_arg.i = 1 #default is true if param.HasField('stride'): stride_arg.i = int(param.stride) |
|---|
9.4. 修改shape_inference.py
文件路径SGS_IPU_SDK/Scripts/CaffeConvertTool/mace/python/tools/converter_tool/shape_inference.py
该文件的作用是计算layer的output shape
| Reorg': self.infer_shape_Reorg, ... ... def infer_shape_Reorg(self, op): #only support stride is 2 output_shape = self._output_shape_cache[op.input[0]] input_shape = list(self._output_shape_cache[op.input[0]]) input_n = input_shape[0] input_c = input_shape[1] input_h = input_shape[2] input_w = input_shape[3] output_shape = [input_n,int(input_c*4),int(input_h/2),int(input_w/2)] self.add_output_shape(op, [output_shape]) |
|---|
9.5. 修改SGSModel_transform.py
如下图所示,我们发现reorg在NCHW的排列顺序下,它实际上是对数据做了一个重排。
因此,我们最后拆解出来的算子组合是
按照算子组合顺序,编写代码
文件路径SGS_IPU_SDK/Scripts/CaffeConvertTool/mace/python/tools/SGSModel_transform.py
该文件作用是增加该layer的拆解函数。即用Sigmastar提供的基本算子实现该layer。
| Reorg':self.split_Reorg, ... ... def split_Reorg(self, op): #only support strid is 2 [n,c,h,w] = op.output_shape[0].dims[:] c = int(c/4) op_name = op.name xi = op.input[0] ... ... |
|---|
至此,新的layer支持添加完成
9.6. Layer拆解注意事项与技巧
9.6.1. 数据维度的问题
在caffe网络中,使用NCHW数据排列。而sigmastar使用NHWC的顺序进行数据计算(与tensorflow类似)。所以在模型转换成sim模型的时候,会对所有4维度的shape和数据做一次转换。即NCHW转到NHWC
参考代码:SGS_IPU_SDK/Scripts/CaffeConvertTool/mace/python/tools/SGSModel_converter.py
对于tensor data的转换
| def creatBuffer(self): ... ... if len(ori_shape) == 4: #transpose data to NHWC six.print("Reshape ",tensor.name,"to NHWC") data = np.array(ori_data) data = data.reshape(ori_shape) data = data.transpose(0,2,3,1) |
|---|
对于shape的转换
| def _creatTensor(self): ... ... if len(shape) == 4 and data_format == mace_pb2.DT_NCHW: Transformer.transpose_shape(shape, [0, 2, 3, 1]) tflite.Tensor.TensorStartShapeVector(self._builder,len(shape)) |
|---|
因为shape在创建sim模型的时候会被强行改变,所以拆解的时候要注意
(1)有axis参数的,要注意顺序交换
比如`concat layer,caffe model里面,它要对C纬度做concat,其axis为1。网络转换后,C为换到了最低维,所以要修改axis为3,代码如下。相似的还有split、PRelu等
| def split_Concat(self, op): ... ... if len(output_shape[0].dims) == 4:#nchw -> nhwc if arg[i].i == 1: arg[i].i = 3 else if arg[i].i == 2: arg[i].i = 1 else if arg[i].i == 3: arg[i].i = 2 |
|---|
(2)指定算子output_shape的时候,特别是4维的输出,要注意顺序变化带来的影响。比如希望tensor的输出是[A,B,C,D],那么代码中我们写的数值为[A,D,B,C]。因为[A,D,B,C]经过上面代码的转换,就得到了[A,B,C,D]这个顺序
(3)在NCHW数据排列下有很强规律的layer,可以先转到NCHW下操作。比如上面提到的reorg layer。
(4)用sdk里面提供的Netron工具打开转换后的sim模型,方便查看各种属性和shape。
9.6.2. 建议拆解流程
综上所述,在拆解的过程中,我们建议按照如下流程进行
9.6.3. 数据对比及验证
前期可以用python创建tensorflow算子的方法,进行验证。
当验证完成,再修改SGS_IPU_SDK的相关代码,参考第6章DumpDebug Tool的方法,dump出最后结果与golden比对。
10. 特殊模型转换要点
10.1. 灰度模型转换要点
灰度模型,指输入是单通道图片的模型,即输入C维度上为1的模型。
10.1.1. 灰度模型input_config配置信息要点
input_config.ini文件使用在2.2节input config配置信息设置有过介绍,对于灰度模型,要注意如下要点。
input_config.ini文件中这两个配置必须写成
| [INPUT_CONFIG] ...... training_input_formats=RGB; input_formats=GRAY; ...... |
|---|
将灰度图片的有效数据只放在R通道上,因此仅需设置R通道的mean值(mean_red)
| [INPUT_CONFIG] ...... mean_red=127.5; mean_green=0.0; mean_blue=0.0; ;std_value parameter for image models, std_value=1.0; |
|---|
10.1.2. 灰度图片输入模型前处理方法
灰度图片输入的前处理方法与3.2节图片前处理方法要求相同,函数必须包含2个参数:
-
图片路径
-
归一化标记(norm=True)
参考代码SGS_IPU_SDK/Scripts/calibrator/preprocess_method/caffe_lenet.py
| import cv2 import numpy as np def get_image(img_path, resizeH=28, resizeW=28, norm=True, meanR=33.318, std=1): img = cv2.imread(img_path, flags=-1) try: img_dim = img.shape[2] except IndexError: img_dim = 1 if img_dim == 3: img = cv2.cvtColor(img, cv2.COLOR_BGR2GRAY) elif img_dim == 4: img = cv2.cvtColor(img, cv2.COLOR_BGRA2GRAY) img_norm = cv2.resize(img, (resizeW, resizeH), interpolation=cv2.INTER_LINEAR) if norm: img_norm = (img_norm - meanR) / std img_norm = np.expand_dims(img_norm, axis=2) dummy = np.zeros((28, 28, 2)) img_norm = np.concatenate((img_norm, dummy), axis=2) img_norm = img_norm.astype('float32') return img_norm def image_preprocess(img_path, norm=True): return get_image(img_path, norm=norm) |
|---|
Please Note:
灰度图片输入模型在PC上运行与开发板上运行不同。在PC上需要将单通道图片扩维至3通道,并在后两个通道补0,在开发板上需要YUV图片输入数据。
11. DLA SDK支持
11.1. Caffe支持算子
| 算子 | 备注 |
|---|---|
| BatchNorm | |
| Bias | |
| Concat | |
| Convolution | |
| ConvolutionDepthwise | |
| CReLU | |
| Deconvolution | 只支持以下size: Stride = 2,kernel_size支持2,3,4,5 Stride = 3,kernel_size支持2,3 |
| Dropout | |
| Eltwise | |
| Flatten | |
| InnerProduct | |
| Permute | |
| Pooling | |
| PriorBox | |
| ReLU | |
| PReLU | |
| TanH | |
| Sigmoid | |
| Slice | |
| Softmax | 如需对指定维度进行运算,将要计算的维度转置到最后的维度(最内维度) |
| Split | |
| Threshold | |
| Upsample | Upsample算子在caffe中没有,可以手动将Deconvolution修改成Upsample |
| Reorg | 只支持stride = 2 |
| LSTM |
Please Note:
Upsample算子在prototxt中这样描述:
| layer { bottom: "layer85-conv" top: "layer86-upsample" name: "layer86-upsample" type: "Upsample" upsample_param { scale: 2 } } |
|---|
scale参数与Deconvolution的Stride含义相同。但需注意Upsample相当于权重全为1的Deconvolution算子。
11.2. TensorFlow支持算子
| 类别 | 算子 | 备注 |
|---|---|---|
| Convolution | Conv | |
| DepthwiseConv2dNative | ||
| FullyConnected | ||
| Pooling | Max pooling | |
| Average Pooling | ||
| Activation | ReLU | |
| PReLU | ||
| ReLU6 | ||
| LeakyReLU | ||
| Sigmoid | ||
| Math | Less | |
| Greater | ||
| GreaterEqual | ||
| Equal | ||
| Add | ||
| Sub | ||
| Mul | ||
| RealDiv | ||
| Maximum | ||
| Minimum | ||
| FloorMod | ||
| Mean | ||
| Max | ||
| Sqrt | ||
| Rsqrt | ||
| Round | ||
| Softmax | 如需对指定维度进行运算,将要计算的维度转置到最后的维度(最内维度) | |
| FusedBatchNorm | ||
| Exp | ||
| DMA | Align | |
| ConcatV2 | ||
| Fill | ||
| Gather | ||
| GatherV2 | ||
| Pack | ||
| Pad | ||
| SpaceToBatchND | ||
| BatchToSpaceND | ||
| Zeroslike | ||
| Split | ||
| Slice | ||
| Unpack | ||
| Tile | ||
| Reshape | ||
| Transpose | ||
| Resize_bilinear | 目前的双线性插值的版本只能支持满足下面条件的case: (1)只能支持整数倍的放大。 (2)放大倍数必须小于等于8倍。 (3)只支援3维数据的差值,即NHWC中的N必须为1,这点和卷积类似 | |
| Misc | TopKV2 | |
| NonMaxSuppressionV2 | ||
| shape |
11.3. SigmaStar DLA SDK对模型的限制
-
DepthwiseConv如果kernle size > 3,必须满足input size == kernel size。
-
对于指定维度的Softmax,我们只支持对最内维度的操作(多余多维Tensor所Softmax运算,我们只支持Softmax制定在最内维度做)。
-
对于TensorFlow的网络,尽量减少大数据量DMA算子(包括Gather、Unpack、Pack、Concat、Reshape、Slice、Tile、Tanspose、Pad、Split等这类单纯数据搬运操作的算子)的使用
-
对于Caffe 网络与TensorFlow类似,尽量减少Split、Concat、Reshape、Flatten、Slice、Permute的使用。
-
除第一层Conv外,其他层的Conv DI维度(即NHWC 中C这个维度)越大效率会越高,最大支援2048。
-
Math类算子(包括Add、Sub、Mul、Div等元素操作的算子),如果右操作数是scaler(单个数字) 或者 1 维向量(HW维度数据相同,C维度不同),效率会更高。
-
网络结构中尽量减少一个算子的输出被多个算子作为输入的情况,如ResNet的残差结构,GoogLeNet的Inception模块等。